Quantcast
Channel: GameDev.net
Viewing all 17625 articles
Browse latest View live

2D Rotated Rectangle Collision

$
0
0
Introduction

While working on a project for school, I found it necessary to perform a collision check between sprites that had been translated and rotated. I wanted to use bounding boxes because a per-pixel check was time consuming and unnecessary. After a couple of days of research I managed to work out an efficient solution using the separating axis theorem. After explaining my method to classmates and a few lab technicians, I realized that the game development community could benefit from a clear and thorough explanation of the process. Knowledge of linear algebra, specifically vector math, is useful but not necessary for understanding this article.

Separating Axis Theorem

The separating axis theorem states that for a pair of convex polygons that are not in a state of collision there exists an axis perpendicular to an edge of one of the polygons that has no overlap between the projected vertices of the two polygons. Essentially, what this means is that if we project the vertices of the two polygons that we are testing onto each axis that is perpendicular to the edges of each polygon and we detect an overlap on each polygon there is a collision, if even one axis shows no overlap then a collision is impossible. This solution works for any collision possibility, even the dreaded cross collision.

Posted Image
Figure 1. Cross Collision

Setting Up

Before we dive into the collision algorithm itself, there are a few prerequisites for this particular method. Firstly, although the separating axis theorem can be used to check for collisions between any convex polygons, rectangles are the normal collision method in 2D, so I will assume that you are using rectangles. Additionally, I will assume that you can convert your rectangles into a structure with four vectors, each representing a corner, and labeled or organized in such a way that you can tell which corner is which (specifically, we need to be able to identify which corners are adjacent – if the upper-left corner has been rotated until it is on the bottom of the rectangle that’s fine, just so long as it remains connected by an edge to the corners labeled upper-right and lower-left.).

The Method

The problem with checking for collision between two rotated rectangles is really a matter of being able to decide when they’re not colliding. The simple intersection test used by the Microsoft InteresectRect() function will check if the minimum and maximum x and y values of rectangle B are within the minimum and maximum x and y values of rectangle A. This method works fine for axis-aligned rectangles, but when dealing with rotated rectangles we need something a little more complex.

Posted Image
Figure 2. Standard Bounds-based Collision Check

As you can see, the minimum x value of B lies within the space defined by the minimum and maximum x values of A. Additionally, the minimum y value of B lies within the space defined by the minimum and maximum y values of A. With simple bounds based collision detection this would register as a collision, when it clearly is not.

Step 1

The first step in this method is to determine the axes that we will be projecting our vertices onto. The separating axis theorem states that we must have an axis that is perpendicular to each of the edges of our two polygons.

Posted Image
Figure 3. The Eight Perpendicular Axes

As you can see, we end up with eight axes. You should also immediately see the benefits of using rectangles. Firstly, each edge has an opposite edge which shares an identical axis, we can take advantage of this to lower the number of axes that need checked to four. Secondly, the angle that exists between any two adjacent edges on a rectangle is 90 degrees. As such, for any edge of a rectangle, both of the adjacent edges are perpendicular to it. This means that we can calculate our four axes to be as such:

Axis1.x = A.UR.x - A.UL.x
Axis1.y = A.UR.y - A.UL.y
Axis2.x = A.UR.x - A.LR.x
Axis2.y = A.UR.y - A.LR.y
Axis3.x = B.UL.x - B.LL.x
Axis3.y = B.UL.y - B.LL.y
Axis4.x = B.UL.x - B.UR.x
Axis4.y = B.UL.y - B.UR.y


Meaning that Axis 1 is the resultant vector of the upper-right corner of A minus the upper-left corner of A and so on. This gives us four axes, each of which is perpendicular to two opposite edges of one of the rectangles, meaning that for each edge we have an axis that is perpendicular to it.

Posted Image
Figure 4. Our Four Axes

Step 2

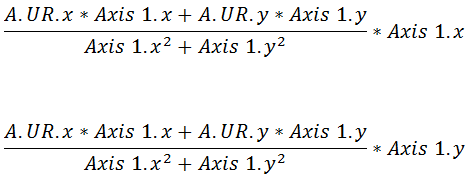
The next step is to project the vectors representing the four corners of each rectangle onto each of the axes. If you know how to do matrix projections then you should have no problem doing this. Ifyou understand vectors, but have forgotten how to do projections, then here is the equation for the projection of rectangle A’s upper-right corner onto Axis 1:

Posted Image

Here is the equation expanded out into scalar math and simplified:

Posted Image

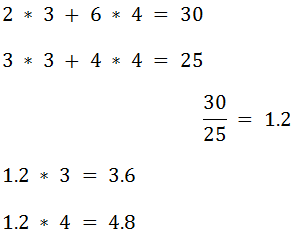
It is important to note that the only difference between these two equations is that we’re multiplying by Axis 1’s x coordinate at the end of the first equation and we’re multiplying by Axis 1’s y coordinate at the end of the second equation. That will give you the x and y coordinates of A.UR projected onto Axis 1. As an example, let’s pretend that A.UR isat location (2, 6) and Axis 1 is represented by the vector (3, 4):

Posted Image

Therefore, in this example, the x coordinate of A.UR projected onto Axis 1 is 3.6 and the y coordinate is 4.8.

Posted Image
Figure 5. Vectors Projected Onto Axis 1

Step 3

The third step in this algorithm is to calculate scalar values that will allow us to identify the maximum and minimum projected vectors for each of the rectangles. While it might seem natural to use the norm (length) of the vectors, this won’t work as coordinates with negative values will return a positive scalar value. The simplest and cheapest solution is to take the dot product of each of the vectors and the axis. This will give us an essentially meaningless scalar value, however, this value will be indicative of the vector’s position on the axis. To use our above example:

Posted Image

Posted Image
Figure 6. The minimum and maximum scalar values

Step 4

Now identify the maximum and minimum scalar values (the ones that we just calculated) for rectangle A and rectangle B. If the minimum scalar value of B is less than or equal to the maximum scalar value of A and/or the maximum scalar value of B is greater than or equal to the minimum scalar value of A then our objects overlap when projected onto this axis.

Attached Image: eq5.png

Attached Image: fig7.png

Figure 7. No Overlap = No Collision

Repeat

Repeat steps 2, 3, and 4 for each of the axes. If all of the axes show an overlap then there is a collision, if even one of the axes shows no overlap then there is no collision.

Optimizations

There are a few things that can be done to optimize this algorithm:
  • You can and should stop checking for collision the instant you find an axis where the rectangles don’t overlap. Remember, the separating axis theorem says that if two polygons arecolliding all axes that are perpendicular to the edges of the polygons will show an overlap. Meaning that, if one axis shows no overlap, then collision is not possible and you should opt outto prevent unnecessary math.
  • It can really pay off to transform rectangle B into rectangle A’s local space. In order to do this, you should maintain these rectangles in local space and then transform rectangle B intoworld space and then by the inverse of rectangle A’s world space transform to put rectangle B into rectangle A’s local space. Then, translate both rectangles equally so that rectangle Ais centered about the x and y axes. This means that two of the four axes that you need to project vectors onto are the unit (x and y) axes. Simply check for overlap between the x values of thecorners of both rectangles and between the y values of the corners of both rectangles. With this solution you only have to actually project the vectors onto arbitrary axes twice, instead of fourtimes.

    Posted Image
    Figure 8. Rectangles A and B in world space

    Posted Image
    Figure 9. Rectangles A and B Transformed Into A's Local Space
  • It can be wise to utilize a radius that completely encompasses the rectangle. If the distance between the centers of rectangles A and B is greater than the radius of A and B added together thenthere cannot possibly be a collision and it is unnecessary to use the separating axis theorem.

Exporting C++ functions to Lua

$
0
0

Introduction

This whole adventure started a couple of weeks ago, when a question about using Boost.Python was posted on a Swedish game development forum where I usually lurk. I hadnÆt used Boost.Python before, and I wasnÆt even using Python in my current project, but I decided to take a quick look anyway. A really cool thing that I saw was that they could automatically deduce the types of the parameters for functions they were exporting, but I didnÆt give it that much more thought. A little while later I started looking around for a C++ library that would let me export functions to Lua, and I stumbled upon Luabind which used a lot of the same techniques as Boost.Python. Once again, the library could automatically deduce types, and now I was really curious.

I downloaded the Luabind code and started rummaging through it. I quickly realized that the project was way beyond the scope of what I was looking to do (which was just the most basic automatic exporting of functions from C++ to Lua). But in skimming the code, I noticed that Luabind used Boost.FunctionTypes, which was a library that I'd never paid much attention to before, so I decided to check it out. And when I did, it literally blew my mind.

Boost.FunctionTypes gives you functionality to generate typelists containing the types of the parameters to any function you specify (and more!). My Spidey sense was telling me that this was all I needed to automatically generate a type-safe interface between C++ and Lua, so I decided to see were this would take me

Breaking It Down

The problem of exporting C++ functions to Lua can be broken down into a couple of distinct parts:
  • Better dispatching of the Lua callback. The Lua C interface allows you to connect a string (the function name) to a static function with a given prototype, and from this callback I had to be able to call the correct instance of the class that would handle the real executing.
  • Type checking and value extraction. Given the Lua stack, I needed to be able to traverse it, and for each value on the stack verify that it was of the correct type, and if it was, store it away somewhere until it was time to call my function.
  • Execution. At this stage, I would be holding some kind of function object that represented the C++ function I was going to call, and I also had a list of the parameters, so the problem was invoking the functor with the parameters.
  • Handling the return value. Functions that don't return anything aren't really that fun, so the final part of the puzzle was getting the return values from my C++ function back to Lua via the stack.

Better Dispatching of the Lua Callback

When dealing with function pointers to unknown types, I usually begin with a template class holding with a member variable representing the function pointer, so I started with that.

Lua states that all C callbacks we expose must have the following signature:

typedef int (*lua_CFunction) (lua_State *L);
Now this didnÆt exactly match anything I had written yet, but I added the static method inside my template class, thus guaranteeing that IÆd at least have a unique static method for each type of function I was exporting.

Lua allows for C closures, which enable you to associate variables, integers in this case, with a specific callback. As I had a unique static callback for each type, I knew that it would be safe to store my this pointer as an integer in the closure, and cast it back when my callback got called. This gave me the following structure:

template< class T >
struct CommandT : public Command {
  CommandT(const string& name, const T& fn) 
    : Command(name)
    , fn_(fn) 
  {}

  int Execute(lua_State* lua_state) const {
    return 1;
  }

  static int callback(lua_State* lua_state){
    const CommandT* this_ptr = reinterpret_cast<CommandT*>(lua_tointeger(lua_state, lua_upvalueindex(1)));
    return this_ptr->Execute(lua_state);
  }
  T fn_;
};
I also added a simple base class, Command, and a class to manage some state, like the Lua state, and the pointers to the Command classes that IÆm creating, and gave the manager class a Register method to call where I could register function names and pointers. Register would create an instance of the CommandT class, register the callback, store a pointer to the class in the C closure of the function, and also put the pointer in an internal list so it could be deleted when we shut down.
  template< class T >
  void Register(string function_name, const T& t) {
    CommandT<T>* ptr = new CommandT<T>(function_name, t);
    // Store the this pointer in the c-closure
    lua_pushinteger(lua_state_, reinterpret_cast<int>(ptr));
    lua_pushcclosure(lua_state_, &CommandT<T>::callback, 1);
    lua_setglobal(lua_state_, function_name.c_str());
    commands_.push_back(boost::shared_ptr<Command>(ptr));
  }

Type Checking and Value Extraction

Ok, this is where it starts to get exciting! By applying the function_types::parameter_types metafunction1 we get a typelist that contains the types of the parameters of the function we want to export2. WhatÆs even better is that this typelist is in boost::mpl format, meaning that we can manipulate the typelist using the tools available in the metaprogramming library. One of these tools is for_each, which applies a user-specified functor on each type in the typelist.

IÆve experimented a bit with functors mapped over typelists before, so I had a pretty good idea of what I wanted to do here. For each application of the functor, weÆre basically walking one step down the Lua stack, and seeing if the type we get from the typelist matches the type that Lua says is on the stack. If it is, we want to get the value from the stack and store it; otherwise we signal an error in some way.

One way to implement this is by having the functorÆs operator() call a method that weÆve overloaded with all the types we want to be able to handle. The overloaded method can then use LuaÆs own lua_isXXX family of functions to ensure that the parameter has the correct type. The functor also holds a stack pointer, keeping track of where we are in the Lua stack, and increments this on each iteration.

class Extractor
{
public:
  Extractor(lua_State* lua_state, AnyParams& params) : lua_state_(lua_state), params_(params), stack_index_(1) {}

  void Extract(const int&) {
    if (!lua_isnumber(lua_state_, stack_index_)) {
      throw exception("Expected parameter of type interger");
    }
    params_.push_back(lua_tointeger(lua_state_, stack_index_));
  }

  void Extract(const std::string&) { 
    if (!lua_isstring(lua_state_, stack_index_)) {
      throw exception("Expected parameter of type string");
    }
    params_.push_back(string(lua_tostring(lua_state_, stack_index_)));
  }

  template< typename T >
  void operator()(T t) {
    Extract(t);
    stack_index_++;
  }
private:
  lua_State* lua_state_;
  vector<boost::any>& params_;
  int stack_index_;
};
The Extract method is overloaded for each type we want to be able to extract (double and bool have been omitted above). IÆve actually rushed ahead a little here, and also shown how I extract the values from the Lua stack. This turned out to be trivial, just adding this little guy:
typedef vector AnyParams; 
So if the value on the stack is of the correct type, we just store it in our boost::any vector. Our Execute method has been extended a little to apply the Extractor functor as well
   typedef typename parameter_types<T>::type ParamTypes;

  int Execute(lua_State* lua_state) const {
    AnyParams params;
    boost::mpl::for_each<ParamTypes>(Extractor(lua_state, params));
    return 1;
  }

Execution

This is moving along nicely! WeÆve got a function object, and a vector of values of the correct types, so now all we need is a way to call the function with the parameters.

I banged my head against this problem for a little while, until I remembered a trick that IÆd used a while back, that involved partial template specialization and a one line superstar called Int2Type.

template<int T> struct Int2Type {};
So, what does Int2Type do? Well, you create an instance of it with an integer, and youÆve got yourself a unique type for that integer value. ôUm, yeahö I hear you saying, hoping that IÆll show you where IÆm going with this. How about if we combine this with another metafunction from function_types, namely arity? This will give us unique types for each arity, and specializing a template on these types will allow us to create unique methods to invoke for each number of parameters.

Hopefully some code will be less confusing than that description!

/**
* The executor is a class with operator() specialized on the class Int2Type<N>, where N is the
* arity of the function we're calling. By specializing on the arity, we know the number of parameters
* the function expects, and can extract these from the vector<boost::any> and cast to the correct type
*/ 
template<class Fn, class ParamTypes>
struct Executor;

// 0 parameters
template<class ParamTypes>
struct Executor<Int2Type<0>, ParamTypes> {
  template<class Fn> void operator()(Fn& fn, const vector<boost::any>& /*params*/) {
    fn();
  }
};

// 1 parameter
template<class ParamTypes>
struct Executor<Int2Type<1>, ParamTypes> {
  template<class Fn> void operator()(Fn& fn, const vector<boost::any>& params) {
    fn( boost::any_cast<at<ParamTypes, int_<0> >::type>(params[0]) );
  }
};

// 2 parameters
template<class ParamTypes>
struct Executor<Int2Type<2>, ParamTypes> {
  template<class Fn> void operator()(Fn& fn, const vector<boost::any>& params) {
    fn( 
      boost::any_cast<at<ParamTypes, int_<0> >::type>(params[0]),
      boost::any_cast<at<ParamTypes, int_<1> >::type>(params[1]) );
  }
};
To be able to get the ôunboxedö value from the boost::any value, we need to call boost::any_cast to cast it to the type we want. Getting the correct type for a parameter at any given index is done using the ôatö metafunction which returns the type at the specified index in a typelist (using the int_<N> construct to specify the index)3. This type is passed as the template parameter that any_cast wants.

And once again we update our Execute method slightly to create the proper instance of Executor and call it.

// Typedef for the executor (based on the arity of the function)
typedef Executor< Int2Type<boost::function_types::function_arity<T>::value>, ParamTypes> Executor;

int Execute(lua_State* lua_state) const {
  AnyParams params;
  boost::mpl::for_each<ParamTypes>(Extractor(lua_state, params));
  Executor f;
  f(fn_, params);
  return 0;
}
WeÆve now got type safe extraction and execution of functions with an arbitrary number of parameters (well, as many as we specialize the executor for), and only one piece of the puzzle remains.

Handling Return Values

The final problem, pushing eventual return values back on the Lua stack, actually consists of two smaller problems. First, we have to determine if the function weÆre exporting has a return value at all; the reason for this is that we need separate code paths for handling the void and the non void return value cases. Pseudo code would look something like:
if (function_has_return_value) {
  return_value = function();
  push_on_lua_stack(return_value);
} else {
  function();
}
Ideally we want this resolved at compile time, as all the information needed is known then. The second problem is knowing that we have a return value, to push it on the stack.

Finding out if we have a return value or not is solved by combining function_types magic to get the type of the result, and using the is_void metafunction found in boost.type_traits to determine if itÆs void.

typedef typename result_type<T>::type ResultType;
enum { IsVoidResult = boost::is_void<ResultType>::value };
If we view the pseudo code above as a case of overloading, with the if branch implemented in one function body, and the else branch in another, we just need to figure out how to call the correct branch, depending on the value of IsVoidResult. ItÆs time for Int2Type again!
// Typedef for the executor (based on the arity of the function)
typedef Executor< Int2Type<function_arity<T>::value>, ParamTypes, ResultType > Executor;

// Executer for void return type
int Execute(lua_State* lua_state, Int2Type<true>) const {
  AnyParams params;
  for_each<ParamTypes>(Extractor(lua_state, params));
  Executor f;
  f(fn_, params);
  return 0;
}

// Executer for non void return type
int Execute(lua_State* lua_state, Int2Type<false>) const {
  AnyParams params;
  for_each<ParamTypes>(Extractor(lua_state, params));
  Executor f;
  AddReturnValue(lua_state, f(fn_, params));
  return 1;
}

static int callback(lua_State* lua_state){
  const CommandT* this_ptr = reinterpret_cast<CommandT*>(lua_tointeger(lua_state, lua_upvalueindex(1)));
  return this_ptr->Execute(lua_state, Int2Type<IsVoidResult>());
}
We create two versions of Execute, one for the void case, and one for the non void case. We then use Int2Type to create an instance of either Int2Type<true> or Int2Type<false>, depending on the value of the enum IsVoidResult, and overloading takes care of calling the correct version.

Once this was solved, pushing the correct value to the Lua stack was a simple matter of overloading AddReturnValue for the types we wanted to be able to return, and a call to the correct lua_pushXXX function.

void AddReturnValue(lua_State* lua_state, const bool value) {
  lua_pushboolean(lua_state, value ? 1 : 0);
}

void AddReturnValue(lua_State* lua_state, const int value) {
  lua_pushinteger(lua_state, value);
}
And finally, weÆre done (Yata!)

Future Work

Any time you start working on something fun, a million ideas for improvements pop into your head. Here are a couple of things that I might experiment with in the future.
  • Named parameters, and a single dispatch function. A friend at work was working on a system where he just exported a single function from C++ called dispatch, and that function took two parameters: the name of an internal function to call, and a table containing pairs of parameter names and values. This would require adding support for tables, amongst other things.
  • Support for member functions. Right now, we just handle global functions, but it should be fairly simple to extend to support member function pointers as well. This will require handling objects going out of scope and unregistering their callbacks when they do.
  • Multiple return values. Might be more fun than useful, but IÆm interested in seeing if I can get Boost.Tuple to interact with this system, and allow for multiple return values on the Lua stack.
  • Use the Preprocessor Library for generating the execute code. That code is just repetitive and error prone to write for a greater number of parameters, and seems like a great fit for the Preprocessor Library.
  • Understand whatÆs going on under the hood of FunctionTypes. I think this can be summarized with *gulp*.

Sample Code

The sample code is a single .cpp file along with a .lua file that calls the exported functions. To be able to compile, you need to have Lua and Boost installed, with correct include paths set up. IÆm using Lua 5.1 and Boost 1.36.

References

Lua
Boost, various libraries
Luabind
Modern C++ Design, Andrei Alexandrescu
C++ Template Metaprogramming, David Abrahams, Aleksey Gurtovoy

1 IÆm not sure of the proper name for this type of construct, and I realize that metafunction is probably wrong, as it returns a type and not a value, but it will have to do.
2 This isnÆt 100% accurate, as the typelist may contain references to types, which we donÆt want, so we apply a transform to the list to remove references. See the code for more details
3 Using boost::any is a bit of overkill, as we know when we extract the parameters that weÆre getting the correct types, so we donÆt need the extra type safety/overhead that any_cast gives us

Simple STL Logging System

$
0
0

A Brief Introduction
I thought I would start off my first article with something simple, yet something that might prove useful to the average programmer. In this article, I will explain how to use Boost and a couple of its libraries to implement a simple logging system that works directly with the STL clog output stream, so that you can simply use: std::clog << "Your text here"; and make use of these features.
A Note on Boost
Boost is a third party library and not included with C++. If you are running Windows and Visual C++ you can download an installer at http://www.boostpro.com/products/free. I am currently using version 1.36.0. If you don't understand please go to http://www.boost.org to find instructions. Note: even with the installer you must still configure your C++ directories to find the include and lib files for Boost.
Boost IOStreams
The first Boost library we will be dealing with is the IOStreams library. This nice little library allows speedy development of streams (like cout, cin, clog, cerr). The first step of our custom logger is to create our own stream class, called CLogger which will handle all the features we will add. For now, let's just make our class print to the screen. Firstly, include these headers in your project. #include //Sink stuff #include //IOStream stuff Making a simple output stream is easy. You just need to make a class that declares the type of characters used (in our case, char's), the type of stream (ours is output or a “sink”) and any read/write functions that the class uses. Observe the basic class below: class CLogger { public: //Sink information typedef char char_type; //Defines char as the character input type typedef boost::iostreams::sink_tag category; //Declares that this class is a “sink” i.e. Output stream //Writes n characters from s std::streamsize write(const char* s, std::streamsize n) {} }; Very simple implementation. Now, let's put a simple body in the write function that uses cout to output to the screen. //Writes n characters from s std::streamsize write(const char* s, std::streamsize n) { //Write data std::cout.write(s, n); return n; } Basically, just print the char buffer s to the screen. We have to return the amount of chars written, so we'll just assume cout printed all of them and return n, the amount of chars we were told to print. In order to test our stream, we have to use the Boost iostream library to “transform” our little class into something like cout. This is accomplished with a simple typedef line:

typedef boost::iostreams::stream logstream; Now, to use our stream in programming – just initiate an instance of the stream class and do cout-like things: logstream mylogger; //Remember to pass argument to the "something" variable mylogger.open(CLogger()); //This is used to “open” the stream given an instance of our logging class mylogger << "This is some text" << std::endl << "And another line" << std::endl; See, just like any other stream. Every call to << just sends the data to our write function.
Sinks and Sources
I said earlier that in our class we were using the characteristics of a sink. In Boost, streams are classified in three ways. They are either a sink, a source or both. A “source” means that the stream is a “source” of input, or a read stream. Such examples of read streams you probably know are cin and ifstream. Both these streams read data via a read function and optionally reading operators such as >>. A sink is a stream that outputs data, like a sink outputs water. Some streams from the STL like this are cout and ofstream. Both these streams take data and put them somewhere else, such as a screen or a file, via functions such as write and the output operators <<. A mix is simply a stream that has both characteristics. Now by putting the typedef boost::iostreams::sink_tag category, we defined a class called category that is the same type as sink_tag. When Boost uses our class, it looks for the class called category inside and checks out some of its members to deduce what the stream is built for. In the case of sink_tag, it tells Boost that our class has a function called write that writes data outbound, and it knows to generate all the << operators for different types to accommodate a sink type system. If you wish to make a source, consult the Boost documentation to learn how.
Customizing
Now that we have a working log stream, we can customize it to do as we please with the incoming data. First of all, let's add a time entry in front of every log entry. For this we will use Boost's POSIX time extension (I like Boost). Add the following header to your headers (wherever you put them) #include //Date time stuff Now, let's modify our write function to use a handy function to get a string with the POSIX time+date in it for logging. //Writes n characters from s with the date std::streamsize write(const char* s, std::streamsize n) { //Get current universal time from the POSIX second clock boost::posix_time::ptime t(boost::posix_time::second_clock::universal_time()); //Format that time as a simple string std::string time = boost::posix_time::to_simple_string(t); //Write the time out std::cout << "[" << time.c_str() << "] "; //Write incoming data std::cout.write(s, n); return n; } As seen, we use one of the Boost time functions to get the current time, then convert it into a string. This string is then outputting before our log string in [] brackets. The result looks like this: [2009-Jan-05 23:49:42] Creating worker thread 9

Now that we have a basic framework, let's integrate this into the std::clog stream. This task is actually incredibly easy. One simply must redirect the clog stream into an instance of the logstream we defined in the typedef. This simple code at the beginning of the program does that very easily:

//Setup logging logstream logger; mylogger.open(CLogger()); std::clog.rdbuf( logger.rdbuf() ); std::clog << "Logging system engaged" << std::endl; The rdbuf line simply does a redirect. As long as logger is not destroyed via deconstructor, the program will run without error. Now every instance of clog anywhere in your program will redirect into logger, regardless of what thread it's in. Useful no?
Extras
I thought I'd include another little idea I used in my logging system. My program has multiple threads running in it, and I thought it would be cool if the logger would show what thread was calling it. To do this I used yet another Boost feature (Yes, Boost is awesome isn't it?) called thread_specific_ptr. This little class does a very simple task. It's like a normal pointer except for the interesting concept that it is thread independent. So it has different values in different threads as you set it. Basically I will use it to hold a string and call it thread_name. This way each thread can set thread_name to whatever it wants to be called, and then the logging class will output it. I just put a global instance right above my logging class. Make sure to add the following header first though: #include //Thread specific storage And here is the variable: //Thread's name static boost::thread_specific_ptr thread_name; Now that we have the variable, it can be set to a string by use of the following code (for those familiar with Boost, it is basically an instance of shared_pointer). //Set thread name thread_name.reset( new std::string("Main Thread") ); Basically the .reset function changes the value of the pointer to a different pointer. In this case we make a new string class and initialize it to “Main String”. So for each thread you create you must initialize the value in this way, otherwise it will cause a runtime error because there is no value set and when the logger tries to read it, it will be very unhappy. Now, let's change our logging write function: //Writes n characters from s with the date and thread std::streamsize write(const char* s, std::streamsize n) { //Get current universal time from the POSIX second clock boost::posix_time::ptime t(boost::posix_time::second_clock::universal_time()); //Format that time as a simple string std::string time = boost::posix_time::to_simple_string(t); //Write time and thread name std::cout << '[' << time << "] report from thread " << *thread_name << " - "; //Write incoming data std::cout.write(s, n); return n; } As seen, we just use the * operator to dereference thread_name into a string (just like normal pointers). Now the output looks like this: [2009-Jan-05 23:49:42] report from thread Main Thread – Creating worker thread 9

One might notice running this example with a few threads that the threads will actually overwrite each other. One thread will start writing a message but the CPU switches to a new thread and that starts writing and so on, causing a jumble if more than one thread is writing. This is solved by a friendly (yes, Boost) class called a “mutex.” Basically a mutex just sections off an area of code such that only one thread can be inside at a time, and others must wait to enter until the first one is done – almost like a gate. I won't go into detail on this, as it is not the topic of the article, but it is used like this:

boost::mutex mymutex; //... boost::mutex::scoped_lock lock(mymutex); //Locks down so none can enter until unlocked //Do code here lock.unlock(); //Thread is done here, allow another thread to "lock in" Basically I made a static mutex variable in the CLogger class in the example and then create instances of scoped_lock using that mutex to lock it down. I use scoped_lock here because it was designed to be exception safe, so if an exception is thrown or something else happens it will automatically be destroyed and unlock the mutex.
Source
I've included for download 3 cpp files that demonstrate what is done here. Written in either STL or Boost they are platform independent. Just do whatever you would do for console applications and compile them. Each runs on its own:
  • Logging1.cpp - Basic write function and hooking into std::clog
  • Logging2.cpp – Adds support for posting the timestamp into logs
  • Logging3.cpp – Adds a thread name to the loggings
Source Download: http://brwarner.co.c...TLLogSource.zip
Conclusion
So now you have the tools to do anything you want. I have provided a few examples you can use to build your own framework. With Boost IOStreams you have unlimited possibilities in regards to what you can do with log data, and all from the comfort of your friendly std::clog class. If you edit it, your other files don't even need to recompile because they will only be exposed to clog, and don't even know the logger exists. You can also add more data to your logging, or manipulate log data, or even redirect to some other output like a file or a text box control or whatever you see fit. I also encourage you to continue to look into the Boost library for some very neat functions, such as their networking library (very nice platform -independent interface for sockets/TCP/ports) and other thread functions that they offer. For a complete documentation of all the Boost libraries, visit their documentation at http://www.boost.org/doc/libs/1_36_0 (for version 1.36.0).

Well, until next time,

Brook “Brwarner” Jensen – Hobbyist Programmer (Brwarner's Server)

Continuing GameMonkey Script: Advanced Use

$
0
0

Introduction

Article Source Code

By reading my Introduction to GameMonkey Script articles you have been introduced to the basic features of the GameMonkey Script (GM Script or simply æGMÆ herein) language and how to embed it into your game or application. This article will teach you some of the more advanced aspects of the GM language and the virtual machine API. I will begin by describing the functionality and provide examples in GameMonkey Script code itself as this allows simple and quick demonstration of the features. I will then continue this discussion with examples in C++ code to demonstrate how to access this functionality from within your game engine itself.

In order to follow this article you are assumed to have read, understood and implemented the ideas and examples presented in the introductory articles. It is also expected that you are familiar with concepts such as simple messaging systems and event handlers so that you can follow some of the sample code without issue.

This article covers the following topics:

  • Cooperative Threads
  • Blocking / Signalling
  • Threads and æthisÆ
  • Thread States
  • The Structure of a Thread
  • Creating Script-Extensible Entities
  • Best practices for using GameMonkey

Scripting Cooperative Threads

Every script running within the GM virtual machine is executed within its own ôthreadö. A ôthreadö is standalone in that it has its own executable bytecode and stack but it runs within the overall context of the GameMonkey machine so can access data and functions from other threads. Unlike your operating systemÆs definition of a ôthreadö, the GM virtual machine is based around a co-operative threading model, so that upon every execution of the gmMachine::Execute() method each thread must either complete (terminate) or yield to the machine to allow other threads a chance to execute.

When a thread runs, it executes a function, a sequence of bytecode that is contained within its own stackframe. Whenever you execute a script in GameMonkey the bytecode is compiled into a function and is actually created within a thread to be executed. As a result, any explicit creation of your own threads will need a function to actually execute. This concept will be covered in more detail in a later section of this article.

Creating Threads from Script

There are two ways of creating a thread in GM; the first is via the scripting language itself û there is an in-built function called thread() that takes the thread function and the values to be passed to this function as arguments. The following example demonstrates how to create a new thread from script:

global thread_1 = function( a_count )
{
  print( "[1] Starting..." );
  for (i = 0; i < a_count; i = i + 1)
  {
    print( "[1] iteration: " + i );
  };
  print( "[1] Finishing..." );
};

print( "[0] Ready to execute..." );
thread( thread_1, 100 );
sleep(1);
print( "[0] Thread created..." );
Example: threads_01.gm
[0] Ready to execute...
[1] Starting...
[1] Iteration 0
...
[1] Iteration 99
[1] Finishing...
[0] Thread Created...
Output: threads_01.gm

In this example, a new thread is created within the machine which executes a function to count from 0 to 99. It will continue until the function is completed, hogging the machineÆs runtime until it is done. In this example, the sleep() function is called to yield control from the main thread and into the new thread we create. Use of sleep will be discussed later on in this article.

Yielding Thread Execution

Now that you are able to spawn a new scripted thread you can begin to run processes co-operatively. As mentioned before, GM is not based upon a pre-emptive threading environment so each thread needs to yield to others after it has finished a portion of work; it is up to the script writer to define what a portion of æworkÆ for a thread and should be.

In the following example we create two threads, each counting from 0 to a specified number. This example does not use yield() û what do you think will happen when you run it?

global thread_func = function( a_name, a_count )
{
  print( "["+a_name+"] Starting..." );
  for (i = 0; i < a_count; i = i + 1)
  {
    print( "["+a_name+"] iteration: " + i );
  };
  print( "["+a_name+"] Finishing..." );
};

print( "[0] Ready to execute..." );
thread( thread_func, 1, 100 );
thread( thread_func, 2, 100 );
sleep(1);
print( "[0] Thread created..." );
Example: threads_02.gm
[0] Ready to execute...
[1] Starting...
[1] Iteration 0
...
[1] Iteration 99
[1] Finishing...
[2] Starting...
[2] Iteration 0
...
[2] Iteration 99
[2] Finishing...
[0] Thread Created...
Output: threads_02.gm

As you see from the output of the script, the two threads ran consecutively and not concurrently as you might have expected. The reason for this is that although two threads were created, the first was executed which blocked the second thread until it had completed. Once complete, the second thread was free to run until completion. If you intended to run a single cycle of each thread in turn you need to tell the GM machine when to yield execution to other threads. In order to tell a thread to yield, you simply call the scripted function yield() with no parameters.

The following example is the same script but with a yield() in the loop of each function.

global thread_func = function( a_name, a_count )
{
  print( "["+a_name+"] Starting..." );
  for (i = 0; i < a_count; i = i + 1)
  {
    print( "["+a_name+"] iteration: " + i );
    yield();
  };
  print( "["+a_name+"] Finishing..." );
};

print( "[0] Ready to execute..." );
thread( thread_func, 1, 100 );
thread( thread_func, 2, 100 );
sleep(1);
print( "[0] Thread created..." );
Example: threads_03.gm
[0] Ready to execute...
[1] Starting...
[1] Iteration 0
[2] Starting...
[2] Iteration 0
...
[1] Iteration 99
[2] Iteration 99
[1] Finishing...
[2] Finishing...
[0] Thread Created...
Output: threads_03.gm

After running the above script, you will see that instead of running consecutively as witnessed in the first example the two threads appeared to run concurrently. Internally, the GM machine ran only one thread at a time but the yield() command instructed the virtual machine to switch contexts and execute the next thread.

Sometimes you may want to pause a thread for a specific length of time, for example if you had an NPC that needed to wait for 10 seconds at a waypoint before moving on. This can be achieved using the script command sleep(), which takes a numeric parameter of how many seconds the thread needs to sleep for. A sleeping thread yields until the sleep duration has passed, after which it resumes execution of the next command. Try experimenting with the samples above and replace a yield() with sleep to see the effects it has on execution.

Blocking and Signalling

In the real world context of a game you will not be using long loops and yield() very often; instead thread execution and context switching can be controlled by the more powerful blocking and signalling mechanism provided by GameMonkey. In games you would use a scripted thread to act as the æbrainÆ of an entity which would æthinkÆ on every game cycle and perform an action based on an event or stimulus; the majority of the time it may be sitting waiting for that trigger, potentially by checking a loop. The following example demonstrates the traditional and extremely inefficient way of doing this:
global WakeUp = false;

global thread_1 = function( a_count )
{
  while (WakeUp == false)
  {
    // Snooze
    print("zzz");
    yield();
  }

  print("I just woke up, boy was I tired!");
  
};

// Launch thread
thread( thread_1 );
// Sleep for 1 secs then set the wakeup variable
sleep(1);

WakeUp = true;
Example: blocking_01.gm

When running the script, you will see a screen full of ôzzzöÆs before the thread æwakes upÆ. The thread is actually still running here, taking up CPU cycles and waiting for the WakeUp call. GM presents a much more efficient way of handling this scenario via its blocking and signalling mechanism.

A thread can block itself until a specific signal (or one of several signals) is received. Blocking effectively takes a thread out of the active thread pool, yielding until a signal wakes it up. A simple example is demonstrated below:

global thread_1 = function()
{
  block("WAKEUP");

  print("I just woke up, boy was I tired!");
  
};

// Launch thread
thread( thread_1 );
// Sleep for 1 secs then set the wakeup variable
sleep(1);

signal("WAKEUP");
Example: blocking_02.gm

The thread will block until it receives a signal string of ôWAKEUPö, which is sent to it after 1 second. This is more efficient as itÆs not taking up interpreted script cycles checking for a scripted variable, weÆre literally waiting upon a message from the GameMonkey machine to continue. It is important to remember that a thread can block or signal on any gmVariable and not specifically strings, which I have used here as the most intuitive way to demonstrate the functionality.

LetÆs take a look a more complicated example involving two threads. Each thread will be created consecutively and will block on a different signal. The first signal will be thrown after the sleep command, which in turn will signal the other thread.

global thread_1 = function()
{
  block("WAKEUP");

  print("I just woke up, boy was I tired! You should wake up too!");
  
  signal("YOUTOO");
};

global thread_2 = function()
{
  block("YOUTOO");

  print("What did you wake me up for?");
  
};

// Launch thread
thread( thread_2 );
thread( thread_1 );
// Sleep for 1 secs then set the wakeup variable
sleep(1);

signal("WAKEUP");
Example: blocking_03.gm
I just woke up, boy as I tired! You should wake up too!
What did you wake me up for?
Output: blocking_03.gm

Often it is desirable for a thread to be able to block until it receives one of a selection signals - for example, you may want your scripted entity to walk to an area and then wait there until it receives a command to move to another point, attack an entity or indeed simply defend itself. The block and signal mechanism offers support for this by allowing you to block on multiple signals. The signal which resumes the thread is returned from the block command allowing you to act in appropriate manner.

global blockfunc = function()
{
  print( "Waiting for instruction, sir!" );
  signal_received = block("attack", "move", "defend");
  if(signal_received == "attack")
  {
    print("Attacking!");
  }
  else if (signal_received == "move")
  {
    print("Moving to position!");
  }
  else if (signal_received == "defend")
  {
    print("Defending til the death!");
  }
};

thread( blockfunc );
sleep(1);
signal("attack");
Example: blocking_04.gm
Waiting for instruction, sir!
Attacking!
Output: blocking_04.gm

In the example above, the thread will block upon 3 signals, attack, move or defend. The signal received will determine what the thread then proceeds to do û in this case the attack signal is received so the entity attacks.

Each of the signalling examples presented until now have relied upon the signal being global, meaning that if two threads were waiting on the same signal, they would both be activated together. In games this would mean that all of your game units waiting for a wakeup call will spring into action at once. You will be relieved to know that it is possible to send a signal to a single thread rather than globally. To achieve this you must know the Thread Id of the thread youÆre signalling, this is returned by the normal thread function when you first create the thread. The following example is adapted to demonstrate the same block function being used with multiple threads.

global blockfunc = function(name)
{
  print( name + ", waiting for instruction, sir!" );
  signal_received = block("attack", "move", "defend");
  if(signal_received == "attack")
  {
    print(name + " is attacking!");
  }
  else if (signal_received == "move")
  {
    print(name + " is moving to position!");
  }
  else if (signal_received == "defend")
  {
    print(name + " is defending til the death!");
  }
};

thread_1 = thread( blockfunc, "woob" );
thread_2 = thread( blockfunc, "foo" );
sleep(1);
signal("attack", thread_1);
signal("defend", thread_2);
Example: blocking_05.gm
woob, waiting for instruction, sir!
foo, waiting for instruction, sir!
woob is attacking!
foo is defending til the death!
Output: blocking_05.gm

As you have seen, the blocking and signalling mechanism in GameMonkey Script allows you to create multiple threads within the virtual machine and have them remain dormant and taking up no execution cycles until a signal is received to call it back into action. This allows you to design complex behaviours within your entities that respond to the signals that are sent back and forth between objects.

Script Threads and æthisÆ

Now that youÆve explored the topics of GameMonkeyÆs threading model, using block to pause them and signal to resume execution, itÆs time to look at how we can use the concept of this with threads to open up a lot of power for scripting in your game.

Each thread has a special gmVariable associated with it - the this variable. The concept of this allows you to effectively run a thread against an object and always have that object in scope. If you recall in the introductory article, I demonstrated how you could use this to reference specific objects in function calls. In GameMonkeyÆs threading system, this can be used in exactly the same way, except that it can be accessed in every function. See the example that follows:

global my_entity = {
  x = 50, y = 100, name = "test"
};


global move_ent_left = function()
{
  print( "Starting thread - this.name = " + .name );
  while( this.x > 0 )
  {
    this.x = this.x - 10;
    print( this.name + " - x = " + this.x );
    yield();
  }
  print( "Ending thread - this.name = " + .name );
};

my_entity:thread( move_ent_left );
sleep(1);
Example: threads_this_01.gm
Starting thread û this.name = test
test û x = 40
test û x = 30
...
Ending thread û this.name = test
Output: threads_this_01.gm

The code demonstrated above creates a simple table called my_entity, which has members x, y and name. The function move_ent_left, which will simply decrement the x position of this by 10 units, is created in the global scope and accepts no parameters, so we canÆt æcheatÆ by passing an object instance to the function.

The thread itself is created as normal using the thread() function, but with one key difference û the my_entity table is passed as this via the syntax my_entity:thread( func );

The next example will show the move_ent_left function being used for multiple objects and on multiple threads.

global robot = {
  x = 50, y = 100, name = "robot"
};

global player = {
  x = 150, y = 200, name = "player"
};

global move_ent_left = function()
{
  print( "Starting thread - this.name = " + .name );
  while( this.x > 0 )
  {
    this.x = this.x - 10;
    print( this.name + " - x = " + this.x );
    yield();
  }
  print( "Ending thread - this.name = " + .name );
};

robot:thread( move_ent_left );
player:thread( move_ent_left );
sleep(1);
Example: threads_this_02.gm
Starting thread û this.name = robot
robot û x = 40
Starting thread û this.name = player
player û x = 140
...
Ending thread û this.name = robot
player û x = 90
player û x = 80
...
Ending thread û this.name = player
Output: threads_this_02.gm

Clever use of threads and this is an extremely useful way of giving different entities different behaviours, even if they have the same properties; all you would need to do is pass different functions on the thread. In the example that follows, we define 5 ôrobotsö that each posses a different behaviour û this behaviour is executed at runtime.

global create_robot = function(x, y, name)
{
  return { x = x, y = y, name = name, id, class="robot" };
};

global behaviour_stupid = function()
{
  print( .name + " is acting stupidly" );
};

global behaviour_seek = function()
{
  print( .name + " is seeking resources" );
};

global behaviour_rest = function()
{
  print( .name + " is resting" );
};

global robot_def = {
  {"tom", behaviour_seek},
  {"mike", behaviour_rest}, 
  {"jane", behaviour_stupid}, 
  {"bob", behaviour_stupid},
  {"sarah", behaviour_seek}
};

for(id = 0; id < 5; id = id + 1)
{
  robot = create_robot(1 * id, 10 * id, robot_def[id][0]);
  robot:thread(robot_def[id][1]);
}

sleep(1);
Example: threads_this_03.gm
tom is seeking resources
mike is resting
jane is acting stupidly
bob is acting stupidly
sarah is seeking resources
Output: threads_this_03.gm

If the robot were your normal game entity that is displayed on screen, IÆm sure you could appreciate how being able to script them in this way is extremely powerful.

Thread States

Games often utilise finite state machines to control the behaviour and state of an object. State machines are often used in game entity artificial intelligence scripts which may want to act upon a specific stimulus and then return to their previous state. Consider the PacMan ghosts who change into to a æpanicÆ state when the PacMan eats a power-up and then revert back to æroamingÆ once the power-up has worn off; or the patrolling unit in an RTS game that encounters an enemy, intercepts to attack it and then resumes its patrol once the threat has passed.

I have demonstrated how you can effectively use different functions to interact with a scripted object through the use of threads and this. As you have seen, GameMonkey Script threads execute a function - the state binding allows you to change the function that is running on a thread. The thread will keep the same Thread Id, but will lose any locally defined variables in the change of execution context. The following code will demonstrate how to initiate a state and change to another:

global awake = function()
{
  print("I'm awake!");
};

global resting = function()
{
  print("I am resting");
  sig = block("wakeup");
  if (sig == "wakeup")
  {
    stateSet( awake );
  }
};

global init_state = function()
{
  // Set a state on the thread
  // we're now using states
  stateSet( resting );
};

thread( init_state );
sleep(1);
signal("wakeup");
Example: states_01.gm
I am resting
IÆm awake!
Output: states_01.gm

The state of a thread is set by the first call to the in-built global function stateSet() that accepts the new state function and any additionally required parameters. You will notice that this behaves almost exactly how you created the thread in the first place, except this time you are still using the current thread and just changing the function that is being executed. If you want to pass this to the new state, you must explicitly do so when calling stateSet().Once you have set a thread state you can transition to a new state at any time by a subsequent call to stateSet().

Any subsequent changes in state allow you to query the current state function by calling stateGet() or the previous state by calling stateGetLast(). This is useful as GameMonkey allows you to do comparisons on functions, letting you react according to the previous state or simply just resume the previous behaviour by switching the state back to what it was before. If stateGet() returns null, the thread isnÆt engaged in state behaviour; likewise if stateGetLast() returns null the thread hasnÆt had a previous state.

The example that follows will demonstrate an object that is created, blocks until a condition is met, performs an action and then resumes the previous action. In one object, it will start as asleep, stir and then go back to sleep û another will start asleep, get panicked at a loud noise and then cause all sorts of chaos for the player.

global ent_state_panic = function()
{
  print(.name + " is panicking, firing off alrams and attracting attention to you");
};

global ent_state_awake = function()
{
  print(.name + " is waking up");
  this:stateSet( stateGetLast() );	// revert to previous state
};

global ent_state_sleeping = function()
{
  print(.name + " is sleeping");
  sig = block("quiet_noise", "loud_bang", "kill");
  if (sig == "quiet_noise")
  {
    this:stateSet( ent_state_awake );
  }
  else if (sig == "loud_bang")
  {
    this:stateSet( ent_state_panic );
  }
  else
  {
    print( .name + " killed" );
  }
};

/// Initialise the state on the entity
global ent_state_init = function(func)
{
  print( .name, " state initialised");
  this:stateSet(func);
};

global ent_1 = { name = "roboguard 1000" };
global ent_2 = { name = "old ticker" };

// Create two threads, one for each entity and initialise them in the sleeping state
ent_1.threadid = ent_1:thread( ent_state_init, ent_state_sleeping );
ent_2.threadid = ent_2:thread( ent_state_init, ent_state_sleeping );

sleep(1);
print( "You stand on a twig");
signal("quiet_noise");
sleep(1);
print( "You fire a gun at " + ent_1.name + " causing a loud noise");
signal("loud_bang", ent_1.threadid);
// Tell the entity to die
signal("kill", ent_2.threadid);
Example: states_02.gm
roboguard 1000  state initialised
roboguard 1000 is sleeping
old ticker  state initialised
old ticker is sleeping
You stand on a twig
old ticker is waking up
old ticker is sleeping
roboguard 1000 is waking up
roboguard 1000 is sleeping
You fire a gun at roboguard 1000 causing a loud noise
roboguard 1000 is panicking, firing off alrams and attracting attention to you
old ticker killed
Output: states_02.gm

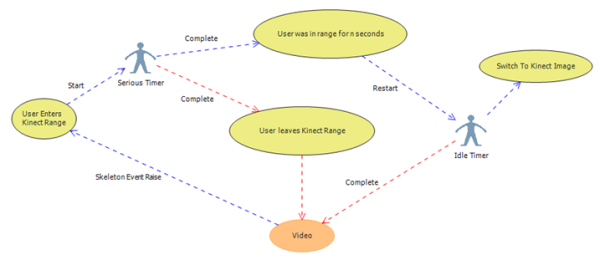
The state transitions involved above are described in this diagram:

Sometimes itÆs useful to know about a state change before it happens to allow you to run cleanup code or trigger another behaviour. To achieve this you can call the function stateSetExitFunction() and pass a function object. The function you pass will be called just before the state of the thread changes, allowing you to run whatever code you need to. When the function completes the state will transition as expected; you could use this to play a sound effect before the real event happens, for example.

global awake = function()
{
  print("I'm awake!");
};

global waking = function()
{
  print("I am stirring...");
};

global resting = function()
{
  print("I am resting");
  sig = block("wakeup");
  if (sig == "wakeup")
  {
    stateSetExitFunction( waking );
    stateSet( awake );
  }

};

global init_func = function()
{
  // set state on thread
  stateSet( resting );
};

thread( init_func );
sleep(1);
signal("wakeup");
Example: states_03.gm
I am resting
I am stirring...
IÆm awake!
Output: states_03.gm

All state changes happen on the currently operating thread, but sometimes it would be useful to change the state of another thread in the machine. Imagine you have a thread blocking on a signal for the player to move out of cover; if the cover explodes, you may want to force the players taking cover into a different state, such as the one that decides the next action. The stateSetOnThread() function allows you to do just this and requires a thread id and a state function.

global state_advance = function()
{
  print("Leaving cover and advancing");
};

global state_decide_action = function()
{
  print("I have to decide on a next action");
};

global state_hiding = function()
{
  print("Behind cover, waiting to advance");
  sig = block("advance");
  if (sig == "advance")
  {
    stateSet( awake );
  }
};

global init_state = function()
{
  stateSet( state_hiding );
};

tid = thread( init_state );
sleep(1);
// Signal isn't thrown, tell this thread to change state
print("Cover explodes!");
stateSetOnThread( tid, state_decide_action );
Example: states_04.gm
Behind cover, waiting to advance
Cover explodes!
I have to decide on a next action
Example: states_04.gm

As you have seen, the threading functionality built into GameMonkey Script provides a useful toolset to control behaviours of your entities and offers flexible solutions to achieve your scripting needs.

Integrating GameMonkey with your Game

As you have seen, GameMonkey Script offers a lot of advanced functionality to script your game entities which can become quite complex for your script writers. In a real-world usage scenario you may wish to simplify your scripting interface and use many of GameMonkey ScriptÆs threading features invisibly. For example, if you create an NPC entity that has an update routine it is often more intuitive for a script writer to simply write a script such as:
npcupdatefunc = function() { ... do stuff... };
npc = createNPC(npcupdatefunction);
Rather than:
npcupdatefunc = function() { ... do stuff... };
npc = createNPC();
npc:thread(npcupdatefunction);
Your game may also feature asynchronous events such as dialog boxes or entity movement instructions that use the blocking functionality.

This section will describe how to work with the GameMonkey Script API to take advantage of the threading functionality and offer some simple methods by which you can simplify the interface you provide to your script writers without compromising on the flexibility offered by the scripting language.

Creation of gmThreads

A new thread can be created at any time in the virtual machine by calling the gmMachine::CreateThread() method. The result of this action is that a new gmThread object is created and a unique thread id is returned. You can call this method passing a gmVariable to act as this and importantly, a gmVariable containing the gmFunctionObject that the thread needs to execute. The following code demonstrates the creation of a simple thread via the API that calls an existing function within script û for simplicityÆs sake this script is embedded in the application.
#include 
#include "gmThread.h"

int main(int argc, char* argv[])
{
  // Create gm virtual machine
  gmMachine	gm;
  // A test script which creates the function we're testing
  const char *testscript = "global threadfunc = function() { print(\"Hello, threads!\"); };";
  // Execute the script to create the function in the VM
  if (gm.ExecuteString( testscript, NULL, true ))
  {
    bool first = true;
    std::cout << gm.GetLog().GetEntry(first);
    return 1;
  }

  int new_threadId = 0;
  // Allocate a thread within the machine
  gm.CreateThread( gmVariable::s_null, gm.GetGlobals()->Get(&gm, "threadfunc"), &new_threadId );
  // Execute the machine
  gm.Execute(1);

  return 0;
}
Example: threads_01a.cpp

The code is simple; a script is executed to create the scripted function (a global named threadfunc) and a new thread is created using the reference to the script function obtained by reading from the global table. One thing to note is that as weÆve created a scripted function using script, we need to call gmMachine::Execute() to run the thread because the original ExecuteString() call actually created a thread to run in and it is still seen as the active thread in the machine.

To demonstrate the passing of this to a thread upon creation we simply pass an actual variable installed of gmVariable::s_null (the static null value variable). An example of this follows, you will notice that the string I pass as this is available in the script function we call.

#include 
#include "gmThread.h"

int main(int argc, char* argv[])
{
  // Create gm virtual machine
  gmMachine	gm;
  // A test script which creates the function we're testing
  const char *testscript = "global threadfunc = function() { print(\"'this' passed as - \", this); };";
  // Execute the script to create the function in the VM
  if (gm.ExecuteString( testscript, NULL, true ))
  {
    bool first = true;
    std::cout << gm.GetLog().GetEntry(first);
    return 1;
  }

  int new_threadId = 0;
  // Allocate a thread within the machine
  gm.CreateThread( gmVariable(gm.AllocStringObject("Hello, this!")), gm.GetGlobals()->Get(&gm, "threadfunc"), &new_threadId );
  // Execute the machine
  gm.Execute(1);

  return 0;
}
Example: threads_01b.cpp

As you expect, itÆs entirely possible to execute a native function as the thread function, you simply bind the function as normal and use the gmFunctionObject pointer wrapped up by a gmVariable. The following code demonstrates the same result as the first, this time binding a function and calling that.

int GM_CDECL gmMyThreadFunc(gmThread *a_thread)
{
  std::cout << "Hello, threads!" << std::endl;
  return GM_OK;
}

int main(int argc, char* argv[])
{
  // Create gm virtual machine
  gmMachine	gm;
  // Bind the function to use by creating a gmFunctionObject
  gmFunctionObject *threadfunc = gm.AllocFunctionObject( gmMyThreadFunc );
  int new_threadId = 0;
  // Allocate a thread within the machine
  gm.CreateThread( gmVariable::s_null, gmVariable(threadfunc), &new_threadId );
  return 0;
}
Example: threads_02.cpp

Any object can be passed to the thread as this if it has been registered within the gmMachine as a gmType and wrapped in a gmVariable. The following example shows how you can access this in the callback via the gmThread::GetThis() method. In this case I expect it to be a string type, but in your code youÆd most likely use your own entity types.

int GM_CDECL gmMyThreadFunc(gmThread *a_thread)
{
  GM_ASSERT( a_thread->GetThis()->m_type == GM_STRING );
  gmStringObject *thisstr = reinterpret_cast(a_thread->GetThis()->m_value.m_ref);
  std::cout << "'this' passed as " << thisstr->GetString() << std::endl;
  return GM_OK;
}

int main(int argc, char* argv[])
{
  // Create gm virtual machine
  gmMachine	gm;
  // Bind the function to use by creating a gmFunctionObject
  gmFunctionObject *threadfunc = gm.AllocFunctionObject( gmMyThreadFunc );
  // Add function to the global table so scripts can access it
  gm.GetGlobals()->Set(&gm, "threadfunc", gmVariable(threadfunc) );
  // Call script to make callback, pass a variable containing "hello" as this
  const char *script = "text = \"hello\"; text:thread( threadfunc );";
  gm.ExecuteString( script );
  return 0;
}
Example: threads_03.cpp

Working with æthisÆ

So far, most of the C++ binding examples weÆve been using have relied on us passing the objects to work on as a parameter to the callback functions. However youÆre more likely to want to pass this to functions explicitly or implicitly by binding them to an instance of a type û this is how weÆve been doing it in many of the actual scripts youÆve seen. This next section will demonstrate how to access and use this in your native callbacks and continue to provide a simple example of some code to extend your bound types.

As you have seen previously, every gmThread has a stack slot allocated for the this variable. This can be accessed in raw gmVariable form by calling gmThread::GetThis(). The main difference between GetThis() and Param() is that GetThis() returns the gmVariable via a const pointer and not by value like the Param() functions. In the previous example (threads_03.cpp), you were accessing a string variable passed as this. It is often required that you validate the type of this variable û the gmThread.h file defines a series of useful macros for checking function parameters, there are also a few for checking the type of this, such as GM_CHECK_THIS_STRING, which will return a thread exception if this is passed as anything other than a string type.

Like the Param() functions, there are several helpers for automatically and safely converting this back to the various native types associated with the GameMonkey type. So, for example ThisString() returns as a const char* and ThisInt() returns an int.

int GM_CDECL gmThisTest(gmThread *a_thread)
{
  GM_CHECK_THIS_STRING;
  std::cout << "'this' passed as " << a_thread->ThisString() << std::endl;
  return GM_OK;
}
Example: this_01.cpp

There are three methods for returning your user types, ThisUser() returns a void* and the gmType of the object it holds; ThisUserCheckType() will only return a non-NULL pointer to the object if the type you pass in matches the object type and finally ThisUser_NoChecks() passes you just the pointer to the data held in the user object. Of course, these are simply common conversions û you are encouraged to create your own routines should you require anything else, such as converting back and forth to your entity type automatically.

Script-Extensible Objects

The use of this becomes incredibly important when it comes to working with your own user types and binding functions and data to them. The rest of this section will demonstrate a highly simplified game entity class that allows you to extend it with scripted properties.

The first thing we do is define our game entity. In this example we declare it to have the following attributes:

Variable Read/Write? Description
Id Read Guid of the entity
X Read, Write Write X position of the entity
Y Read, Write Write Y position of the entity

If you think back to the simple Vector binding I demonstrated in the original articles, you will remember that we used the raw Vector* pointer as the data tied to GameMonkey and bound the Dot/Ind operators to allow modification of the underlying data. This time along we want to take advantage of the flexibility of GameMonkey and effectively allow additional properties to be added to the object û for example, allowing the script writer to add a ônameö property to the object.

struct Entity
{
  Entity() : Id(0), X(0), Y(0) { }
  Entity(int id) : Id(id), X(0), Y(0) { }
  int Id, X, Y;
};
Example: ext_01.cpp

The first step to achieving this goal is to create a proxy object that holds both the raw Entity data and a gmTableObject that will be used to hold our additional properties; this proxy is represented by a ScriptEntity class. We have a choice to make at this stage; do we want to be invasive to the Entity class and allow it to hold a pointer to the ScriptEntity or do we want the ScriptEntity to wrap the Entity object? I have chosen to add a pointer to the ScriptEntity into the Entity class; this enables any other consumers of the Entity class to be aware of the additional properties and create their own or read any existing ones û this allows for some nice data-driven entities to be created as you will see shortly.

struct ScriptEntity
{
  ScriptEntity(Entity &ent) : EntityObject(ent), ScriptProperties(NULL) { }
  Entity &EntityObject;
  gmTableObject *ScriptProperties;
};
Example: ext_01.cpp

Once the basic objects have been defined the type is bound as normal. I have bound a global function createEntity() to the script environment which will allocate a new Entity from the EntityManager and also allocate a new ScriptObject and gmTableObject for it.

int GM_CDECL gmCreateEntity(gmThread *a_thread)
{
  // Create an entity from the manager
  int entityId = 0;
  Entity &ent = s_EntityManager.CreateEntity(entityId);
  // Allocate a script entity & construct it
  ScriptEntity *sent = reinterpret_cast(s_scriptents.Alloc());
  GM_PLACEMENT_NEW( ScriptEntity(ent), sent );
  // Tie back to entity
  ent.ScriptObject = sent;
  // Create a property table
  sent->ScriptProperties = a_thread->GetMachine()->AllocTableObject();
  // Tell GM how much memory we're using
  int memadjust = sizeof(gmTableObject) + sizeof(Entity) + sizeof(ScriptEntity);
  a_thread->GetMachine()->AdjustKnownMemoryUsed(memadjust);
  // return to client
  a_thread->PushNewUser( sent, s_entitytype );
  return GM_OK;
}
Example: ext_01.cpp

IÆve chosen to use some of the in-built GameMonkey memory allocation routines for the ScriptEntity creation (gmMemFixed); this is a fairly simple fixed memory allocator which uses a freelist for reallocations. You are free to use the normal new and delete operators or to rely on memory allocation routines from your own engine.

Once this function is bound, you can create entities in script û but theyÆre not much use until you bind the operators. In this case I will bind the GetDot and SetDot operators only. They will both work in similar ways; the object is retrieved from the relevant operand and the text of the property is resolved from the gmStringObject it is passed as. If the property is resolved to either X, Y or Id (the properties of the Entity class), we simply access the relevant property on the Entity. Any other property accesses will go straight to the gmTableObject we created on the ScriptEntity, thus allowing us to get and set properties that didnÆt exist on the base class. The SetDot operator code is shown below as an example.

void GM_CDECL gmOpSetDot(gmThread *a_thread, gmVariable *a_operands)
{
  if (a_operands[0].m_type != s_entitytype)
  {
    a_thread->GetMachine()->GetLog().LogEntry( "gmEntity:OpSetDot invalid type passed" );
    a_operands[0] = gmVariable::s_null;
    return;
  }
  // Get scriptentity back
  ScriptEntity *sent = reinterpret_cast(a_operands[0].GetUserSafe(s_entitytype));
  // Get name of 'get' prop
  std::string propname = a_operands[2].GetCStringSafe();
  // Test for our known properties and return their values back immediately
  if (propname == "X")
  {
    sent->EntityObject.X = a_operands[1].GetIntSafe();
  }
  else if (propname == "Y")
  {
    sent->EntityObject.Y = a_operands[1].GetIntSafe();
  }
  else if (propname == "Id")
  {
    a_thread->GetMachine()->GetLog().LogEntry( "gmEntity:OpSetDot cannot set Id" );
    a_operands[0] = gmVariable::s_null;
  }
  else
  {
    // Otherwise, store a value in the table
    sent->ScriptProperties->Set(a_thread->GetMachine(), propname.c_str(), a_operands[1]);
  }
}
>Example: ext_01.cpp

When you bear in mind that GameMonkey Script functions can also be stored as variables, you will see that you can start adding scripted functions to the base entity class with ease û be it from the C++ API or from script itself. All functions invoked on the object have this implicitly passed, so code such as the following is possible:

ent = createEntity();
ent.name = "somebody";
ent.sayname = function() 
{ 
  print( "My name is: ", this.name ); 
};
ent.sayname();
By using the C++ API and accessing this, you can begin to add some script-bound functions to the ScriptEntityÆs ScriptProperties table with ease. The following example shows a simple function that displays the entityÆs position, id and name û with name being a property added within script.
// The entity is passed as this
int GM_CDECL gmEntityInfo(gmThread *a_thread)
{
  ScriptEntity *sent = reinterpret_cast(a_thread->ThisUserCheckType(s_entitytype));
  if (sent == NULL)
  {
    a_thread->GetMachine()->GetLog().LogEntry("gmEntityInfo: Expected entity type as this");
    return GM_EXCEPTION;
  }
  std::stringstream infotext;
  infotext << "EntityId: ";
  infotext << sent->EntityObject.Id;
  infotext << " - Postition("; infotext << sent->EntityObject.X; infotext << ","; infotext << sent->EntityObject.Y; infotext << ") - Name: ";
  // Get name from table and pass to object
  gmVariable namevar = sent->ScriptProperties->Get(a_thread->GetMachine(), "name");
  if (namevar.IsNull() || namevar.m_type != GM_STRING)
  {
    infotext << " [No name]";
  }
  else
  {
    infotext << namevar.GetStringObjectSafe()->GetString();
  }
  std::cout << infotext.str() << std::endl;
  return GM_OK;
}
Example: ext_01.cpp

In the full example code ext_01.cpp (not shown), I added an entry to the ScriptProperties table to automatically hold this function for each entity created by the script engine:

// Bind an additional method to the entity's prop table
sent->ScriptProperties->Set(a_thread->GetMachine(), "ShowInfo", gmVariable( a_thread->GetMachine()->AllocFunctionObject(gmEntityInfo) ) );
The script we run can be modified as follows to use the new function:
ent = createEntity();
ent.name = "somebody";
ent.ShowInfo();
And the output?
EntityId: 1 û Position(100,0) û Name: somebody
In this section youÆve learned how to use GameMonkey Script to extend an existing native class and attach new data and functions to it. Armed with this information you are free to create powerful entity types and allow your script writers to extend them without any changes to the engine code.

Threads, The Stack and Function Calls

As threads are an important part of GameMonkey Script, I will use this section to cover how they work in more detail. I will also discuss how a function is called within the GameMonkey Virtual Machine (VM) and how this is tied to threads.

A thread on the VMis composed of the following components:

  • A unique idenfier
  • A stack
  • A function to execute
  • A pointer to the current instruction (if any)
  • A list of blocks and signals pending on the thread
  • State information about the thread
The thread stack is a effectively a list of gmVariable objects that is used to hold the function being executed, the variable for this, any function parameters passed to the thread and then finally any working variables, including return values from functions.

The thread function is a gmFunctionObject which can be either a native function callback or a scripted function. A scripted function is a series of bytecode instructions that are interpreted by the GameMonkey VM to create the behaviours you see in script. The execution of the VM bytecode is dependent on the structures in the thread and the VM cannot execute a function without it.

When a function is called in GameMonkey, what actually happens? The first thing pushed to the stack is a variable containing this, it will contain null if there is no value for this. A variable holding the function object is next to be pushed to the stack, followed by any function parameters in order. Finally, a stackframe is pushed to complete the setup and initialise all internal data and structures to ready the thread for execution on the VM. The stackframe is important as it allows the VM to maintain the correct pointers to instructions and data to, for example, allow nested function calls to be made within the system. The function is then executed by the virtual machine, either by calling a native function or by interpreting the bytecode involved with the scripted function. Any return value is pushed back to the stack and the stack frame is popped, allowing the script to continue where it left off before the function call.

We can see this in action by manually creating a thread and calling a native function. The first code we write is a simple function that accepts two integer parameters and writes them to cout.

int GM_CDECL gmFunctionTest(gmThread *a_thread)
{
  GM_CHECK_INT_PARAM( a_param1, 0 );
  GM_CHECK_INT_PARAM( a_param2, 1 );
  std::cout << "Param 1: " << a_param1 << std::endl;
  std::cout << "Param 2: " << a_param2 << std::endl;
  return GM_OK;
}
Next, we follow the steps detailed above to call the function via the GameMonkey API.
gmMachine	gm;
int threadid = 0;
gmThread *thread = gm.CreateThread(&threadid);
thread->PushNull(); // Push 'this'
thread->PushFunction( gm.AllocFunctionObject(gmFunctionTest) );	// push function to call
thread->PushInt(50);
thread->PushInt(100);
thread->PushStackFrame(2);
Example: functioncall_01.cpp

As you can see, we create a thread, push the required information to it and then finally execute it by pushing the stack frame using gmThread::PushStackFrame. If the function were a scripted function, you would need to run it by executing the thread using gmThread::Sys_Execute or by using gmMachine::Execute() to execute the whole machine.

gmMachine gm;
// Create a global scripted function
gm.ExecuteString("global func = function(a, b) { print(\"Param 1:\", a); print(\"Param 2:\", b); };");
gmFunctionObject *func = gm.GetGlobals()->Get(&gm, "func").GetFunctionObjectSafe();
int threadid = 0;
gmThread *thread = gm.CreateThread(&threadid);
thread->PushNull(); // Push 'this'
thread->PushFunction( func ); // push function to call
thread->PushInt(50);
thread->PushInt(100);
thread->PushStackFrame(2);
thread->Sys_Execute();
Example: functioncall_02.cpp

If weÆd have wanted to return a value from the function itÆs a simple case of pushing it to the stack before we return and retrieving it either by getting the top of the stack from the thread, or if it was a scripted function the call to Sys_Execute accepts an optional pointer to a gmVariable allowing you to capture this if you need to.

This section has shown you how to manually call functions and how they interact with the threads and stack. It is recommended that you use the gmCall helper for most of your script calls as it wraps all of this functionality for you already and reduces the chance of errors occurring.

Callback Return Values

So far, all of the examples of bound functions youÆve seen have returned GM_OK or GM_EXCEPTION. This section will describe how these are used by the virtual machine and discuss other values you can use.

When a function call is made or an operator callback is invoked, you have a chance to indicate success or failure to the VM execution engine. If the call is successful (GM_OK), everything continues as normal û but what happens if there is an error? An error could be that you received the wrong parameter type to a function callback, or maybe even an internal game error that requires your script environment to be notified. In such cases, you would return a value of GM_EXCEPTION to the thread, which has the effect of causing it to terminate.

Usable values are as follows:

Value Meaning
GM_OK Success
GM_EXCEPTION An error occurred
GM_SYS_YIELD Causes a thread to immediately yield execution to another thread
GM_SYS_BLOCK A block has been set on the thread, see later for more detail
GM_SYS_SLEEP Force the thread to sleep after setting the Sys_SetTimeStamp and Sys_SetStartTime values accordingly

There are other values available but they are internal and shouldnÆt be used for risk of corrupting the execution of the VM.

Signalling via the API

Like using signals in the script language you can signal threads from the API. This allows you to implement event-based systems that trigger game events as signals to the entire virtual machine as or to specific threads that are running on particular game entities. One use may be an RPG game that pops up a dialog box for a quest; in script youÆd tell the engine to open the quest dialog with a specific text and wait for the user to accept or decline it. An example script would look like:
ShowQuestDialog( Quests.SaveThePrincess );
response = block( QuestDialog.Accept, QuestDialog.Decline );
if (response == QuestDialog.Accept)
{
  // do something
}
else
{
  // do something else
}
In this example, the ShowQuestDialog() function would be a native function that pops up a non-modal dialog that itself waits for a button response event from your GUI subsystem. As the dialog is non-modal, you need your script to respond from the userÆs input in some way, so you block on two signals to indicate accept or decline. Because the thread is waiting for a block it becomes dormant in the GameMonkey machine and therefore takes up no execution time until itÆs woken by a signal. The signal itself would be fired by your script subsystem in response to a GUI button press event for that specific dialog.

LetÆs look at some sample code:

enum QuestDialog
{
  QD_DECLINE,
  QD_ACCEPT
};

// This function simulates a modal quest dialog
int GM_CDECL gmShowQuestDialog(gmThread *a_thread)
{
  std::cout << "A princess is in danger, do you wish to save her?" << std::endl << "[Accept | Decline]" << std::endl;
  return GM_OK;
}

void HandleUserAcceptQuest(gmMachine &gm, int threadid, QuestDialog response)
{
  // Fire signal to thread to indicate user's choice	
  gm.Signal( gmVariable( (int)response ), threadid, 0 );
}

int main(int argc, char* argv[])
{
  // Create gm virtual machine
  gmMachine	gm;
  // Bind ShowQuestDialog function to script
  gm.GetGlobals()->Set( &gm, "ShowQuestDialog", gmVariable(gm.AllocFunctionObject( gmShowQuestDialog )) );
  // Create a global table to hold Ids for QuestAccept/Decline
  gmTableObject *dialogResponses = gm.AllocTableObject();
  dialogResponses->Set( &gm, "Accept", gmVariable(QD_ACCEPT) ); // Accept = 0
  dialogResponses->Set( &gm, "Decline", gmVariable(QD_DECLINE) ); // Decline = 0
  gm.GetGlobals()->Set( &gm, "QuestDialog", gmVariable( dialogResponses ) );
  // Run an example script that calls dialog and blocks on response
  const char *script = "ShowQuestDialog(); \n"
      "response = block( QuestDialog.Accept, QuestDialog.Decline ); \n"
      "if (response == QuestDialog.Accept) { print(\"[Quest accepted]\"); } else { print(\"[Quest declined]\"); }";
  int threadid = 0;
  // Run script and capture thread it's running on
  gm.ExecuteString( script, &threadid );
  Sleep(5000);	// Wait for 5 seconds to simulate user deciding to accept
  HandleUserAcceptQuest(gm, threadid, QD_ACCEPT);
  // Tick the machine along
  gm.Execute(0);
  return 0;
}
Example: signals_01.cpp

The majority of the code is actually setting up our global script variables and binding the demonstration quest dialog function. The sample script is run on the machine which immediately calls the quest dialog function (in your implementation youÆd open a real GUI window) and then immediately blocks for the response. The signal itself is sent via a call to gmMachine::Signal, which accepts a gmVariable and an optional thread Id û you will see that this is identical to calling signal from script.

A second example is that of a door created in script. The door itself will remain closed until the game instructs it to open, perhaps by a person using a switch or firing some kind of trigger. The script for the door is simple; the door is created and immediately blocks for the signal to open. When this trigger is received, an animation game event is played asynchronously while the door script sleeps for 5 seconds. After it resumes, the close animation is played and the door goes back to blocking û this behaviour will repeat forever or until the thread is terminated by the game, perhaps in response to the door becoming impassible or destroyed.

global DoorFunction = function() 
{	
  while(true)	
  {	
    print(this, "waiting for use..."); 
    block("usedoor");	
    this:startAnimation("dooropen"); 
    sleep(5);	
    this:startAnimation("doorclose"); 
  } 
}; 
createDoor(DoorFunction);
Example: signals_02.cpp û Door Script

The native callback createDoor() will create a new door instance and run the function you pass it. Note that in this example I just demonstrate the object using a text string, your game will most likely feature an actual door entity being created and returned as a user object.

int GM_CDECL gmCreateDoor(gmThread *a_thread)
{
  GM_CHECK_FUNCTION_PARAM(a_func, 0);
  // Simple example, return "TESTDOOR" as the user object
  gmStringObject *door = a_thread->GetMachine()->AllocStringObject("TESTDOOR");
  // Call passed in function as a new thread (gmCall does this under the hood)
    gmCall gmcall;
    gmcall.BeginFunction(a_thread->GetMachine(), a_func, gmVariable(door), false);
    gmcall.End();
  a_thread->PushString(door);
  return GM_OK;
}
Example: signals_02.cpp

To open the door at any point in the game, you fire the signal. IÆm executing the next frame of the VM manually here, but your game loop will be doing this each frame automatically.

// Open the door... fire global signal for now
gm.Signal(gmVariable( gm.AllocStringObject("usedoor") ), GM_INVALID_THREAD, 0);
Example: signals_02.cpp

The output of this whole example:

TESTDOOR waiting for use...
TESTDOOR starting animation: dooropen
TESTDOOR starting animation: doorclose
TESTDOOR waiting for use...
Output: signals_02.cpp

This example is an excellent way of showing how the thread that controls the door can be created within the game code itself, removing the need for a user to explicitly create them to run the door script. To the user, they are simply creating a door that will play out their behaviour, they donÆt even have to know about the signal being fired by the game.

Blocking via the API

It is possible to set a thread to block using the API and it allows more flexibility than blocking in script. When you block from within the GM Scripting language itself the currently executing thread is suspended immediately and is set to the status of ôblockedö. Blocking a thread from the API allows you to continue processing as normal; the blocked state of the thread is only registered upon the next execution cycle of the virtual machine. To block a thread, you need to use the gmMachine::Sys_Block function; this function takes a thread Id and a list of gmVariables to block on. Although it is possible to block on a thread that isnÆt the current thread, it is not recommended as it may cause undesirable or unpredictable behaviour in the scripts running on the machine (such as a thread blocking for a signal that will never occur).

A quick example will show you how to set up a block via script:

enum
{
  SIG_ZERO,
  SIG_ONE
};

int GM_CDECL gmBlockTest(gmThread *a_thread)
{
  gmVariable blocks[] = { gmVariable(SIG_ZERO), gmVariable(SIG_ONE) };
  int ret = a_thread->GetMachine()->Sys_Block( a_thread, 2, blocks );
  if (ret == -1)
  {
    return GM_SYS_BLOCK;
  }
  a_thread->Push(blocks[ret]);
  return GM_OK;
}
Example: blocks_01.cpp

In this callback function I have set up two variables containing the values 0 and 1 and have instructed the GameMonkey machine to block the currently running thread on them. Under the hood, the gmMachine::Sys_Block function will attempt to use up any signals already pending on the thread; if a matching signal is found for one of the blocks, it will return immediately with the index of the block variable you supplied. When this happens, I push the variable back to the thread stack as a return value so that it returns the block immediately to the user to allow them to check which block was signalled. If no corresponding signal is found, Sys_Block returns a value of -1 û when this happens you return a value of GM_SYS_BLOCK to indicate to the VM that this thread should be suspended until a signal is received to wake it. When you bind the function above to the machine, it lets you run a script such as:

r = blocktest();
print( ôsignal fired:ö, r);
This will block until you signal the thread either using gmMachine::Signal or the signal() command from script.

Games often feature asynchronous actions, such as playing an animation or sound, actor pathfinding/movement and so on. In the real world, many of these actions will be kicked off with an event dropped onto a message queue which is picked by the relevant system. Imagine the case of an NPC being instructed to move across town; the entity management system will pick up the movement message and move the entity a little bit each frame until the NPC arrives at its destination many frames later. At this point the entity manager it will signal back to the game that the movement has completed.

Your scripts will often want to trigger asynchronous behaviours but will need to treat them as if they are synchronous by waiting for the result of the task before deciding how to proceed. If the machine-bound function returned immediately after queuing the message, the script would continue as normal without waiting for completion. In a previous section you achieved this in script by using GameMonkeyÆs blocking and signalling functionality; in this case you could fire your event and then immediately block for the signal back from the game engine to wake up the thread.

doasyncbehaviour();
ret = block( ôokö, ôfailedö );
// continue as normal
Although this works, it can be a little clunky in practice and requires that your script writers always remember to block after an asynchronous behaviour. In this next section I will demonstrate an example of working with asynchronous game events elegantly with GameMonkey Script.

For this example I will allow you to imagine a town guard in an RPG game that wanders back and forth between two towers. When he gets to a tower, heÆll inspect the area and move on if nothing is amiss. The guardÆs behaviour is described as the following series of states:

In the game engine this will be achieved by initiating the movement using a goto message to the entity manager. Upon arrival at the destination a goto_success message is sent back to the game system û should anything happen such as the destination being unreachable, the entity being attacked or so on, a goto_failed message is sent back to the game, along with other messages for the next action (if any).

The sequence of events in this asynchronous call are as follows:

  1. Script calls NPCWalkTo( dest )
  2. Game pushes goto message to message queue
  3. Script call blocks thread and returns
  4. Game frame advances, entity manager picks up movement message
  5. Entity manager moves NPC each frame until destination is reached
  6. Message is sent back to script manager to inform destination reached
  7. Script manager signals thread of completion, script progresses as normal
Look at the example code blocking_02.cpp for a simple yet realistic implementation of the above behaviour. In the code, we bind two functions to the GameMonkey machine, CreateNPC() which is tied into the gameÆs entity manager and NPCGoto() which accepts an entity and a location as a parameter. In this simple example, the location is either TOWER_ONE or TOWER_TWO in the global Location table. In a real game youÆd most likely specify a vector, or would bookmark real locations with names like TOWER_ONE. The first thing we do in the script is create the guard NPC and start a thread for it to run in.
global GuardMove = function()
{
  this:stateSet(GuardGotoTowerOne);
};
npc = CreateNPC();
npc:thread(GuardMove);
The guardÆs behaviour function immediately jumps into the state that tells it to go to the first tower.
global GuardGotoTowerOne = function()
{
  print("Going to Tower One...");
  res = NPCGoto(this, Location.TOWER_ONE);
  if (res == Event.SUCCESS)
  {
    print("Arrived at tower One");
    this:stateSet(GuardWait);
  }
  else
  {
    print("Couldn't get there");
  }
};
This script function calls the NPCGoto() function and passes TOWER_ONE as a location for this entity to travel to. The native code behind this function fires off a message to the game system that indicates we want to move the entity to the specified location.
GM_CHECK_INT_PARAM(a_entity, 0);
GM_CHECK_INT_PARAM(a_location, 1);
  
// Push message to Game Message queue
NPCGotoMessage *msg = new NPCGotoMessage( a_entity, a_thread->GetId(), a_location );
s_Game.GetMessageSystem().PushMessage( msg );
The bound function then immediately sets up a block on the scripted thread that suspends it until weÆve received the success or failure result back from the game.
gmVariable blocks[] = { gmVariable(SM_SUCCESS), gmVariable(SM_FAILED) };
int res = a_thread->GetMachine()->Sys_Block( a_thread, 2, blocks );
if (res == -1)
{
  return GM_SYS_BLOCK;
}
The game continues as normal, the entity manager picks up the NPCGotoMessage we posted and processes the movement of the entity each frame. In this example weÆre using a time based trigger that fires after a few seconds, but in a real game you would move an entityÆs co-ordinates in the world.
if (_Dur >= 2500.0f)	// Simulate time passing
{
  NPCArrivalMessage *msg = new NPCArrivalMessage(ent._Id, ent._ScriptThreadId, ent._Destination);
  s_Game.GetMessageSystem().PushMessage(msg);
  ent._State = Entity::ES_WAITING;	// Go back to waiting state
  _Dur = 0;
}
The script manager system is set up to listen for an NPCArrivalMessage; when it recieves one it will post the result of the movement request back on the entityÆs thread in the form of a signal.
if (a_msg->MessageType == MT_GOTO_SUCCESS)
{
  NPCArrivalMessage *msg = reinterpret_cast(a_msg);
  // Fire signal on thread
  _Machine.Signal( gmVariable(SM_SUCCESS), msg->ScriptThreadId, 0 );
}
The GameMonkey Script machine processes the signal on the next update and the thread resumes op

Spatial Hashing

$
0
0

Why spatial hashing?
How often have you bemoaned the lack of a simple way to cut down on the number of objects tested during collision detection or culling? Sure, one could integrate a full-blown physics library, or implement a dynamic quad-tree/kd-tree/BVH, but all of these are time consuming, and not necessarily worth it for a small game or demo. These approaches also all suffer from another drawback (which may or may not affect you, depending on the type of game): they assume the world is a fixed, finite size.

Spatial hashing, on the other hand, is lightweight, trivial to implement, and can easily deal with worlds whose dimensions vary over time.


Why another article on spatial hashing?
There are quite a number of articles on spatial hashing floating around the net, ranging all the way from lengthy academic treatises to back of the napkin sketches. Unfortunately, most of the articles towards the beginning of that spectrum aren't that friendly to the casual observer, and towards the end of the spectrum they don't tend to provide complete implementations, or neglect the more obscure (and useful) tricks.


What is a spatial hash?
A spatial hash is a 2 or 3 dimensional extension of the hash table, which should be familiar to you from the standard library or algorithms book/course of your choice. Of course, as with most such things, there is a twist...

The basic idea of a hash table is that you take a piece of data (the 'key'), run it through some function (the 'hash function') to produce a new value (the 'hash'), and then use the hash as an index into a set of slots ('buckets').

To store an object in a hash table, you run the key through the hash function, and store the object in the bucket referenced by the hash. To find an object, you run the key through the hash function, and look in the bucket referenced by the hash.

Typically the keys to a hash table would be strings, but in a spatial hash we use 2 or 3 dimensional points as the keys. And here is where the twist comes in: for a normal hash table, a good hash function distributes keys as evenly as possible across the available buckets, in an effort to keep lookup time short. The result of this is that keys which are very close (lexicographically speaking) to each other, are likely to end up in distant buckets. But in a spatial hash we are dealing with locations in space, and locality is very important to us (especially for collision detection), so our hash function will not change the distribution of the inputs.


What is this crazy pseudo-code you are using?
That is Python. If you haven't encountered Python before, or don't favour it for some reason, then it makes fairly readable pseudo-code all by itself. Even if you have a passing familiarity with Python, however, be careful of some of the container manipulation used herein.


Where do we start?
The first thing we need to do is create the spatial hash. Because I want to deal with environments of any dimension, we are going to create what I call a 'sparse' spatial hash, and this takes a single parameter: the cell/bucket size. If we were dealing with an environment of fixed and finite dimensions, we could implement a 'dense' spatial hash instead, where we divide the environment up into cells/buckets ahead of time, and pre-allocate those buckets. However, since we don't know the size of the environment, we will still divide the world into cells, but we won't pre-allocate any buckets. We will however allocate a dictionary (hash table/hash map in other languages) to store our buckets later.

def __init__(self, cell_size): self.cell_size = cell_size self.contents = {} Our hash function is also very simple, and unlike a regular hash function, all it does is classify points into their surrounding cells. It takes a 2D point as its parameter, divides each element by the cell size, and casts it to an (int, int) tuple.

def _hash(self, point): return int(point.x/self.cell_size), int(point.y/self.cell_size)
How does one insert objects?
There simplest keys to insert are single points. These aren't generally that useful, but the concept is straightforward, and they might be used for way-points, or similar. The procedure is extremely simple: hash the point to find the right bucket, create the bucket if it doesn't yet exist, and insert the object into the bucket. In this implementation, each bucket is a simple Python list.

def insert_object_for_point(self, point, object): self.contents.setdefault( self._hash(point), [] ).append( object ) Of course, we also need to insert more complex shapes. Rather than deal with the intricacies of determining which bucket(s) an arbitrary shape need to hash to, we support only one other primitive: the axis-aligned bounding-box. The axis-aligned bounding-box is cheap to compute for other primitives, provides a reasonably decent fit, and is incredibly simple to hash.

The astute among you will have already noticed a few problems with inserting objects other than simple points into the spatial hash: a) the object may overlap several cells/buckets if it is near the edge of a bucket, and b) an object may actually be larger than a single bucket. The solution to these is luckily also simple: we add the object to all relevant buckets. And the bounding-box approach comes into its own, as we can just hash the min and max points, and then iterate over the affected buckets.

def insert_object_for_box(self, box, object): # hash the minimum and maximum points min, max = self._hash(box.min), self._hash(box.max) # iterate over the rectangular region for i in range(min[0], max[0]+1): for j in range(min[1], max[1]+1): # append to each intersecting cell self.contents.setdefault( (i, j), [] ).append( object )
What about removing objects?
There are a number of approaches to removing objects from the hash, depending on your needs. The simplest (and the one I used in the accompanying code) is to use the key - feed the position/bounding-box back into the hash function, and remove the object from the resulting bucket(s).

If you don't know the key, you can always perform a linear search over the entire spatial hash, and remove the object wherever you find it, but this of course is not great from a performance standpoint.

And lastly, you can just clear the whole structure (by deleting all the buckets), and start fresh.


And search/retrieval?
Searching follows exactly the same procedure: feed the point into the hash function, and return the list of items in the bucket.

Of course, for this to be useful for collision detection, you also need to be able to search in a range, or in our case, a bounding-box. This once again follows the same idea as insertion and removal: hash the min and max of the bounding-box, iterate over the affected cells/buckets, and build a list of all objects encountered. There is one trick, however - this list is likely to contain (potentially a lot of) duplicates. We don't want the user to have to deal with duplicates, so you need to zap them in some way. The accompanying code does this by adding them to a set (which cannot by definition contain duplicates), and converting the set back to a list, but there are many possible approaches.


How do we tune the spatial hash?
Whenever hashed data structures are discussed, the question of tuning arises. In this sparse spatial hash, we only have a single parameter to tune, namely the cell size. This cell size can have a pronounced effect on performance - too large a cell size and too many objects will end up in the same cell, too small and objects will span too many cells.

As a (very approximate) rule of thumb, I find that the cell size should be roughly twice the size of the average-sized object in your world. However, depending on the relative scales of objects, you may need to tune differently.


What else affects performance?
Apart from the cell size parameter, there are a number of issues that can affect your performance.

The first issue is the size (and density) of your game world. While spatial hashes perform admirably with many objects, they perform best if the objects are sparsely distributed. If you have a small game world, and objects are closely clustered around each other, a dynamic quad-tree might be a better approach.

The next issue is the performance of the underlying container implementation. If you recall, we use the results of our hash function (which are integer tuples) as keys into a Python dictionary (which is itself a hash map). You can substitute whatever container you like, but be aware that your performance is heavily dependent on the performance of this container.


Didn't you mention useful tricks?
Yes I did, but I also lied - I am afraid that I only have one useful trick for you today.

Today's useful trick is how to intersect a line segment with the spatial hash. If you think about this for a moment, the problem is actually how to intersect a line with a grid.

At this point I am going to go off on a short rant: Many of the blog posts/articles on the internet which deal with this topic use the brute force approach of repeated ray<->bounding-box intersections. This is inefficient, and generally unnecessary.

Now with that out of the way, let us go through the approach. We know we want to find the cells in a regular grid, which intersected by a line - remind you of anything yet? How about now?

Posted Image There is our regular grid, there is our line, there are our intersected cells. Yup, line<->grid intersection is better known as line rasterisation. Now, if you did graphics programming back in the day, you will recall that there is an efficient method to rasterise lines, know as Bresenham's algorithm. I won't bore you with the details here - Wikipedia has a decent explanation (see further reading, below), and the attached source code contains an implementation.

As for using it to perform spatial hash look-ups, we rasterise the line onto the cell grid, and at each pixel of the line, we grab the matching bucket and return it, once again eliminating duplicates.

You may be thinking that Bresenham's algorithm does not guarantee to produce 100% coverage of the line, and you would be correct. However, the algorithm can at most miss a small fraction of one corner of a cell, which is generally good enough. If you absolutely need to ensure no misses, you can adapt the line rasterising to suit, or even take an approach along the lines of anti-aliasing.


Further reading
Entity Crisis: Spatial Hashing - http://entitycrisis....al-hashing.html

Spatial hashing implementation for fast 2D collisions - http://conkerjo.word...-2d-collisions/

Wikipedia: Bresenham's line algorithm - http://en.wikipedia...._line_algorithm


Conclusion
I hope you come away from this with a decent understanding of what spatial hashing is, how it works, and what it can do for you. Please don't hesitate to provide me with comments, suggestions or corrections.

Tristam MacDonald - [http://swiftcoder.wordpress.com]

Terrain System for Circuits

$
0
0
This article presents a solution for games - mostly car racing titles - in which the characters – cars – move along a racetrack .

The proposed terrain system will manage the physical information of the track, building an internal data structure and applying a spline algorithm to get an smoothed continous surface.

The physical data structure is not made of triangles or polygons, and no raycasting or polygon collision is performed in the game, which leads to good performance, low memory cost and configurable continuous smoothness (no sharp edges between polygons).

The physical data is generated in a preprocess out of the game, and then saved to a binary file. The track information can be taken from the graphical circuit, raycasting at the control point positions.

To keep the explanation simple, the data structure can be a plain c-style array with the control point positions : Point3D ctlPoints[NumRows][NumColumns] , where every control point position is stored in the array at their column-row slot.

Posted Image This system has been succesfully implemented and tested on a real case: a racing car videogame for the Wii, with 12 fast (about 110 km/h) cars on a track with bumps, cambers, crosses of different levels ... The 12 cars together consumed 1.53% of the CPU process (in the worst case) to obtain information of height, normal and tangent from the terrain, and 0.2% more on knowing its distances to the barriers.

Please note that there are multiple possible implementations, variations and optimizations, as each game should have its own version and applications. The basis is a data structure with spatially-organized control points along the route and a spline algorithm to get a smoothed surface from them.


Features
  • It doesn't use polygons or triangles, and no raycasting or polygon detection is performed in real-time.
  • It allows curves, hills (up-down), concaves (half-pipe, etc ...), all types of camber ...
  • It's not a heightmap, although it shares some characteristics . Some differences:
    • Supports various altitudes. Some paths may cross with others at different heights ...
    • The checkpoints follow the path, so we just store the terrain information that we need, not the entire "rectangle" that covers the circuit - as a heightmap would do.
  • It is very transparent to the art and design areas: there's no need for splitting the track, use of specific graphical tools ...
  • Efficient:
    • Very little memory needed, much less than with polygons or triangles. The amount of memory needed depends on the control point density configured. This density will not affect the continuous smoothness of the terrain, so it is possible for certain titles to have a very low density of control points.
    • Very good performance. The performace remains constant, no matter the circuit size or the control point density.
    • The collision system takes advantage of the predictable movement of the cars through the track, as they use to move “linealy” and continuosly , and the track data is stored organized. It is not efficient for aleatory movements (for instance, if a car is suddenly placed in the middle of a circuit).
    • The data structure and calculations can be reused for many other gameplay needs:
      • barriers.
      • tracking waypoints.
      • race car positions
      • Can be used as a partition space system: collision tests only if you're in the same area, cullings graphics, LODS, optimizations ...
  • Smoothness:
    • It gives us the ground as a continuous curved surface, regardless of the density of control points we use.
    • Smoothing the polygonal terrain, we separate the physics from the graphics. Depending on the control points density that we set, we will have more softness (if less control points) or more fit to the polygonal track (with more control points).

      Setting a density of one control point row each 3-5 meters, the physics will fit quite well to the poligonal track.

      Setting a density of one control point row each 50 meters, the physic track will be super-smoothed and very low memory consuming, the drawback being that you must build (or at least modify) a custom graphical track to avoid graphical-physics differences .
  • We also get the normal and the tangent of the circuit.
Implementation
We built the physics data based on already made graphical track meshes that didn´t have any specific optimization or programming-friendly feature, and we didn´t have the time to reorganize these graphic assets – which was a constraint. There are 2 different phases :

First, a precalculation to make an specific data structure from the graphics. It is done out of the game, and several physic files are generated .

To end, in the game, the data files are loaded and, at real time, the height and normal is calculated for an specific track position.


Real-time calculations
The first step is to calculate where the car is, related to the track control points : lengthwise ( rows ) and widthwise ( column ). For example:
  • lengthwise : the car is 0.2 of row2 and and 0.8 of row3.
  • widthwise : the car is 0.3 of column3 and 0.7 of column4.
It has to be accurate, any approach will produce vibrations in the car movement. It is difficult to make due to the curves and slopes of the circuit.

Calculating the row coordinates of 12 cars consumed 0.41%, and calculating the column coordinates of 12 cars consumed 0.38% of CPU process.

The last step is to get the height and normal of the track at this row and column coordinates.

From the calculations already made (row and column coordinates) we know the 16 control points around, and the distance to the next column and row.

It is time now to get the smooth, continous curved surface from the 16 control points. For this we must use an algorithm for curved surfaces, such as Catmull-Rom.

Given a set of n points, catmull-Rom splines specifies a curve that will pass through all of the control points. For instance, the following function can be used to get the point position of the curve that is between p1 and p2 , and is 0.2 distance of p1 ( so 0.8 of p2 ) :

Point3D CatmullRom(Point3D a, Point3D b, Point3D c, Point3D d, float i) { return a * ((-i + 2) * i - 1) * i * 0.5f + b * (((3 * i - 5) * i) * i + 2) * 0.5f + c * ((-3 * i + 4) * i + 1) * i * 0.5f + d * ((i - 1) * i * i) * 0.5f; } To get the 3D point in the curved surface especified by the 16 control points around us, one option is to do the following : p0= CatmullRom(D0,D1,D2,D3,columnProgress); p1= CatmullRom(C0,C1,C2,C3,columnProgress); p2= CatmullRom(B0,B1,B2,B3,columnProgress); p3= CatmullRom(A0,A1,A2,A3,columnProgress); finalPoint= CatmullRom(p0,p1,p2,p3,rowProgress); Posted Image columnProgress (the column coordinates calculated in the last step), signifies the portion of the distance between the column at the left and the column at the right (normalized, between 0 and 1).

rowProgress (the row coordinates calculated in the last step), signifies the portion of the distance between the row before us and the row in front of us (normalized, between 0 and 1) .

finalPoint is the 3d point coordinates of the especified point projected to the curved surface. With this information we know the height of the point to the curved surface .

This calculation, for 12 cars, obtaining the height, normal and tangent of the circuit consumed 0.73% CPU.


Preprocess calculations
The preprocess calculations are done out of the game. One of the basic things the preprocess has to do is to fill the data structure ctlPoints[NumRows][NumColumns] with the projected position of every control point. This data is stored on disk, and the resulting file can be loaded whenever needed into the game. The projection can be done via raycasting to the graphical, polygonal track.

To know where the control points are placed (before the projection), we need logical waypoints placed along the route. They don't need to be accurate, it doesn't matter the distances between them ... These waypoints can be "dummies" in Max, or Maya ...

These waypoints are used to trace a spline (Catmull-Rom) along the route that will be used as a guide to place the control points.

Throughout the continuous curve generated from the waypoints, every x meters we set a row of control points, with the columns placed width-wise perpendicular to the circuit ( transversal to the spline ) .

For each control point (at every row and column) launch a raycast, and the collision point will fill ptosCtl [NumRows] [NumColumns].


Variations
The proposed terrain system has many possible implementations and variations, all based on its internal data structure designed for circuit tracks ( which is the core of the system ). I will expose here some of the many possible variations for the system.
1. First build the smoothed physical track, and then build (or modify) modify the graphic information to fit it
This way you can set a super-smoothed and super-memory-efficient physics track, for instance a density of one control point row each 50 meters and 3 control points per row. This low control point density will make a very smooth and “rounded” track . 10 kilometers of physical track info can be stored in 3(x,y,z) * sizeof(float) * 3 (control points in a row) * 200 (rows in 10.000 meters) bytes = 1800 * (sizeof float ) bytes. It takes about 8 kb to store 10 km of smooth track!

Once the internal physics data is built, the graphic data should be made or modified modified and its vertex projected to the surface spline.

Another positive point is that the different levels of detail of the graphical tracks fits the same physical information, so the different detail levels are consistent to the car collisions.


2. How to set hard bumps, ramps, obstacles and other discontinuities in such a smoothed environment?
Instead of trying to fit every obstacle into the terrain data, it's a good idea to deal with them as “exceptions”. There can be several obstacles, power-ups ... and the collision detections can be performed in a “more classical” way, testing against its polygons, triangles, raycasting ...

Both systems will work nicely together, filling the gaps.


3. Use the internal data structure for raycasting, forgetting all about splines and curved surfaces.
The control points can be used to make a polygonal track, and then launch raycastings against its triangles.

The structured internal data can be used to choose wich triangles can be discarded, and which ones should be tested.

The calculations done to get the car position (lengthwise and widthwise the track) are performed to find the triangles that are in this same position.

The control points are stored spacially ordered, so it is a simple task to find the closer triangles to a track position .

This implementation doesn't use any spline algorithm between control points, it's a polygonal method, so it needs a high vertex (control points) density to be smooth enough.

This one is definitely an easier implementation.


References
Bicubic interpolation (GDNet Forums)
Bezier Curves and Surfaces
AI Game Programming wisdom I section 9-1 "Representing a racetrack for the AI, by Gari Biasillo

Tweakable Constants

$
0
0
This snippet presents a useful oxymoron. It's just a simple hack, but like the best hacks, it's easy to implement and can save hours of time. This isn't my idea -- I first learned of this technique after posting about a bad experience with .ini files (more on that in a bit). A commenter pointed me to a thread on mollyrocket, and it worked so well I wondered why this simple idea wasn't more well-known. This article is an attempt to publicize this useful technique.


Tweaking == Rapid Iteration
I do a lot of prototyping and weekend programming contests like LD48. I've learned that the key to getting good gameplay is iteration, and the faster you can iterate, the better. Having a value like this might not seem too hard to change: #define TRAVEL_SPEED (10.0f)

Simply recompile, and test it again. Bingo! However, that can take a few minutes even for a small game, and then you need to go through your menus, and play until the point you left off. And when you have several gameplay values that are interacting, this starts to really eat up time. This has led to several common approaches:

  • Debug Mode Menus -- Any reasonably complex game should have a debug mode menu (or console) to allow changing game behavior without restarting. Usually invoked from an uncommon key or button combination (like tilde, or B + START), this allows a way to change gameplay values or modes (such as entering debug drawing mode or no-clip). These modes are often disabled or compiled out entirely in a final build, or left in for modders and tinkerers, but either way they can be vital to the development process.
  • Config Files -- Using a simple config file for gameplay values. A text file or .ini file is easy to change, easy to parse, and allows you to change things without a recompile. By watching the file modification time, you don't even need a restart, your game can automatically reload the values when the file is changed.
For a recent weekend project, I choose to take the latter approach and used a config file. It took a little while to set up but once it was going it was great. I could change a value and see the effect instantly in the running game. The only problem was that it added an extra step to add a new value. My code looked like this:

if (arg_map.count("gameplay.travel_speed")) { m_travelSpeed = arg_map["gameplay.travel_speed"].asFloat(); } I also needed to create a m_travelSpeed member somewhere, be sure to initialize it with some default, and decide what to call it in the config file. Certainly, this is not going to take more than a minute or two, and I'm sure you could come up with a more concise API for getting a value out of an .ini file, but the fact that there is any mental friction at all means that there's a disincentive to use it. For my project, I was very pleased with the tweakable travel speed, but I kept telling myself, "I won't need to change that", and not adding it to the .ini file. In particular, values that would not need to change at all -- like the vertical spacing between buttons on the menu screen -- I resisted adding. After all, wasn't I going to go back and rip that out once I found an acceptable value? After a weekend of work, I still only had three tweakable values in my .ini file.


The Constant Gardener
Enter Tweakable Constants. Here's the idea, in a nutshell: The code itself is the data file. Simply wrap a constant in a macro like this: // Move at constant (tweakable) speed float newPos = oldPos + _TV(5.2f) * dt; // Clear to a solid color glClearColor( _TV( 0.5 ), _TV( 0.2 ), _TV( 0.9 ), 1.0 ); glClear( GL_COLOR_BUFFER_BIT ); // initial monster health Monster *m = new Monster( _TV( 10 ) ); Here, the _TV stands for TweakableValue. Others call these "Hot Values" or something, but the result is the same. I can run my program, change the value in my IDE, and as soon as I save the file the still-running program updates. I can dial in exactly what I want for the value without having to recompile, change my .ini file, or even leave my editor. And unlike changing it in the debugger, I don't have to remember to go back and apply the change to the code. This might seem a tiny savings, but multiplied over the hundreds of values in a reasonably sized project, and thousands of compile/test cycles, it really adds up. Compared to three tweakable values in my .ini file version, I used this 45 times in my next weekend project and saved literally hours of work.

I noticed that I was using it mostly for really insignificant things, such as background colors and button placements, as well as for values which took a little trial and error but didn't need to change, like a near-clip or a good offset distance to prevent z-fighting.


How does this magic work?
It's really pretty simple. The _TV macro expands to a function call like this: #define _TV(Val) _TweakValue( __FILE__, __COUNTER__, Val ) float _TweakValue( const char *file, size_t counter, float origVal ); int _TweakValue( const char *file, size_t counter, int origVal ); void ReloadChangedTweakableValues(); Where _TweakValue is a function that stores a list of files, and their modification times, and the current value for each counter value. _TweakValue just looks up the most recent value, or returns Val unmodified if it hasn't seen that value yet. You also need a function like ReloadChangedTweakableValues, which you call once per frame (or whatever interval you want to check for changes). This function just checks the file modification time for each source file, and if it is more recent than the last time we loaded it, it reloads the values from that file. C++ takes care of the type overloading for you, and if you want to add more types, it's pretty easy (though I'm not really sure why you'd need to do this).

Most people have seen the __FILE__ macro before, it simply expands to the full path to the current source file. The __COUNTER__ macro is a bit newer, it's been available in VC++ since version 6, and in gcc in version 4.3 and higher. The counter macro simply expands to a count of the number of times the compiler has encountered it.

Wait, you mean it actually parses the C++? Well, not really. We can just implement a quick and dirty parser to simply count the number of occurrences of the _TV() macro, and just pull the values themselves out of the parenthesis.

If your compiler doesn't support the __COUNTER__ macro, and you can't upgrade, you can also use the ubiquitous __LINE__ macro, but then you need to either avoid using more than one _TV on a line, or use an additional index. See the mollyrocket forum post for more details on this solution.

Doesn't all of this slow the game to a crawl? In practice, not so much. Since it only has to rescan the source code when there's an actual change, it goes pretty quick, especially if you use a map or a hash to lookup the values.

In release builds, it compiles out to the constant itself, so the compiler has the extra opportunity to optimize and it can be even faster than a .ini file solution where you have a variable in your release build that doesn't actually ever change.

And in case it's not obvious, this is only going to be applicable to PC development, where the game can see the filesystem where the code lives. For an iPhone game, for example, this would only work when running from the simulator. However, many console development environments offer ways for a running game to communicate with the host platform, so there might be a way to shoehorn it in there somewhere.


But Constants are EVIL??!
Okay, we've all had data-driven design drilled into our heads. But often the cure is worse than the disease. If you go too far down the path of configurability, you wind up with some xml-driven abstraction that doesn't actually do anything. Making something configurable is only useful if you're actually going to change it someday. The larger your team is, the less applicable this trick is going to be. If you're a one-man shop writing indie games in your mom's basement (or your yacht -- I'm not judging here), this can be a real gem. Where I found this the most useful so far was in setting up the hacky, hard-coded gui for my games. If you're using gameswf or (God help you) CEGUI or something and your game menus are all in flash or xml then obviously you don't want to use this for any gui tampering.

In general, use common sense. I find that a good rule of thumb is to ask yourself, who will need to change this value?

  • End Users -- Then it better be changeable from a settings GUI screen somewhere. I.e. Screen Resolution.
  • Modders -- A clear, easy to read text file; .ini files work great for this.
  • A level or GUI designer -- Depends on the toolchain, but it should be available wherever they build the gui.
  • A game designer -- Debug menus or your level authoring tools.
  • Just you, the coder -- Go ahead and use TweakVal. :)
Sample Implementation
My sample implementation is available, and you can always find the most up-to-date version here. There are some caveats to be aware of (feel free to send me patches):
  • Wrapping _TV macros in /* C style */ comments or #if 0 blocks will confuse it. // C++ style comments are OK.
  • _TV macros probably won't work in header files.
  • You must call ReloadChangedTweakableValues() once per frame (or however often you want updates)
  • Right now requires compiler support for the __COUNTER__ macro (I've had reports that it's pretty trivial to modify it to use __LINE__ instead).
  • If you're using __COUNTER__ for anything else, you'll need to modify the code to also count those macros.
References
[1] "Watched Constants", Casey Muratori

The Essential Guide to Flash Games: Chapter 2

$
0
0
In the previous chapter, we created a sufficient framework to start making a game. However, our job here is not to be sufficient. You did not buy this book because it was sufficient. If you wanted sufficient, you would have purchased Sufficient Flash Games by Sufficiently Boring Textbook Programmer and his brother. However, you did not. You bought The Essential Guide to Flash Games because you wanted the goods. We will not let you down. This chapter takes the ideas from Chapter 1 and starts to turn them into a reusable framework for making games. We will iterate and reuse this framework for most of the rest of this book. The game framework is the foundation for making the second game. It is an expanded version of the first chapter’s framework with an emphasis on organization and reuse. Since this book is also not called Proper Object-Oriented Design Patterns and Principles for Games, you will see little theory here and mostly practice. Many of these techniques have been hard won and developed over many years of ActionScript programming. We have fought the wars through AS1, AS2, and now AS3, so you don’t have to do it yourself.

While our framework borrows from some design patterns, we feel that games are a very expressive medium. We want you, the reader of this book, to think outside that proverbial, over-used box. While design pattern ideas lend them selves to all manner of application development, we don’t want you to feel hemmed in to using any one set of ideas for creating their games. Our framework gives structure to the overall flow of a game but does not dictate how to code the actual game logic.


Exploring the Framework
The game framework is housed in a reusable package structure. A package structure at its very basic is an organized set of folders that will contain reusable classes. All of the standard class files for using the framwork will be in this package structure. We will update and extend this structure as we proceed through this book. Let’s start by giving you an idea of what classes we will be creating for the framework.
The GameFrameWork.as class
The GameFrameWork.as class is the foundation of the framework. It contains a simple state machine and a basic game loop timer. Our state machine is a simple construct containing a set of state constants to switch the framework between states. States are handled by state functions inside the GameFrameWork.as file. We will employ a variable to reference the current state function. The game timer will use this refernce to call the current state function on each frame tick. We will create states for such things as the title screen, instructions screen, game play, game over, and more. When we create a new game our document class will be an instance of GameFrameWork called Main.as. This Main.as will have an init (short for “initialization”) function that will set up the framework for use. This Main.as class will also act as a sort of message gateway between the game and the framework classes. If you are confused, don’t worry; we’ll be explaining this in greater detail soon.


The FrameWorkStates.as class
This FrameWorkStates.as class will simply contain a set of constant integer values representing the state machine states. When we first create the framework we will have 10 different state constants. All will begin with the STATE_SYSTEM designation. For example, we will have a state that displays the title screen. The state constant for this will be STATE_SYSTEM_TITLE. More states will be added as we progress through the chapters in this book.
The BasicScreen class and SimpleBlitButton helper class
The BasicScreen class will be used to display very simple game state screens. These screens can have a basic background color with transparency (if needed), as well as some text centered on the screen. Each screen can also have a button that needs to be clicked to move to a new state in the state machine. This class is so simple that it will probably never be used without major modification in your own commercial games. We present it here, in its very simple form, for utility purposes. The SimpleBlitButton helper class is used to create a clickable button with rollover and off states. The button is created completely in code with a simple color background for the over and off states to be sed in the BasicScreen class. We do this for simplicity and to demonstrate some Sprite blitting techniques (much more on these later in the book) using a set of BitmapData instances for the background color change of the button on rollover.


The ScoreBoard class and SideBySideScoreElement helper class
The ScoreBoard class displays information for the user during game play. Data such as the current game score, time remaining, and other useful information can be displayed to the user with a very basic look and feel by using this class. It can be used as is, but when you start to make your own commercial games, you might find it useful to extend this class with more functionality. This very basic class is used inside the framework to demonstrate how to use events from a Game instance to update a game score board. The SideBySideScoreElement helper class is used to display a text label and corresponding dynamic text field as a pair side by side on the screen. For example, it can be implemented by the ScoreBoard class to display the word Score followed by the user’s current score.


The Game class
The Game class is a stub style class that all games in the framework will inherit from. It contains the basic variables and functions needed to work with the GameFrameWork class.
The Custom event classes
The framework makes use of events to communicate between classes. The instances of the Game class will use events to communicate with the ScoreBoard and the Main classes. We will create a custom Main.as class for each game. This Main class will be a sub-class (or child) of the GameFrameWork class. Some of the events we will use will be simple events. These are instances of the standard Flash Event class used for basic communication. By this, we mean events that don’t need to send any data along with them. For example, instances of the Game.as framework class will have a constant variable called GAME_OVER. This constant will be used as the name of a simple Event instance that is fired off with the standard dispatchEvent function call. This example GAME_OVER event wil be used to tell the Main.as to move to the game over (STATE_SYSTEM_GAME_OVER) state in the main state loop when the current game has completed. We will also be creating three distinct custom event classes as part of the framework. These will be used to send specific data from the Game class instance to the Main.as (GameFrameWork.as instance) class. The Main.as will act on the data sent and if needed, pass the data to other framework classes. By doing this, we are using Main.as as a sort of message gateway.


The CustomEventButtonId.as class
This custom event will have the ability to pass an identification integer value to the listening function. It is used for cases where multiple buttons share the same listener function. It will be used in the framework (specifically in the GameFrameWork instance, Main.as) to allow BasicScreen instances to each share the same listener functions if they employ a SimpleBlitButton. You will see this when we examine the GameFrameWork class file. It can also be used for any game or application that needs to send a basic integer id along with an Event instance.
The CustomEventLevelScreenUpdate.as class
This custom event will be used by the Game.as class instance to send data to a BasicScreen instance we will create called levelInScreen. The levelInScreen will have the ability to display custom text between each level. The event listnener for this event will change this text with a value passed when the event is fired off. The Main.as (GameFrameWork.as sub-class) will listen for this event and pass the data to the levelInScreen.
The CustomEventScoreBoardUpdate.as class
This custom event will be used by the the Game.as class instance to update the values on the ScoreBoard class instance. The Main.as class will listen to for this event and pass the data on to the ScoreBoard.as class instance.
The framework package structure
We will be organizing all of the code we will create into a package structure. The reusable framework classes will be in one package, and the games we will create will be in a separate package. Let’s to create these two package structures now.
The source folder
Choose a spot on your disk drive of choice, and create a folder called source. This will be the root or base level for all of the code and games we will create in this book.
The classes package
The reusable framework classes will be in a package called classes. Create a folder called classes inside the source folder from the previous step. You should now have a folder structure that looks a little like this: [source lang='plain'] [classes] Next, we will create the actual package that will contain all of the source code for the reusable framework classes. We will name this package com.efg.framework. To create this, you must first create a folder inside the classes folder called com, then a folder called efg inside the com folder, and finally a framework folder inside the efg folder. By the way, the “efg” is an abbreviation for the book title, Essential Flash Games. You should now have a folder structure that looks like this: [source lang='plain'] [classes] [com] [efg] [framework] When we start to create all of the class files necessary for the framework, they will all go into the framework folder. You will see that when we create these classes, the package name will look like this: package com.efg.framework {


The projects package
The second package we will create is called the projects package. You can start this right away by creating a folder inside the root source folder called projects. The projects folder is not going to be a straight package structure like the classes folder. It is organized in a manner to allow individual custom game development using the framework. Inside this projects folder, we are going to create a unique folder for each game in the book. The first game we are going to create is called stubgame. A stub is usually a function or class that contains very little (if any) usable code but is instead a simple placeholder. Our game will be slightly more than a placeholder but not much more. It will be used to demonstrate the basic functionality of the framework. Go ahead and create a folder called stubgame in the projects folder. You should have a projects set of folders that look like this:

[source lang='plain'] [classes] ... [projects] [stubgame] Next, we are going to create two folders, each to hold a different version of our game. Why are we going to do this? This book is meant to support Flash game development with a variety of tools. There are many popular methods to create Flash games with an assortment of tools and code integrated development environments (IDEs). We are going to focus on two such tools in this book: the Flash IDE (the one with the library, timelines, drawing tools, and so on all combined into a single tool) and Flash Develop (a very popular, free IDE made specifically for ActionScript development). You can use any tool with this book, but you will need to follow the documentation specific to your own tool when setting up projects. You will need to pay careful attention to linking the reusable code package structure to your games, because linking may vary depending on the Flash code editor environment you are using. Linking the package to a game is actually a very simple process, but it differs between the various code IDE versions. Jeff does most of his Flash game development Flash Develop using the free Flex SDK that Adobe provides. Steve, on the other-hand, uses the Flash IDE almost exclusively. We have combined our efforts on all of the chapter games to bring you code that will work with both a Flex SDK project and a Flash IDE project.

On that note, the next two folders you will create inside the stubgame folder are called flashIDE and flexSDK. You don’t have to create both for any project. You just need to create the one that works with the tools you are going to use to create Flash games. Each is set up differently, so pay attention to the specifics of the one you will be using the most.

You should now have a projects folder that looks like this:

[projects] [stubgame] [flashIDE] [flexSDK]
The Flash IDE package structure
The Flash IDE package structure begins right inside the flashIDE folder. The package name is very similar to the classes package you saw in the last section. The package structure will be com.efg.games.[game name]. For instance, with the stub game we are going to create in this chapter, the package name will be com.efg.games.stubgame. Go ahead and create those folders now. You should have this package structure when you are complete: [projects] [stubgame] [flashIDE] [com] [efg] [games] [stubgame] [flexSDK]
The Flex SDK package structure
The Flex SDK package structure is very similar to the Flash IDE package structure with one small difference. Flash Develop and other Flex tools use a specific set of folders for organizing their own project structures. To accommodate these and still have a common package structure for our games, we must add the Flash Develop created src folder to the flexSDK folder. You will not have to create the src folder or the package structure by hand, as Flash Develop will create it automatically for you when you start a new project. In the section called “Setting up the game in Flash Develop,” we will go into the details. For now, here is the way the structure will be laid out (including the Flash Develop specific folders such as bin, obj, and lib. If you have used Flash Develop to create a Flex SDK project, you will recognize the following structure: [projects] [stubgame] [flexSDK] [bin] [obj] [lib] [src] [com] [efg] [games] [stubgame] Notice that we have created the exact same package structure inside the src folder as we will use with the Flash IDE. The package name for our game will be com.efg.games.stubgame. The package name in the code for classes in both the Flash IDE and Flex SDK will be the same:

package com.efg.games.stubgame {


The Main.as and StubGame.as files
When we start to add files to the subgame package we will be creating two subclasses (or children) of framework classes that will be unique to our game. The Main.as will be created as a subclass (or child) of GameFrameWork.as framework class. The StubGame.as class will be a subclass (or child) of the Game.as framework class.
Starting a project using the framework packages
You have just seen the basic package structure for both the framework reusable classes and the projects we are going to create. Let’s make use of this right away by creating a project for the stub game. The stub game will be very similar to the Chapter 1 game where the player is tasked with clicking the mouse ten times.
Creating the stub game project in the Flash IDE
Follow these steps to set up stub game using the Flash IDE:
  • Start up your version of Flash. I am using CS3, but this will work exactly the same in CS4 and CS5.
  • Create a .fla file in the /source/projects/stubgame/flashIDE/ folder called stubgame.
  • In the /source/projects/stubgame/flashIDE/ folder, create the following package structure for your game: /com/efg/games/stubgame/
  • Set the frame rate of the Flash movie to 30 FPS. Set the width and height both to 400.
  • Set the document class to com.efg.games.stubgame.Main
  • We have not yet created the Main.as class so you will see a warning. We are going to create this later in this chapter.
  • Add the framework reusable class package to the class path for the .fla file
    • In the publish settings, select [Flash] -> [ActionScript 3 Setting].
    • Click the Browse to Path button and find the /source folder we created earlier for the package structure. Select the classes folder, and click the choose button. Now the com.efg.framework package will be available for use when we begin to create our game. We have not created the framework class files yet, but we will be doing this very shortly.
Creating the stub game project in Flash Develop
And these are the steps to create the same project using Flash Develop:
  • Create a folder inside the [source lang='plain'][projects][stubgame] folder called [flexSDK] (if you have not already done so).
  • Start Flash Develop, and create a new project:
    • Select Flex 3 Project.
    • Give the project the name stubgame.
    • The location should be the /source/projects/stubgame/flexSDK folder.
    • The package should be com.efg.games.stubgame.
    • Do not have Flash Develop create a project folder automatically. Make sure the Create Folder For Project box is unchecked.
    • Click the OK button to create the project.
  • Add the class path to the framework to the project:
    • Go to the [project] -> [properties] -> [classpaths] menu item.
    • Click the add class path button.
    • Find the /source folder we created earlier, and select the classes subfolder.
    • Click the ok button and then the apply button.
You now have the basic structure to start creating projects inside the framework. We are now going to discuss a few topics concerning the structure of the framework classes and then move into building the reusable framework code.

Here are a couple of things to note: For Flex Builder, Flash Builder, or other IDEs, please refer to the documentation provided for that product to create a new project and set the default compile class.

A common method of Flash development is to use the Flash IDE for assets and organization and Flash Develop for code editing. If this is your workflow of choice, you will want to follow the Flash IDE folder and package structure rather than the Flex SDK folder structure.


Creating game timers
There are two basic methods that most Flash developers implement when creating a frame-based game timer. By “frame-based,” we mean a timer that uses the idea of a segment of time broken up into logical slices (or frames) to manage game logic. There are other types of methods for timing game updates, but we will make extensive use of time-slice or frame-based timers in this book. The basic game timer we will use most of the games will attempt to squeeze all processing and screen updates into each segment or frame. We will also explore a time-step timer and a sleep-based timer in chapter 11. The first timer method is the Event.ENTER_FRAME event timer. The standard Event.ENTER_FRAME event handler will attempt to run the game loop at the .swf file’s set frame rate. This very handy game loop timer has been in use for a number of years. The second standard game loop timer method makes use of the Timer class. The Timer class is used to call the game loop at millisecond intervals specified by a delay interval. For example, if the millisecond delay interval is set to 100, the Timer instance would run ten times a second (there are 1,000 milliseconds in a single second). Our framework will begin by using this Timer instance game loop timer. We will do this so we can make use of the TimerEvent.TIMER updateAfterEvent function. As you will see, this function will help smooth out screen updates.


Defining “frame timer tick”
You will see the phrases “frame timer tick,” “timer tick,” and “frame tick” used in this book. When we refer to a “tick” or a “frame tick,” we simply mean one frame’s worth of processing. When we run a game at 30 frames per second, we have 30 ticks or 30 frame ticks. This also means that we only have 33.33 milliseconds (or 1,000/30) inside each tick to do all of our processing.
State Machines
A traditional state machine at its very basic is a mechanism that controls the state, or current actions a system can perform. Sometimes this is called a finite state machine. Finite state machines have traditionally been used to model complex mathematical computations and more recently artificial intelligence. The “finite” in the name refers to the fact that the system can only be in a single state at any one time. Our game framework is built on a simple state machine pattern that employs a separate code function or method for each state. There are many other styles of state machines; some use entire classes for each individual state (sometimes called an object-oriented state machine) and some use a simple switch:case statement block called on each frame tick to control state. We will use a third type that borrows from these two. We call our state machine pattern a function reference pattern. Unlike the object-oriented state machine, our machine will contain a separate method or function for each state inside a single framework class. Each of these state functions will control elements in the framework such as instances of the BasicScreen and Game classes. We will use a switch:case statement to move between states. Unlike the afore mentioned very simple switch/case state machine structures that call this switch/state control structure on each frame tick, we only need to call it when we are switching states. The switch:case we call will simply change the function reference we call on each frame tick. The GameFrameWork.as will contain the state machine that controls overall game flow. This will move our game system between states defined in the FrameWorkStates.as file.

Each individual game package we create will contain a Main.as (in the game’s own package structure) that will extend GameFrameWork.as. We will also create a unique Game.as child class for each game. The Game class children that we create can also employ their own internal state machines based on the function reference pattern when needed.

Richard (Squize) Myles of www.gamingyourway.com was one of the first to offer the idea of a function reference state machine for ActionScript 3 on his well-respected blog.


The FrameWorkStates.as class file
This class file is a simple collection of constants that will define the states for the game framework. They will be consumed by the GameFrameWork.as class file. The following code listing shows the entire code for this file; you will want to create this file according to the package structure in the previous section: package com.efg.framework { /** * ... * @author Jeff and Steve Fulton * */ public class FrameWorkStates { public static const STATE_SYSTEM_WAIT_FOR_CLOSE:int = 0; public static const STATE_SYSTEM_TITLE:int = 1; public static const STATE_SYSTEM_INSTRUCTIONS:int = 2; public static const STATE_SYSTEM_NEW_GAME:int = 3; public static const STATE_SYSTEM_GAME_OVER:int = 4; public static const STATE_SYSTEM_NEW_LEVEL:int = 5; public static const STATE_SYSTEM_LEVEL_IN:int = 6; public static const STATE_SYSTEM_GAME_PLAY:int = 7; public static const STATE_SYSTEM_LEVEL_OUT:int = 8; public static const STATE_SYSTEM_WAIT:int = 9; } } The first thing you should notice about this class is the package name in the first line. It conforms to the file system structure we created earlier. No matter if you are using a version of Flash, Flex Builder, Flash Builder, Flash Develop, TextMate, or even plain old Notepad, this package name will be the same. The package name is not depended on the code development environment but the chosen file structure for organizing the code. Save this file in the location we created previously. /source/classes/com/efg/framework/FrameWorkStates.as


The state variables
The state variables are constants that the game loop state machine will use to move between game states. We have set up the most common basic states in this sample file, but you will be able to create as many as you need. As we progress through the chapters, more will be added as necessary.
  • STATE_SYSTEM_TITLE: This state is used to display a basic title screen with an OK button for the user to click to move on. Once the instructions are on the screen, the state will change to the next state.
  • STATE_SYSTEM_WAIT_FOR_CLOSE: This one waits until the OK button is clicked for any instance of the BasicScreen class.
  • STATE_SYSTEM_INSTRUCTIONS: This state is used to display basic instructions with the same OK button as in the SYSTEM_TITLE state. It also changes to the STATE_SYSTEM_WAIT_FOR_CLOSE state until the OK button is clicked.
  • STATE_SYSTEM_NEW_GAME: This state will call the game logic class and fire off its game.newGame() function. It does not wait but moves on to the NEW_LEVEL state right away.
  • STATE_SYSTEM_NEW_LEVEL: With this state, we can call the game.newLevel() function to set up a new level for the given game.
  • STATE_SYSTEM_LEVEL_IN: This state is used to display some basic information, if needed, for the beginning of a level. In this basic game, we simply display the level screen and wait a few seconds before moving on. The wait is accomplished by changing state to the STATE_SYSTEM_WAIT state for the specified number of frame ticks.
  • STATE_SYSTEM_GAME_PLAY: This one simply calls the game logic class’s runGame function repeatedly and lets the game take care of its own logic and states.
  • STATE_SYSTEM_GAME_OVER: The game over state displays the basic game over screen and waits for the OK button to be clicked before moving back to the instructions screen. It quickly changes state to the STATE_SYSTEM_WAIT_FOR_CLOSE until the OK button is clicked.
  • STATE_SYSTEM_WAIT: This state waits for a specified number of frames and then fires off a simple custom event constant called WAIT_COMPLETE.
The GameFrameWork.as class file
The GameFrameWork.as will be that parent of our game’s document class. Main.as (the game’s document class) for our games will extend this class and call functions to modify the framework for each unique game. The entire code listing is provided at the end of this section. We will explore it in detail once your have had a chance to type in the code. The location for this file in the package structure is /source/classes/com/efg/framework/GameFrameWork.as

The GameFrameWork.as will be the parent class to the Main.as class we will use for our games, and it’s shown in the following listing. In later chapters, we will add some functions to this file and even create one that uses a completely different timer. The Main.as will subclass this class with the extends syntax and override the blank stub init function we are about to create. This class will also contain all of the state functions that coincide with the state variables in the FrameWorkStates class. All of the functions in the GameFrameWork.as are public so all can be overridden by the Main.as if needed. In this way, we can customize the behavior of the state functions if we need to.

For example, in later chapters, we will want to play music on the title screen. The function call to play the music will need to be added to the systemTitle state function. Not all games will need this though, so we will not add it to the GameFrameWork.as file’s systemTitleFunction. Instead, we will create a new version of the function in Main.as to override the one in GameFrameWork.as. The new one will play the sound needed and then call the systemTitle function inside GameFrameWork.as with the super.systemTitle() function call.

Source Listing 1


The class imports
The class import section contains the necessary Flash core classes needed for the Main class. Notice the package name coincides with the package structure we created earlier in the chapter for the framework: package com.efg.framework {

We also must import all of the classes needed for the framework to run. You will see this put to use shortly.


The variable definitions
The variable definition section defines all of the global scope variables for the class. These include all of the variables needed for the state machine, screens, and the game timer. We will make use of constants to define the current state and a set of variables to hold the state information. These have been be defined on the FrameWorkStates.as file we created in the last section. More states can be added to the basic ones, but these will be sufficient for many games that we will create in this book. There are two special states that are used for the system and wait for button clicks or things like animations to complete. These are the STATE_SYSTEM_WAIT_FOR_CLOSE and STATE_SYSTEM_WAIT respectively. We will also make use of a generic function called systemFunction that will hold the current state function to call in our game loop. Combined with this, we use a set of integer variables to hold the value of the current state (currentSystemState), the last state (lastSystemState) and the next state (nextSystemState) for processing purposes. These states should not be confused with an actual game pause function. This will be handled in a different manner and added to the framework in Chapter 11.

If you are using the Flash IDE and have any assets in the library that need to be exported in the first frame, you must extend MovieClip and not Sprite even if you don’t plan to use the main time line for anything else. We have extended MovieClip for the GameFrameWork so it will work with both Flex SDK and Flash IDE projects.


The state control variables
The control variables keep the system functioning within the context of the current state. The main control variable is an instance of the Function class called systemFunction. This function holds a reference to the current function that will be repeatedly called on each frame tick. This saves us from having to evaluate a switch:case statement on each frame to decide which function to call. The function is changed to a new reference by called the switchSystemState() function and passing a new constant that represents the new state. Optimization! switchSystemState() is the first of many optimizations we will make to the game framework. All of these optimizations will make the Flash games run much more efficiently. These efficiencies in the game framework will allow the actual game code to perform more complex operations and still run with a reasonable frame rate. The currentSystemState integer variable holds a number representing the constant of the current state the system is running. The nextSystemState contains the constant integer value for the state to transition to after this state is complete. The lastSystemState variable holds the integer constant of the previous system state. This is used in the rare occurrence that the game loop needs to return to the previous system state. The lastSystemState variable will become useful when we use a shared state such as STATE_SYSTEM_WAIT. The STATE_SYSTEM_LEVEL_IN state will implement a 30-millisecond delay before moving on to the STATE_SYSTEM_GAME_PLAY state. The nextSystemState will be STATE_SYSTEM_WAIT and the lastSystemState will be STATE_SYSTEM_LEVEL_IN. When the 30-millisecond wait time has expired, the waitCompleteListener function will be called. It will use the lastSystemState to determine where the processing was before the wait was started. You’ll see this in detail later in this chapter when we examine the waitCompleteListener function.


The background fill variables
All Flash applications have a background color of some type. No matter what game we are going to be creating, the framework can control this background color. You should never rely on the background color setting in HTML for your Flash application’s background color. This leaves the HTML embed code with control over major aspect of your application. If you are creating a viral game to be placed on game portals, you will lose control of your game’s background color, and it will default to what ever the game portal operators have selected as the standard background color in their embed code. The framework allows you to override the HTML settings here by placing a simple colored Bitmap behind the entire application. We will simply define a BitmapData object called appBackBitmapData and a Bitmap object called appBackBitmap that will be used to place the BitmapData onto the displayList. We will not define the background in the GameFrameWork.as file, but rather the Main.as subclass of the GameFrameWork will set the background if needed in its init function override.


The timer variables
The timer will control the frame rate of the game and help smooth out the display by employing the TimerEvent.updateAfterEvent method. The frameRate variable will be defined in Main.as as the number of frame ticks per second we want our game timer to run. The most important thing to note is that we are making use of the built-in Timer class (gameTimer). We are not using the standard EnterFrame event. This allows us to create our own frame rate for the game and specify it in the frameRate variable. By doing this, we can control game timer tick rate independent of the .swf file’s frame rate (FPS). The .swf file can have a frame rate setting of 25 (for example), but the game can run at a 30 frame ticks a second. To do this, we first set the frameRate to the desired number of frame update ticks we want per second (30). When Main.as calls the startTimer function (described in detail when we get to the section on the init function), the gameTimer is put into action. First, we will calculate the timerPeriod value as 1000 / frameRate. With the updateAfterEvent function call (in the runGame function), we help to smooth out the render of the screen by asking the Flash display engine to update at the rate of the Timer, not the frame rate set in the .swf. So, going back to our example, if the game SWF is set to run at 25 FPS, and the frameRate is set to 30 ticks, the updateAfterEvent will help to smooth out the rendering of the screen by asking the Flash display engine to update at the timer tick rate (30), not the .swf file’s FPS setting (25).

The timerPeriod will be passed into the Timer instance and the game will attempt to run at this rate. We say “attempt” because if the game includes too many on screen moving objects or more logic than can be computed inside the timerPeriod number of milliseconds (or a combination of both), then there will be a noticable slowdown in the game screen updates. In later chapters, we will add functionality to the runGame function to mitigate some of these issues.


The screen definition variables
The screen definition variables create instances of our BasicScreen class. This is a rather simple class that allows a single positional text box and an OK button on the screen. We will use this simple screen for the title, instructions, level, and game over screens. We will customize each screen when we create the init function override in our game’s Main.as class. Note that the levelInText is a special variable. Setting this string to a default value will allow the leveInScreen to display some default text along on each new level. This text can be combined with dynamic text to create a screen that says something like Level 1 with the word “Level” being the default text and the number “1” being the dynamic text. public var titleScreen:BasicScreen; public var gameOverScreen:BasicScreen; public var instructionsScreen:BasicScreen; public var levelInScreen:BasicScreen; public var levelInText:String; public var screenTextFormat:TextFormat; public var screenButtonFormat:TextFormat; We also create two TextFormat objects that will be used for defining the format of the text on the screens and the format of the button text.
The ScoreBoard variables
The scoreBoard instance of the ScoreBoard class will handle a simple heads up display (HUD) for the user with information such as the current score. It is a simple framework class that will be customized in the init function override in each game’s Main.as class. The changes will depend on the game that is to be created. We also define a TextFormatObject for the basic look of the text for our scoreboard text: scoreBoardTextFormat.
The Game object variable
The Game object, represented by the variable simply named game, is an instance of the Game class. The Main.as class’s init function override will inistantiate this. For example, the StubGame.as we will create for the game in this chapter will be a child of the Game.as base class. It will override some of the Game.as base classes and hold the custom logic for the game. //Game is our custom class to hold all logic for the game. private var game:Game;
The wait variables
These variables are used for the simple wait period in the STATE_SYSTEM_WAIT state. waitTime can be set to a different value each time it is used. 30 is the default. We have set the frame rate for our application framework to 30 frames per second, so this would be a one second wait time. 30 frame ticks equals 1 second of time in our game timer if the frame rate is set to 30. waitCount is incremented each frame when a wait is occurring. When waitCount==waitTime, the control moves to the next state. //waitTime is used in conjunction with the STATE_SYSTEM_WAIT state // it suspends the game and allows animation or other processing to //finish private var waitTime:int = 30; private var waitCount:int=0;
The constructor function definition
The constructor for GameFrameWork.as does not contain any code. It is simply a placeholder. We will subclass GameFrameWork.as to create the unique Main.as for each game. The Main.as constructor will contain code to call the init function override. public function GameFrameWork() {}


The init function definition
The init() function is simply a stub to be overridden by the Main.as subclass of GameFrameWork.as.
The setApplicationBackGround function definition
This function accepts in parameters to create a basic back ground for the game. The width, height, transparency Boolean, and color values for the back ground are passed and used to instantiate the appBackBitmapData and place it on to the display list.
The startTimer function definition
This function will be called by the Main.as subclass inside its init function. It will use the frameRate variable to create the timerPeriod. Since the timerPeriod must be expressed in milliseconds (1,000/1 of a second equals a timerPeriod of 1000 or a single second), we simply divide the frameRate into 1,000 to get the number of times per second that the timer must run. In the case of a frameRate that is set to 30 ticks for example, the timerPeriod would be 33.33.
The runGame function definition
The runGame function is the core of the state machine. Once the systemFunction has been set with the switchSystemState (discussed next) function call, the runGame function will call it repeatedly at the set timerPeriod rate every 33 milliseconds (or so) for or frame rate of 30. public function runGame(e:TimerEvent):void { systemFunction(); e.updateAfterEvent(); } The e.updateAfterEvent() function call tells the Flash player to make an extra screen update after the frame tick is over, rather than waiting for the next system frame update to occur. System frame update events happen based on the SWF’s stage frame rate. If we don’t call e.updateAfterEvent here, the screen would not be updated until an actual system frame update event occurs. By using this, we smooth out the look of the screen updates to coincide with out selected gameTimer delay value.
The switchSystemState function definition
While the runGame function is the core of the timer, the switchSystemState() function is the core of the simplified state machine. It is passed a constant value for the state. Using that value, it switches the systemFunction reference accordingly. The switchSystemState function is used to change the current systemFunction of the timer for the next frame timer tick. A reference to one of the state constants is passed into the function, and it acts on it to change the systemState variable. It also changes the lastSystemState and nextSystemState variables. As a refresher, here are the constants from the variable definition section of this FrameWorkStates.as class:

public static const STATE_SYSTEM_WAIT_FOR_CLOSE:int = 0; public static const STATE_SYSTEM_TITLE:int = 1; public static const STATE_SYSTEM_INSTRUCTIONS:int = 2; public static const STATE_SYSTEM_NEW_GAME:int = 3; public static const STATE_SYSTEM_GAME_OVER:int = 4; public static const STATE_SYSTEM_NEW_LEVEL:int = 5; public static const STATE_SYSTEM_LEVEL_IN:int = 6; public static const STATE_SYSTEM_GAME_PLAY:int = 7; public static const STATE_SYSTEM_LEVEL_OUT:int = 8; public static const STATE_SYSTEM_WAIT:int = 9; We first set lastSystemState = currentSystemState, so we can have a reference if needed to switch back to previous state. This might occur in circumstances where we need to jump to the STATE_SYSTEM_WAIT state for a period of time and then jump back to the state we were in before the wait. The systemLevelIn function is a good example of this. Once we get to the systemLevelIn function, we want to wait a specified number of milliseconds before removing the levelInScreen from the display. Once the wait is over, the WAIT_COMPLETE event is fired off. The waitCompleteListener function will need to know what the previous systemState was before the wait so it can determine what to do next. We then set currentSystemState = stateval. The stateval was passed when we called the switchSytemState function. This forces the switch/case statement to set the current systemFunction to the function we want to repeatedly call in our loop. We will now start with the first function state the loop calls, the systemTitle function.


The systemTitle function definition
The systemTitle function sets up the display of the title screen and then jumps to a common state used for all button clicks that close the BasicScreen windows STATE_SYSTEM_WAIT_FOR_CLOSE We have not looked at the set of functions that control the STATE_SYSTEM_TITLE, STATE_SYSTEM_INSTRUCTIONS, SYSTEM_LEVEL_IN, and STATE_SYSTEM_GAME_OVER states in detail yet, so let’s do that now. There are two basic screen types represented:

  • Those that wait for a click of the OK button: titleScreen, instructionsScreen, and gameOverScreen
  • Those that wait a predefined time to display the screen before moving on: levenInScreen
First, we add an event listener to listen for the OK button clicked event to call the okButtonClickListener function that is shared among all of the screens. After that, we switch the systemState to the constant STATE_SYSTEM_WAIT_FOR_CLOSE. We then set the nextSystemState to be called after okButtonClickListener is fired off. This the first use for one of the three custom event classes we will create:

titleScreen.addEventListener(CustomEventButtonId.BUTTON_ID, okButtonClickListener,false, 0, true);

All of the BasicScreen instances share the same okButtonClickListener function. The custom event passes the id value of the BasicScreen instance to this listening function. The id value is used to determine which screen the button was on and then moves the state machine to a new state based on this evaluation.

The systemTitle, systemInstructions, and systemGameOver functions all look very similar. We’ll take a look at those in a bit. First, let’s examine the waitForclose and okButtonClickListener functions.


The systemWaitForClose function definition
The systemWaitForClose() function is associated with the STATE_SYSTEM_WAIT_FOR_CLOSE state. It simply does nothing until the OK button on a screen is clicked. This is the simplest function that you will encounter in this book. It does absolutely nothing! It is just a placeholder that the game loop can call while waiting for the OK button to be clicked.


The okButtonClickListener function definition
The okButtonClickListener function is used to determine what to do when an OK button on one of the various BasicScreen instances is clicked. It switches to the nextSystemState when complete. This “listener” function is only fired off when it receives a CustomEventButtonId.BUTTON_ID event.

No matter which OK button was clicked (on any of the three screens that we will define with them), we remove the event listener before we change state. Even though the same listener is used for both the title and the instructions screens (for example), and we remove it from the title screen before adding it again in the systemInstructions function. We do this to be sure we never have extra listeners hanging around. Unused listeners waste memory and can slow down processing. This function shows how we can share a single listener for the OK button click on three different screens (title, instructions, and game over). We switch on the id value passed from CUSTOMEVENT_OK_CLICKED.

No matter which screen we were on, the last line of the function calls the switchSystemState function and passes in the nextSystemState variable.


The systemInstructions function definition
The systemInstructions function is used to display the instructions screen to the user. It is associated with the STATE_SYSTEM_INSTRUCTIONS state. It is called a single time and then processing is passed to the STATE_SYSYEM_WAIT_FOR_CLOSE state. The systemInstructions function is very similar to the systemTitle function. In fact, they are almost identical with a few minor changes. We first add the systemInstructionsScreen to the displayList with an addChild call.

We also setup a listener for the same CustomEvent that the titleScreen used and we switch to the STATE_SYSTEM_WAIT_FOR_CLOSE state. Again, this state does nothing but let the system wait for the CustomEventButtonId.BUTTON_ID on an instance of the BasicScreen class. Finally, we switch to the STATE_SYSYEM_WAIT_FOR_CLOSE on to wait for the OK button to be clicked. We also set the nextSystemState to be evaluated and used once the OK button is clicked.


The systemGameOver function definition
The systemGameOver function displays the gameOverScreen. It is associated with the STATE_SYSTEM_GAMEOVER state and waits for the OK button click shared with the other BasicScreen instances. We take a look at the systemGameover function now, because it uses the BasicScreen instance gameOverScreen in a similar manner as the titleScreen and instructionsScreen instances. The systemGameOver state is set in Main when the Game class instance sends out the simple custom event called GAME_OVER. In the next section, we will see the Main class set up to listen for this event from the Game class.

The sytemGameOver function follows the exact same format as the systemTitle and systemInstructions functions. There is one difference though: it takes care of removing the Game class instance, game, from the display list with a call to the removeChild function.


The systemNewGame function definition
The systemNewGame function is associated with the STATE_SYSTEM_NEW_GAME state. It is called one time and then moves on to the STATE_SYSTEM_NEW_LEVEL state. Its purpose is to add all of the event listeners for communication between the Game class and some other framework classes (such as the ScoreBoard class). It also calls the game.newGame function to allow the Game instance to do its own internal new game related processing. When setting up a new game, we first add our Game class instance (game) to the display list with the addChild function call. This will display the Game.as Sprite (or MovieClip) on the screen. Next, we set up some basic communication between the Game.as and the Main.as classes. We do this by creating four event lsteners. The first two we set up are custom event class instances (classes we will discuss in detail later in the chapter).

The CustomeEventLevelScreenUpdate class allows the passing of a text String instance with the event. The String is used in the Game class to pass the level number (or any text) back to the Main.as class. The Main.as class updates the levelInString variable with the passed in text. We will see this listener function shortly.

The CustomEventScoreBoardUpdate class is used to update the ScoreBoard (another class we will discuss later in this chapter). This event passes data back to the scoreBoadUpdateListener indicating which field on the ScoreBoard to update and what the new value will be. For example: If we wanted to update the player’s score, we would pass back the name of the score field (probably “score”) and the value of the player’s score (example, 5000).

We also create two simple event constants called GAME_OVER and NEW_LEVEL. These will not pass any data back to the listening functions so they will be fired by passing the GAME_OVER or NEW_LEVEL constant into the dispatchEvent function. We do not need custom classes for these types of events.


The systemNewLevel function definition
The systemNewLevel function is associated with the STATE_SYSTEM_NEW_LEVEL state. Its purpose is to call the game.newLevel function and allow the game to start its own internal new level processing. The systemNewLevel function doesn’t do much inside Main. It is merely there to call the Game classes’ newLevel function. This function will be demonstrated when we get to the simple stub game example. It is used to initialize variables and difficulty for the new level. When it is complete, it switches the system state to STATE_SYSTEM_LEVEL_IN.


The systemLevelIn function definition
The systemLevelIn() function is associated with the STATE_SYSTEM_LEVEL_IN state. It displays a new level message for 30 frame ticks and then moves processing on to the STATE_SYSTEM_GAME_PLAY state. Using systemLevelIn is by no means the only method of forcing the state machine to wait. There are a number of third party custom classes and tools such as TweenMax that can be used for the synchronization of clips and tweens between screens and states. We have added this simple wait state to the state machine for it to be complete framework. The state machine is designed to be easily updated with new states and system functions. Feel free to implement any custom or third-party library or tools that will make your job easier.

The systemLevelIn function is used to allow the developer to display some sort of special text or animation as a precursor to each game level. It employs the use of the STATE_SYSTEM_WAIT state. It is set right after the levelInScreen is added to the display list. The levelInScreen is a BasicScreen instance that does not use the OK button. Instead, it simply waits for the specified waitTime (30 frame ticks in this example) and then fires off the WAIT_COMPLETE simple custom event. The Main class listens for this event and calls the associated listener function. The text on this screen is a combination of the levelInText variable we created in the variable definition section and text passed through the CustomeEventLevelScreenUpdate event. The levelIntext can be set in the init function override of the Main.as (GameFrameWork.as child class). It will be combined with the text passed from the event to create the text on the levelInScreen. We will examine the listener function that does this shortly.


The systemWait function definition
The levelInscreen is very similar to the instructionsScreen, but instead of using the STATE_SYSTEM_WAIT_FOR_CLOSE state, it uses the STATE_SYSTEM_WAIT state. What’s the difference? The STATE_SYSTEM_WAIT state calls a function that counts for a specified number of frame ticks before moving on to the nextSystemFunction rather than waiting for the click of the OK button. When the systemState is switched to the STATE_SYSTEM_WAIT state, it calls the systemWait function repeatedly (on each frame tick) until the waitCount is greater than the waitTime set in the systemLevelIn function. When the waitCount is reached, we dispatch a WAIT_COMPLETE event that calls the waitCompleteListener (see the next section). Currently, there is only one systemState that uses the systemWait function, so there is only one item in the case statement. We could add many states that use this systemWait function though, so we have it set up for later expansion. The waitCompleteListener function definition The waitCompleteListener function is triggered when the WAIT_COMPLETE event is fired off from the levelInScreen. It can be used for more screens by updating the switch:case statement.

Once the waitCompleteListener fires off, it switches on the lastSystemState because the currentSystemState is now the STATE_SYSTEM_WAIT. This allows us to share a single listener function for all uses of the WAIT_COMPLETE event. It then switches state to the nextSystemState when it calls switchSystemState(nextSystemState). In this example, the nextSystemState is systemGameplay.


The systemGameplay() function definition
The systemGameplay function is the heart of the gameTimer. It is associated with the STATE_SYSTEM_GAME_PLAY state. The game.runGame function is called on each frame tick when systemGamePlay is the systemFunction reference. The Game class instance (game) will handle all of the game’s processing within the game.runGame function. private function systemGameplay():void { game.runGame(); }
The custom event listener functions
The last four functions inside GameFrameWork.as are listener functions for simple and complex custom events that are needed by the Game instance class to communicate with Main class, as well as the levelInScreen and scoreBoard class instances. We’ll briefly explain each here so you have a complete version of all the Main.as code in one place. Their use inside those classes will be examined later as we go through the Game->ScoreBoard, and CustomEvent classes.
The scoreBoardUpdateListener function definition for Main.as
The scoreBoardUpdateListener receives updates from the Game class instance that are passed to the ScoreBoard through a CustomEventScoreBoardUpdate instance. The scoreBoardUpdateListener passes data, represented by a simple key/value pair of String object class instances to the ScoreBoard class instance. The element variable will contain a string value representing a constant that we will define in the Main.as (GameFrameWork.as child class). The constant will be the id string name of the element on the scoreBoard to update. The value variable passed will be a string representing the value to show on the scoreBoard for the corresponding TextField. It’s constructed to allow the Game class instance and its associated classes to update the ScoreBoard class instance without having to maintain a reference to it. This allows the Game and its associated classes to remain decoupled from the Main.as and the basic framework classes. We will see the same thing with the levelInScreen a little later. Why is the ScoreBoard part of the framework and not part of the Game class? We wanted to have the ScoreBoard be part of the Main class game framework because the Game class instance is not the only object that might interact with the ScoreBoard. We do not implement it in this simple example, but the Main might have other data such as a system-held high score, links out, or even a frame counter in the ScoreBoard.

Why decouple the scoreboard from the game class instance? It is true that we could make calls directly to the ScoreBoard from Game by using the root or parent attribute of the Game class. While this is certainly possible, if we decouple the Game class from the ScoreBoard class, then the Game class will be reusable across multiple frameworks (even your own) with no need to use our framework. The new framework would just need its own ScoreBoard or the Game would need to implement its own.


The levelScreenUpdateListener function definition for Main.as
The levelScreenUpdateListener allows the Game class to update the text on the levelInScreen. Like the scoreBoardUpdateListener, the levelScreenUpdateListener function is used to pass data from the Game class instance to the levelInScreen. When the Game class updates the level value using its own newLevel function, the levelInScreen must also update its text so the correct level number will be shown on the screen during the systemLevelIn function. The predefined default String variable, levelIntext will be combined with the passed in value:

levelInScreen.setDisplayText(levelInText + e.text);


The gameOverListener function definition for Main.as
The gameOverListener listens for the Game.GAME_OVER simple custom event and then changes the framework state accordingly. When the Game class instance fires off the GAME_OVER simple custom event, the Main listens for it and runs this function. It cleans up all of the game-related listeners by removing them and then changes state to the STATE_SYSTEM_GAME_OVER state which was discussed earlier


The newLevelListener function definition for Main.as
The newLevelListener listens for the Game.NEW_LEVEL simple custom event and changes the state accordingly. The newLevelListener listens for the Game class instance to fire off the simple custom event, NEW_LEVEL. It then changes the systemState to the STATE_SYSTEM_NEW_LEVEL state.


Framework classes beyond Main
The framework does not rely on FrameWorkStates and the GameFrameWork classes alone. We are now going to define and explain the classes that make up the BasicScreen (and its helper classes), ScoreBoard, and the custom event classes. We have discussed all each of these briefly in the GameFrameWork.as class description. Now, we take a look at each in greater detail.
The BasicScreen class
All of the simple screens in this basic game framework are created using a very simplified BasicScreen class. The BasicScreen class can become a parent class for more elaborate screens, but in the basic framework, it is very simple. Each screen contains some text positioned on the screen, an OK button if needed and a background color. That is all. If the OK button is needed, there is an event inside the BasicScreen class that is fired off, and it, in turn, fires off its own event to tell GameFrameWork class that it has been clicked. This makes use of a custom event class instance (okButtonClickListener) that we will create in the next section. You should save this class file in the folder structure we created earlier in the chapter to correspond to the framework package.

/source/classes/com/efg/framework/BasicScreen.as

Here is entire code listing for this class.


Class import and variable definition section for BasicScreen
The class import section imports the necessary core Flash classes we will see in action shortly. The one custom class the BasicScreen class makes use of is the CustomEventButtonId class. We will dissect this class in detail later in the chapter, but for now, know that we dispatch an instance of it if the OK button is clicked on any of the instances of this BasicScreen.

The variable definition section of the BasicScreen class creates variables to hold data for the three optional pieces of the BasicScreen:

  • The background color BackGroundBitmapData, which is associated BackGroundBimap
  • The text to display on the screen, displayText
  • The button that will fire off the CustomEventButtonId when clicked, which is an instance of another framework custom class we will create called SimpleBlitButton
All three of these optional items are set with public functions inside the BasicScreen class. The Main.as class we create for each unique game will customize the BasicScreen instances by passing values to these public functions inside its init function override of the GameFrameWork’s init function. One of the most interesting things about this BasicScreen class is the way we are creating this background for the OK button. We decided not to import or embed any external assets for this first game, because it would necessitate explaining how to do it in both the Flash IDE and Flash Develop (with the open source Flex SDK), and it’s too early in this book for that discussion. Instead, we have created a very simple custom button class called SimpleBlitButton. The instance name for this button is okButton. We will discuss this class in detail in the SimpleBlitButton class deinition.

The final variable we need is the id integer. This is passed into the BasicScreen instance from Main. It is used in the switch:case inside the GameFrameWork classes’ okButtonClickListener function to change state based on the screen whose OK button was clicked.


Class constructor function definition
The constructor for the BasicScreen class accepts in the basic information needed to set up a screen for display. A screen needs an id value passed in as an integer, as well as the information needed to create the background color for the screen. This is done by passing values needed to customize the backGroundBitmapData variable that was created in the variable definition section. A BitmapData instance needs these four pieces of data passed:
  • A width
  • A height
  • A Boolean (true/false) value to indicate whether or not the BitmapData will use transparency
  • A color represented as an unsigned integer (uint).
A completely transparent background can be set for a screen by passing in true for the isTransparent parameter and a 32-bit color value with an alpha channel set to 00. Colors are represented as AARRBBGG where the alpha (AA) values ranging from 0x00 (0) (completely transparent) to 0xFF (255) (completely opaque) can be passed in. The init function is used to set up the field for the display text (displayText) and the OK button (okButtonSprite). The OK button is added only if the passed in okNeeded is set to true.

The first actual line of code might be a little cryptic:

textformat1.align = flash.text.textFormayAlign.CENTER

When we set up the textFormat1 variable, we didn’t set the alignment to center because not all uses of it will be centered. We can change the alignment on the fly, and we do so here before we apply it to the displayText field as its defaultTextFormat. Then, we simply add the text to the screen. In the first init call, there is no text to actually add to the screen. It is added with the setDisplytext function described next. The setDisplayText function is public and is called by the Main class when the BasicScreen instances (title, instruction, game over, and so on) are placed on the display list. This allows the text for the screen to be customized for each showing.


The createDisplayText function definition
By calling the createDisplayText function on a BasicScreen instance, we can turn on a

The Game Maker

$
0
0
So here we are, about to embark on another journey into the world of game development. You may have joined us last time in The Game Maker’s Apprentice: Game Development for Beginners (Apress, 2006), or perhaps you taught yourself the basics of Game Maker under your own steam. Either way, we invite you to dust off your trusty keyboard and loosen up your mouse-arm as you join us in The Game Maker’s Companion.

The path ahead is an exciting one and we have a host of new challenges in store to enhance your skills as a game developer. Nonetheless, it would be foolish to undertake such a journey without making suitable preparations first. Each of you will bring your own unique skills to the journey ahead, but you won’t get very far without some level of background knowledge. This chapter will equip you with that knowledge, so please make sure you are familiar with it before continuing. The majority of this information was covered in our first book, so this chapter simply summarizes the important facts as a reminder. It won’t take long to cover the essentials, so let’s make a start. This chapter will also serve as a handy reference if you need to check back on something later on in the book.


Resources
Video games are made up of different kinds of digital resources such as animations, sounds, music, and backgrounds. Game Maker lists all of its resources down the left-hand side of the main window (see Figure 1–1). These are grouped together into folders according to the different kinds of resources that Game Maker supports. You don’t need to know every detail of every kind of resource, but you should be generally aware of what each type of resource is for.

  • Sprites: Sprite resources are the digital images that you use to represent foreground objects in your games. Game Maker supports loading sprite images from .bmp, .jpg, and .gif file formats and now in Game Maker 8, .png and .gmspr as well. You can load animated images using the .gif and .gmspr formats, or by treating .png files as sequential strips of images by using _stripXX at the end of the file name (where XX = the number of frames in the image).
  • Sounds: Sound resources include both sound effects and music for your games. Game Maker supports .wav, .mid (MIDI), and .mp3 formats, but .mp3 music can take up a lot of space and often contributes to the large size of finished games.
  • Backgrounds: Background resources are digital images that you use to represent the background scene of your game. Backgrounds can only contain single images and Game Maker can load these images from .bmp, .jpg, .gif, and .png formats.
  • Paths: Path resources contain a series of points that define a route for object resources to follow in the game. These can be either closed looping paths or open paths with a start and finish point.
  • Scripts: Script resources contain programming instructions written in Game Maker Language (GML). GML provides a more advanced way of programming in Game Maker.
  • Fonts: Font resources provide a means of displaying text in your game using the fonts installed on your machine. Game Maker grabs images of each character in your chosen font so that the player doesn’t need to have the same font installed on their machine.
  • Timelines: Timeline resources provide a way of triggering many different actions at specific points of time in your game (see Objects for more on actions).
  • Objects: Object resources are the most important of all the resource types in Game Maker as they are used to represent all of the active components of your game. Objects can respond to events in the game by following a series of actions that you add to the event. In this way, you can program the desired behavior for all the different components of your game.
  • Rooms: Room resources provide spaces for staging all the visible aspects of your game (levels, menus, cut scenes, and so forth) and contain all sorts of settings relating to backgrounds, views, and the game window. It also provides an editor for placing instances of objects into your rooms to determine their starting positions.
Posted Image
Figure 1–1. The main Game Maker interface with the resource list on the left


Instances and Objects
Objects are the programmable elements of your game and their behavior is directly determined by the events and actions that you choose to give them. However, there is an important distinction to be made between the object resources, which define the general behavior of objects, and the individual object instances, which occupy your game world. Once you have defined the behavior of an object resource, then you can place any number of instances of that object in your game. All these instances will behave in the same way (because they follow the same events and actions), but each has its own variables (position, speed, direction, and so forth) that are unique to that instance. If you like, you can think of object resources as being like jelly molds, and instances as the jellies you make with them. You only need one mold to make any number of jellies that have the same basic structure (see Figure 1–2).

Posted Image
Figure 1–2. Object resources are like jelly molds and you can use them to create any number of object instances


Variables
A variable is a general programming term for something that can store information. In Game Maker, variables can either store a number (for example, 3, -12, 151.33) or some text (for example, demons don’t like dragons). You use variables in Game Maker to store all the unique information about individual instances, such as their position on the screen, or their speed. So if you create a new power variable in the Create event of a dragon object, then every dragon object will have this variable, but each instance can have its own different value for power. It’s also worth noting that you must assign variables a value (using a Set Variable action, for example) before you can use them (with a Test Variable action); otherwise, Game Maker will produce an error.


Local Instance Variables
Game Maker uses a number of predefined variables for storing standard information about each instance in the game. All of the following variables either directly or indirectly affect the position of an instance in the room:

  • x and y provide the current position of the instance in the room.
  • xstart and ystart provide the starting position of the instance in the room.
  • xprevious and yprevious provide the room position of the instance in the previous step.
  • hspeed is the horizontal speed of the instance (in pixels per step).
  • vspeed is the vertical speed of the instance (in pixels per step).
  • direction is the instance’s current direction of motion in degrees (360 degrees of rotation in an anticlockwise direction; 0 degrees is horizontally to the right).
  • speed is the instance’s current speed in the current direction.
  • friction is the amount of friction reducing the speed of the instance (in pixels per step).
  • gravity_direction is the current direction of influence for gravity (defaults to 270 = downwards).
  • gravity is the amount of gravity that pulls the speed of the instance in gravity_direction every step (in pixels per step).
The following variables are also predefined for each instance and affect the appearance or collision of the instance in some way:
  • sprite_index is the sprite displayed for the instance.
  • image_index is the current index into the images of an animated sprite displayed for the instance.
  • image_speed is the animation speed of an animated sprite (in subimages per step). This is typically set to a value between 1 (normal forward speed) and -1 (normal backwards speed).
  • mask_index is the sprite used for collision detection (usually set to -1, which makes themask_index the same as the sprite_index).
  • depth is used to control the order in which instances are drawn on the screen. Highest depth values are drawn first and so appear behind those with lower values.
  • image_xscale is a scaling value applied to the width of the sprite, where a value of 1.0 is 100% of the original width (normal size).
  • image_yscale is a scaling value applied to the height of the sprite, where a value of 1.0 is 100% of the original height (normal size).
  • image_angle is a rotation angle (0-360) applied to the sprite, where a value of 0 is no rotation. You can only change this variable in the registered, Pro version of Game Maker 8.
  • image_alpha is the opacity of the sprite (how difficult it is to see through it), which can range from a value of 1.0 for fully opaque (unable to see through it at all) to a value of 0.0 for fully-transparent (invisible).
  • image_blend is a color applied to the sprite when it is drawn. It is set to c_white by default, and using different values will change the color of the sprite when it is drawn. You can only change this variable in the registered, Pro version of Game Maker 8.
  • visible determines whether the object is visible or invisible (true or false).
  • solid determines whether the object is treated as solid in collisions (true or false).
  • persistent determines whether the object will continue to exist in the next room, or whether it remains part of the room in which it was originally created (true or false).

Note The constants true and false correspond to the values 1 and 0, respectively.

These two variables hold information about the identity of the instance:

  • id is a unique identifying number that distinguishes the current instance from any other.
  • object_index is the index of the object resource that the current instance is an instance of.
There are also a number of other variables that you cannot change, but are maintained internally by Game Maker for each instance depending on the current sprite. So you can check to see what values these variables hold (using a Test Variable action, for example), but you cannot change them (using a Set Variable action):
  • sprite_width is the width of the current sprite displayed for the instance.
  • sprite_height is the height of the current sprite displayed for the instance.
  • sprite_xoffset is the x position of the origin within the sprite.
  • sprite_yoffset is the y position of the origin within the sprite.
  • image_number is the number of images in the current sprite.
  • bbox_left is the x coordinate of the left edge of the sprite’s bounding box in the room.
  • bbox_right is the x coordinate of the right edge of the sprite’s bounding box in the room.
  • bbox_top is the y coordinate of the top edge of the sprite’s bounding box in the room.
  • bbox_bottom is the y coordinate of the bottom edge of the sprite’s bounding box in the room.
Variables in Other Instances
You usually refer to an instance’s variables within its own actions by entering their names in their basic form, as provided previously. Using actions to set or test an instance’s variables in this way will only affect the instance concerned (hence, they are local to the instance). However, you can also refer to variables in other instances by using an object name followed by a dot (period/full- stop) and then the variable name (for example, obj_dragon.x). Used within a Test Variable action, this would retrieve the x position of the first instance of obj_dragon that was placed in the room (disregarding any other instances of obj_dragon). However, used within a Set Variable action, it would change the x position of all the instances of obj_dragon in the game—so be careful.

Game Maker also includes a number of special object names that you can use to refer to different objects in the game:

  • other is an object that is used to refer to the other instance involved in a collision event. So other.x is the x position of the other object involved in a collision.
  • all is an object that refers to all instances, so setting all.visible to 0 would make all instances of all objects invisible.
  • global is an object used to refer to global variables that you create yourself.
Global Variables
You can also create global variables, which are common to all objects and instances in the game. These are useful for storing values that relate to the overall state of the game, such as the current player’s name, or time playing the game. When you use a global variable of your own, you need to put the word global and a period (full-stop) in front of the variable name (for example, global.player_name). If you leave off the global part, then Game Maker will automatically assume you are referring to a local variable instead. However, there are also a number of built-in global variables that do not require the use of the global object to access them. This can cause problems if you try and create local variables with the same name, so it’s best to be aware of these so that you can choose different names:

  • score is the global score value (as used by the actions on the score tab).
  • lives is the global lives value (as used by the actions on the score tab).
  • health is the global health value (as used by the actions on the score tab).
  • mouse_x is the current x position of the mouse cursor in the room.
  • mouse_y is the current y position of the mouse cursor in the room.
  • room_caption is the caption shown in the window title bar.
  • room_width is the width of the current room in pixels.
  • room_height is the height of the current room in pixels.
Coordinates and Angles
If you want to position something in your room using actions (rather than the Room Editor), then you need to consider how Game Maker’s coordinate system works. Traditionally, coordinates on computer screens are calculated slightly differently from how they are taught in school. As you might expect, the x-axis starts on the left-hand side of the screen with a value of zero and increases as you move horzontally to the right. However, the y-axis starts at the top of the screen with a value of zero and increases as you move vertically down (see Figure 1–3). This means that the origin of each room (x=0,y=0) is in the top left, rather than the bottom left and the y-axis is probably the other way from how you might have expected as well. Nonetheless, so long as you can remember that an increase in y moves something down the screen, then you won’t go too far wrong.

Posted Image
Figure 1–3. The screen coordinate system used in Game Maker, illustrated for a standard 640x480 room

Similarly, angles in Game Maker may not work in the way you expect, either. Angles can range from 0-360 degrees as normal, but an angle of 0 degrees represents a direction that points horizontally to the right. Game Maker angles also increase anti-clockwise, so 90 degrees points vertically upwards, 180 degrees points to the left, and 270 degrees points vertically downwards (see Figure 1–4). This can take a bit of getting used to, so it may be worth copying this diagram and sticking it to your monitor until you’re completely comfortable with it.

Posted Image
Figure 1–4. The angle system used in Game Maker


Transparency
One area that changed significantly in Game Maker 8 is the way that transparency works for sprites. Previous versions of Game Maker have only allowed one color to be transparent for each sprite, which meant that the pixels of sprites were either fully transparent or fully opaque (that is, nothing can be seen through it). This allowed simple punch-through transparency, where a single background color within the sprite is not drawn (see Figure 1–5). However, the edges of sprites could often seem quite harsh and jagged using this method—particularly when there was a large contrast in color between the sprites and the background behind them (see Figure 1–6, left).

Fortunately, Game Maker 8 supports a more advanced kind of transparency by which every pixel in a sprite can have its own level of opacity from 0 (fully transparent) to 255 (fully opaque). Opaque just means the opposite of transparent, so this value represents how hard it is to see through something. A low value means that it is easy to see through it (with a value of zero being invisible), and a high value means that it is hard to see through it (with a value of 255 being unable to see through it at all). A more general term for this measure in computer graphics is alpha, but you will come across both the terms opacity and alpha in Game Maker.

Posted Image
Figure 1–5. A sprite displayed in front of a background with and without punch-through transparency

Posted Image
Figure 1–6. The jagged edges produced by punch-through transparency (left) compared to the smoother edges produced by alpha transparency (right)

Figure 1–6 (above) shows how this new alpha transparency can improve the look of your sprites when they appear against contrasting backgrounds. Only two of the file types supported by Game Maker can include transparency in this way. PNG files (.png) support alpha transparency, and you can create them in many different graphics packages, but you need to use animation strips (using _stripXX at the end of the file name) to support multiple frames of animation. This is the most common format we use in this book, but Game Maker 8 includes a new sprite format (.gmspr) that supports both alpha transparency and animation frames, so we sometimes use that as well. There are plenty more cool effects that you can achieve with this new level of alpha control such as creating shadows and advanced particle effects.

Note Perhaps you’re wondering why many things seem to be measured between such strange values as 0 and 255 in computing rather than 0 to 100 (red, blue, and green components of colors, are another example). The answer has to do with the way that numbers are stored on computers. The numbers 10, 100, 1,000, 10,000, and so forth have significance to us because we use a number system called decimal. Our number system is based on the number 10 (because we have 10 fingers) and each of the numbers above is 10 times the last. However, computers use a number system called binary, which is based on the number 2 (because in electronics, things can either be on or off), so the numbers that are significant to them are 2, 4, 8, 16, 32, 64, 128, 256, and so forth, where each number is 2 times the last.


Congratulations
Fantastic—the necessary preparations have been made, and we’re ready to get started. We’ll begin on easy ground, but there are trickier paths ahead, so make sure you take the opportunity to begin with a sure footing. Each chapter will build upon the challenges of the last, so you can’t afford to take any shortcuts. Anyway, we hope you’re not scared of heights, because that’s the least of your worries when you’re a character in a platform game….

Why AppUp? A Quick Review of the AppUp Model

$
0
0
This is a sponsored post paid for by Intel

Intel launched a beta version of the AppUp Center in January of 2010. We’ve since come out of beta and added many new features. Here's a look back and forward to help you know what to expect with AppUp. Before you read on, though, we’d like to invite you to enroll in our developer program; also, check out our Million Dollar Development Fund and the Intel AppUp developer challenge, which awards cash prizes on a monthly basis.

Why App Stores Matter


The launch of recent smartphone app stores is relevant. Smartphones are a new computing device that require a new service to sell, distribute, and purchase apps for that device. Existing solutions do not suffice. These new phones require a single and convenient gateway to browse and purchase verified applications for that device. With this new app store model you can, at an instant anytime and anywhere, have a need for an, app then within seconds have that app working on your device. No longer do you need to hunt across many websites, using a variety of installers, with disparate reviews and different methods for purchasing the app. There is one standard for distribution, search, browsing, rating, purchasing, and installing applications. This makes it extremely easy and convenient for consumers and developers.

The App Store Gap


Posted Image

However the market is evolving. Devices will continue to come in all flavors, sizes, and shapes. A store per manufacturer, per carrier, or device will again lead to fragmentation. What about when we get apps on our TVs, netbooks, PC-based tablets, and other smart consumer electronics outside of the smartphone model? How do we get those apps as conveniently as we do on our phones? And what if I have apps purchased from my PC, or TV and now I'm the road using a netbook and I want that app? Also, what if you as a developer create a new service or capability that helps deliver solutions for the store and/or developers?

What's missing is a model that allows developers to get their apps and component services into a store framework for distribution across many devices, many manufacturers, and service providers, while also allowing consumers to access apps they may have purchased on other devices.

The AppUp Model


This is where AppUp comes in. AppUp is an app store framework designed to allow developers to submit apps or app components to stores that serve various devices and operating systems, where those apps are sold by various manufacturers, service providers, and retailers. And from a consumer’s perspective. we allow for them to have the AppUp client installed on a multiple systems where their existing purchases are tracked and available for download across compatible systems.

So with AppUp you get all the benefits of an app store, along with the opportunity to distribute and buy apps across manufacturers, service providers and device types.

The Start of AppUp


For Intel, netbooks represent a large existing market of computing devices that lacked apps verified to work well for a netbook. As of 2009, nearly 40 million netbooks had been sold – more than iPhones. And research predicts 150 million netbooks in the market by 2014. Additionally. the AppUp store allows clients to be installed using one account on up to five netbook devices. Thus each of those netbooks has access to all apps purchased under that account.

In terms of development environments, we started with C/C++ and Windows support for our SDK. Again this was a starting place as Netbooks this provided the broadest solution for that community. The SDK for our program has been very lightweight and primarily focused on establishing app initialization and authentication to ensure the app was bought and properly licensed for use on the system running it.

Intel also recognized the need to allow our community to build on the value of the marketplace by creating services and components that will help developers build and sell their apps. With the beta program we created a developer catalog and marketplace within our community. This is already paying dividends for Intel and developers. To date we've seen solutions that are enabling a broader set of apps to get into the store than the SDK alone enables.

Broadening Developer Environments


Beyond C/C++, we have recently announced support for Adobe's AIR runtime and Microsoft .NET. However, these supported languages and runtimes are not the boundaries of app development for AppUp. For Windows apps we have wrappers to be implemented around any language or runtime that Windows can support. Thus, if your app is not written in a language our SDKs support then a wrapper solution allows you to use one of our natively supported languages as a layer in your application for our SDK. Meanwhile, your apps runs in its native environment. The message here is that choice is at the cornerstone of the AppUp model. You can develop apps using the tools, languages, and runtimes that best suit your app needs.

Broadening OS, Device and Storefront Options


Currently, AppUp supports Windows and Moblin aligning with the prevalent OSs for netbook systems, with MeeGo coming soon. MeeGo is a new, full-featured OS that is designed to support netbooks, new smartphones, tablet devices, smart TVs and more. Intel and Nokia announced MeeGo as the next-generation OS that marries the best of Moblin and Maemo operating systems. Shortly after, in May, the netbook version of MeeGo was released. In October, the handset and tablet versions of MeeGo released. Things are moving quickly and we can expect an AppUp client to follow for each of these devices.

Industry and Ecosystem Support


AppUp Center launched as an Intel® store. The model is to partner with manufacturers, services providers, and retailers to extend the reach of the Intel AppUp center. Recently, Intel announced agreements with retailers U.S.-based Best Buy, U.K.-based Dixons, Croma India and netbook manufacturer ASUS, to sell netbooks with Intel AppUp center pre-installed, and available online for download.


Show Me The Money


In the end, none of the above matters much if monetization of apps is not realized. We are working to broaden the number of devices and storefronts for AppUp. We believe the potential to monetize applications is ever increasing with AppUp. We also believe there is a huge opportunity for developers to create and sell solutions that help other developers monetize and distribute applications. Perhaps the best option for developers is to consider the ground-floor opportunity for AppUp as it evolves beyond beta. Those who deliver the early apps and early core services and components will in all likelihood translate to earlier success for those developers.

Sign up Today!


If we’ve piqued your interest, we’d like to once again invite you to enroll in our developer program and also check out our challenge. We also have a great FAQ that can answer most questions, and an excellent community forum that can handle just about everything you can throw at it!

The Game Maker's Companion

$
0
0
So here we are, about to embark on another journey into the world of game development. You may have joined us last time in The Game Maker’s Apprentice: Game Development for Beginners (Apress, 2006), or perhaps you taught yourself the basics of Game Maker under your own steam. Either way, we invite you to dust off your trusty keyboard and loosen up your mouse-arm as you join us in The Game Maker’s Companion.

The path ahead is an exciting one and we have a host of new challenges in store to enhance your skills as a game developer. Nonetheless, it would be foolish to undertake such a journey without making suitable preparations first. Each of you will bring your own unique skills to the journey ahead, but you won’t get very far without some level of background knowledge. This chapter will equip you with that knowledge, so please make sure you are familiar with it before continuing. The majority of this information was covered in our first book, so this chapter simply summarizes the important facts as a reminder. It won’t take long to cover the essentials, so let’s make a start. This chapter will also serve as a handy reference if you need to check back on something later on in the book.

Resources

Video games are made up of different kinds of digital resources such as animations, sounds, music, and backgrounds. Game Maker lists all of its resources down the left-hand side of the main window (see Figure 1–1). These are grouped together into folders according to the different kinds of resources that Game Maker supports. You don’t need to know every detail of every kind of resource, but you should be generally aware of what each type of resource is for.
  • Sprites: Sprite resources are the digital images that you use to represent foreground objects in your games. Game Maker supports loading sprite images from .bmp, .jpg, and .gif file formats and now in Game Maker 8, .png and .gmspr as well. You can load animated images using the .gif and .gmspr formats, or by treating .png files as sequential strips of images by using _stripXX at the end of the file name (where XX = the number of frames in the image).
     
  • Sounds: Sound resources include both sound effects and music for your games. Game Maker supports .wav, .mid (MIDI), and .mp3 formats, but .mp3 music can take up a lot of space and often contributes to the large size of finished games.
     
  • Backgrounds: Background resources are digital images that you use to represent the background scene of your game. Backgrounds can only contain single images and Game Maker can load these images from .bmp, .jpg, .gif, and .png formats.
     
  • Paths: Path resources contain a series of points that define a route for object resources to follow in the game. These can be either closed looping paths or open paths with a start and finish point.
     
  • Scripts: Script resources contain programming instructions written in Game Maker Language (GML). GML provides a more advanced way of programming in Game Maker.
     
  • Fonts: Font resources provide a means of displaying text in your game using the fonts installed on your machine. Game Maker grabs images of each character in your chosen font so that the player doesn’t need to have the same font installed on their machine.
     
  • Timelines: Timeline resources provide a way of triggering many different actions at specific points of time in your game (see Objects for more on actions).
     
  • Objects: Object resources are the most important of all the resource types in Game Maker as they are used to represent all of the active components of your game. Objects can respond to events in the game by following a series of actions that you add to the event. In this way, you can program the desired behavior for all the different components of your game.
     
  • Rooms: Room resources provide spaces for staging all the visible aspects of your game (levels, menus, cut scenes, and so forth) and contain all sorts of settings relating to backgrounds, views, and the game window. It also provides an editor for placing instances of objects into your rooms to determine their starting positions.

Posted Image
Figure 1–1. The main Game Maker interface with the resource list on the left

Instances and Objects

Objects are the programmable elements of your game and their behavior is directly determined by the events and actions that you choose to give them. However, there is an important distinction to be made between the object resources, which define the general behavior of objects, and the individual object instances, which occupy your game world. Once you have defined the behavior of an object resource, then you can place any number of instances of that object in your game. All these instances will behave in the same way (because they follow the same events and actions), but each has its own variables (position, speed, direction, and so forth) that are unique to that instance. If you like, you can think of object resources as being like jelly molds, and instances as the jellies you make with them. You only need one mold to make any number of jellies that have the same basic structure (see Figure 1–2).

Posted Image
Figure 1–2. Object resources are like jelly molds and you can use them to create any number of object instances

Variables

A variable is a general programming term for something that can store information. In Game Maker, variables can either store a number (for example, 3, -12, 151.33) or some text (for example, demons don’t like dragons). You use variables in Game Maker to store all the unique information about individual instances, such as their position on the screen, or their speed. So if you create a new power variable in the Create event of a dragon object, then every dragon object will have this variable, but each instance can have its own different value for power. It’s also worth noting that you must assign variables a value (using a Set Variable action, for example) before you can use them (with a Test Variable action); otherwise, Game Maker will produce an error.

Local Instance Variables

Game Maker uses a number of predefined variables for storing standard information about each instance in the game. All of the following variables either directly or indirectly affect the position of an instance in the room:
  • x and y provide the current position of the instance in the room.
  • xstart and ystart provide the starting position of the instance in the room.
  • xprevious and yprevious provide the room position of the instance in the previous step.
  • hspeed is the horizontal speed of the instance (in pixels per step).
  • vspeed is the vertical speed of the instance (in pixels per step).
  • direction is the instance’s current direction of motion in degrees (360 degrees of rotation in an anticlockwise direction; 0 degrees is horizontally to the right).
  • speed is the instance’s current speed in the current direction.
  • friction is the amount of friction reducing the speed of the instance (in pixels per step).
  • gravity_direction is the current direction of influence for gravity (defaults to 270 =
    downwards).
  • gravity is the amount of gravity that pulls the speed of the instance in gravity_direction every step (in pixels per step).
The following variables are also predefined for each instance and affect the appearance or collision of the instance in some way:
  • sprite_index is the sprite displayed for the instance.
  • image_index is the current index into the images of an animated sprite displayed for the instance.
  • image_speed is the animation speed of an animated sprite (in subimages per step). This is typically set to a value between 1 (normal forward speed) and -1 (normal backwards speed).
  • mask_index is the sprite used for collision detection (usually set to -1, which makes themask_index the same as the sprite_index).
  • depth is used to control the order in which instances are drawn on the screen. Highest depth values are drawn first and so appear behind those with lower values.
  • image_xscale is a scaling value applied to the width of the sprite, where a value of 1.0 is 100% of the original width (normal size).
  • image_yscale is a scaling value applied to the height of the sprite, where a value of 1.0 is 100% of the original height (normal size).
  • image_angle is a rotation angle (0-360) applied to the sprite, where a value of 0 is no rotation. You can only change this variable in the registered, Pro version of Game Maker 8.
  • image_alpha is the opacity of the sprite (how difficult it is to see through it), which can range from a value of 1.0 for fully opaque (unable to see through it at all) to a value of 0.0 for fully-transparent (invisible).
  • image_blend is a color applied to the sprite when it is drawn. It is set to c_white by default, and using different values will change the color of the sprite when it is drawn. You can only change this variable in the registered, Pro version of Game Maker 8.
  • visible determines whether the object is visible or invisible (true or false).
  • solid determines whether the object is treated as solid in collisions (true or false).
  • persistent determines whether the object will continue to exist in the next room, or whether it remains part of the room in which it was originally created (true or false).
Note The constants true and false correspond to the values 1 and 0, respectively.

These two variables hold information about the identity of the instance:
  • id is a unique identifying number that distinguishes the current instance from any other.
  • object_index is the index of the object resource that the current instance is an instance of.
There are also a number of other variables that you cannot change, but are maintained internally by Game Maker for each instance depending on the current sprite. So you can check to see what values these variables hold (using a Test Variable action, for example), but you cannot change them (using a Set Variable action):
  • sprite_width is the width of the current sprite displayed for the instance.
  • sprite_height is the height of the current sprite displayed for the instance.
  • sprite_xoffset is the x position of the origin within the sprite.
  • sprite_yoffset is the y position of the origin within the sprite.
  • image_number is the number of images in the current sprite.
  • bbox_left is the x coordinate of the left edge of the sprite’s bounding box in the room.
  • bbox_right is the x coordinate of the right edge of the sprite’s bounding box in the room.
  • bbox_top is the y coordinate of the top edge of the sprite’s bounding box in the room
  • bbox_bottom is the y coordinate of the bottom edge of the sprite’s bounding box in the room.
Variables in Other Instances

You usually refer to an instance’s variables within its own actions by entering their names in their basic form, as provided previously. Using actions to set or test an instance’s variables in this way will only affect the instance concerned (hence, they are local to the instance). However, you can also refer to variables in other instances by using an object name followed by a dot (period/full- stop) and then the variable name (for example, obj_dragon.x). Used within a Test Variable action, this would retrieve the x position of the first instance of obj_dragon that was placed in the room (disregarding any other instances of obj_dragon). However, used within a Set Variable action, it would change the x position of all the instances of obj_dragon in the game—so be careful.

Game Maker also includes a number of special object names that you can use to refer to different objects in the game:
  • other is an object that is used to refer to the other instance involved in a collision event. So other.x is the x position of the other object involved in a collision.
  • all is an object that refers to all instances, so setting all.visible to 0 would make all instances of all objects invisible.
  • global is an object used to refer to global variables that you create yourself.
Global Variables

You can also create global variables, which are common to all objects and instances in the game. These are useful for storing values that relate to the overall state of the game, such as the current player’s name, or time playing the game. When you use a global variable of your own, you need to put the word global and a period (full-stop) in front of the variable name (for example, global.player_name). If you leave off the global part, then Game Maker will automatically assume you are referring to a local variable instead.

However, there are also a number of built-in global variables that do not require the use of the global object to access them. This can cause problems if you try and create local variables with the same name, so it’s best to be aware of these so that you can choose different names:
  • score is the global score value (as used by the actions on the score tab).
  • lives is the global lives value (as used by the actions on the score tab).
  • health is the global health value (as used by the actions on the score tab).
  • mouse_x is the current x position of the mouse cursor in the room.
  • mouse_y is the current y position of the mouse cursor in the room.
  • room_caption is the caption shown in the window title bar.
  • room_width is the width of the current room in pixels.
  • room_height is the height of the current room in pixels.
Coordinates and Angles

If you want to position something in your room using actions (rather than the Room Editor), then you need to consider how Game Maker’s coordinate system works. Traditionally, coordinates on computer screens are calculated slightly differently from how they are taught in school. As you might expect, the x-axis starts on the left-hand side of the screen with a value of zero and increases as you move horzontally to the right. However, the y-axis starts at the top of the screen with a value of zero and increases as you move vertically down (see Figure 1–3). This means that the origin of each room (x=0,y=0) is in the top left, rather than the bottom left and the y-axis is probably the other way from how you might have expected as well. Nonetheless, so long as you can remember that an increase in y moves something down the screen, then you won’t go too far wrong.

Posted Image
Figure 1–3. The screen coordinate system used in Game Maker, illustrated for a standard 640x480 room

Similarly, angles in Game Maker may not work in the way you expect, either. Angles can range from 0-360 degrees as normal, but an angle of 0 degrees represents a direction that points horizontally to the right. Game Maker angles also increase anti-clockwise, so 90 degrees points vertically upwards, 180 degrees points to the left, and 270 degrees points vertically downwards (see Figure 1–4). This can take a bit of getting used to, so it may be worth copying this diagram and sticking it to your monitor until you’re completely comfortable with it.

Posted Image
Figure 1–4. The angle system used in Game Maker

Transparency

One area that changed significantly in Game Maker 8 is the way that transparency works for sprites. Previous versions of Game Maker have only allowed one color to be transparent for each sprite, which meant that the pixels of sprites were either fully transparent or fully opaque (that is, nothing can be seen through it). This allowed simple punch-through transparency, where a single background color within the sprite is not drawn (see Figure 1–5). However, the edges of sprites could often seem quite harsh and jagged using this method—particularly when there was a large contrast in color between the sprites and the background behind them (see Figure 1–6, left).

Fortunately, Game Maker 8 supports a more advanced kind of transparency by which every pixel in a sprite can have its own level of opacity from 0 (fully transparent) to 255 (fully opaque). Opaque just means the opposite of transparent, so this value represents how hard it is to see through something. A low value means that it is easy to see through it (with a value of zero being invisible), and a high value means that it is hard to see through it (with a value of 255 being unable to see through it at all). A more general term for this measure in computer graphics is alpha, but you will come across both the terms opacity and alpha in Game Maker.

Posted Image
Figure 1–5. A sprite displayed in front of a background with and without punch-through transparency

Posted Image
Figure 1–6. The jagged edges produced by punch-through transparency (left) compared to the smoother edges produced by alpha transparency (right)

Figure 1–6 (above) shows how this new alpha transparency can improve the look of your sprites when they appear against contrasting backgrounds. Only two of the file types supported by Game Maker can include transparency in this way. PNG files (.png) support alpha transparency, and you can create them in many different graphics packages, but you need to use animation strips (using _stripXX at the end of the file name) to support multiple frames of animation. This is the most common format we use in this book, but Game Maker 8 includes a new sprite format (.gmspr) that supports both alpha transparency and animation frames, so we sometimes use that as well. There are plenty more cool effects that you can achieve with this new level of alpha control such as creating shadows and advanced particle effects.

Note Perhaps you’re wondering why many things seem to be measured between such strange values as 0 and 255 in computing rather than 0 to 100 (red, blue, and green components of colors, are another example). The answer has to do with the way that numbers are stored on computers. The numbers 10, 100, 1,000, 10,000, and so forth have significance to us because we use a number system called decimal. Our number system is based on the number 10 (because we have 10 fingers) and each of the numbers above is 10 times the last. However, computers use a number system called binary, which is based on the number 2 (because in electronics, things can either be on or off), so the numbers that are significant to them are 2, 4, 8, 16, 32, 64, 128, 256, and so forth, where each number is 2 times the last.

Congratulations

Fantastic—the necessary preparations have been made, and we’re ready to get started. We’ll begin on easy ground, but there are trickier paths ahead, so make sure you take the opportunity to begin with a sure footing. Each chapter will build upon the challenges of the last, so you can’t afford to take any shortcuts. Anyway, we hope you’re not scared of heights, because that’s the least of your worries when you’re a character in a platform game….

New Incentives and a Whole New Platform From The Intel AppUp developer program

$
0
0
This is a sponsored post paid for by Intel

Whether you've enrolled in the <a href="http://altfarm.mediaplex.com/ad/ck/12124-121349-26654-0?mpt=29649766">Intel AppUp Developer Program</a> to get your apps in the Intel <a href="http://altfarm.mediaplex.com/ad/ck/12124-121349-26654-1?mpt=29649766">AppUp Center</a>, Intel's app store for mobile devices, or have yet to do so, we have some great news for you.

<h1>Now Accepting MeeGo Apps for Netbooks and Tablets</h1>
Delivering superior experiences for multiple form factors and multiple screen sizes represents a great opportunity for developers. MeeGo brings the ability to easily and rapidly create a variety of these experiences across many computing device types.

The Intel AppUp developer program now provides resources and tools they need to create, distribute, and sell applications for MeeGo tablets and netbooks. That means everything from validation to eventual distribution through the Intel AppUp center for MeeGo.

Throughout 2011, the developer program will be hosting application labs to provide hands-on training for MeeGo worldwide. In addition, we are also giving away MeeGo-based devices as software development platforms for early adopters to jumpstart development. <a href="http://altfarm.mediaplex.com/ad/ck/12124-121349-26654-2?mpt=29649766">Visit our app labs homepage to learn more</a>.

<h1>Incentives for Developers</h1>
<h2>Submit Early for MeeGo</h2>
<a href="http://altfarm.mediaplex.com/ad/ck/12124-121349-26654-3?mpt=29649766">Be an early adopter and get rewarded</a>! If your app is among the first 100 to be validated, you will receive US $500. The 10 best apps of the first 100 stand to receive an additional US $1,000. That's on top of being among the first apps to be offered to customers once the AppUp Center begins offering MeeGo apps. Participants have until 3:00 PM PDT, April 29, 2011 be eligible to take part in these promotions.

<h2>The Intel AppUp developer challenge and Accelerator Program</h2>
<a href="http://altfarm.mediaplex.com/ad/ck/12124-121349-26654-4?mpt=29649766">The AppUp Developer Challenge</a> awarded many lucky winners with cash prizes and more for submitting their best-in-category apps in 2010, and in 2011 Intel is upping the stakes with over US $250,000 in prizes for qualifying apps.

Another program launched in 2010, Accelerator, is also back. Accelerator is designed to help developers overcome barriers for creating apps for AppUp by providing financial support ranging from US $10,000-25,000. <a href="http://altfarm.mediaplex.com/ad/ck/12124-121349-26654-5?mpt=29649766">Learn all about it here</a>.

<h1>Much More to Come</h1>
The year has just begun. To get the latest news from the developer program, <a href="http://altfarm.mediaplex.com/ad/ck/12124-121349-26654-0?mpt=29649766">enroll today</a>.

Developing a Mobile Application with Flash

$
0
0
As you have undoubtedly seen in recent months, you can build mobile applications with Flash. And you have probably seen quite a bit of drama and degrees of support from the mobile hardware-makers ranging from “we do not want it on our platform” to “we love it and fully embrace it”.

For this article I am going to skip all that drama apart from how it affects the underlying technology and talk about the process of building a Mobile Flash app using Flash, the AIR SDK, and the mobile packager.

First off, what is AIR?

I must start with a description of Adobe AIR because it is not an obvious thing. At its heart, AIR is a webkit-based HTML rendering engine. It is not, however, a web browser. It’s best thought of as a “browser construction kit” which is used as a base for applications that look and behave like OS-native applications even though they are built using web client technologies (HTML, Javascript, Flash, and Acrobat) rather than native code.

For example, let’s say that I wanted to build a simple text editing application like Windows Notepad or Mac TextEdit, and I wanted to build it with Javascript and/or Flash. With a little work I could put together such a tool (as the Mozilla “Bespin” project shows). The only problem is that such an application would have two big deficiencies that would make it a poor cousin of a standalone text editor:
  • It would have to run in a browser, so I am stuck with the browser’s Windows and menus and toolbar buttons and URL bar and such.
  • The Javascript and Flash sandbox would preclude me from accessing the underlying OS filesystem, so I could not open or save text files on the computer.
Adobe AIR is designed to get around those limitations. Using some XML-based window description code and a class library of cross-platform “native bridge” functions exposed to Javascript and Flash, you can give your application a native look as well as access to much of the underlying OS that is denied to web client technologies. Popular desktop applications like TweetDeck are actually written in Flash and use the AIR classes and runtime to give the appearance of being OS-native applications.

If you have downloaded an application like TweetDeck, you might have been presented with a file with the extension .AIR and not quite understood what that’s about. Well, that is how the AIR runtime deals with cross-platform executable files. Rather than have the developer maintain multiple executable files for multiple platforms, you build a single AIR file that’s actually a bundle of all your assets (HTML, JS, SWF, PDF), which the AIR runtime then converts into something resembling a first-class executable on your target platform (Windows, Mac, or Linux). Adobe’s AIR packager handles all of the building for you, and your user just double-clicks the AIR file to install.

And, to quote Bill Cosby, “I told you that story so I can tell you this one”.

AIR on Mobile

AIR on a mobile platform (specifically iOS, Android, and Playbook) is a bit different from its desktop counterpart. Not only is it different from desktop AIR, but each device deals with them differently. Thankfully, the differences between mobile platform AIR implementations are internal and, with a couple of exceptions, are not things you need to worry about.

For developers, the biggest difference between desktop AIR and mobile AIR is that mobile AIR is Flash-only. While you could build a desktop AIR application entirely out of HTML and/or Javascript and/or PDF, mobile AIR only deals with Flash. It’s best thought of as a runtime that runs your Flash content full-screen and with access to the AIR native-OS class library so you can talk to the underlying phone OS and pretend you are a native mobile application.

In addition to standard OS stuff (files, process control, system event notifications), the AIR class library has been extended to include mobile OS features that most desktops lack, like geolocation, the accelerometer, and multi-touch gestures.

AIR on Android

Android AIR is much more like its desktop counterpart than iPhone AIR. Like desktop AIR, it is a free-to-download runtime (available in the Android Market for Android 2.2 “Froyo” and later) containing a Flash interpreter and native class library. While developers use the same command-line packager utility as the one that builds .AIR files, Android files are built into APK (native Android executable) files. These APK files look and behave like native Android executable files, although they require the AIR runtime to be installed (ala .NET). If you install an AIR-enabled executable to an Android device that doesn’t currently have the AIR runtime installed, you will be gently ushered to the Android Market to install the runtime. While it is not a completely invisible process, it is just a one-time thing. Once the runtime is installed, you are good to go.

AIR on Playbook

Playbook AIR is even simpler, mainly because the AIR runtime is already baked into every shipping Playbook. You use a different command-line packager (supplied by RIM for free) to build a .BAR file that Playbooks run as first-class applications.

AIR on iPhone

You have undoubtedly heard of the drama surrounding the Adobe iPhone packager. In response to Apple’s “no third-party libraries (by which we mean virtual machines)” decree, Adobe quietly put together a method to pre-compile iPhone native executable apps using Flash. In retaliation, Apple altered its license to specifically exclude Adobe-authored content (as well as several other non-Xcode development tools) from the App Store.

Apple did eventually soften its stance regarding non-Xcode tools, likely following some credible legal threats, and they did start to “bless” various non-Xcode-authored applications for the App Store. Ultimately Adobe-authored apps were quietly paroled. So it is once again “game on” for building iPhone apps with Flash.

Internally, iPhone AIR applications are quite a bit different from the the other mobile systems, and that is mainly due to Apple’s license and its ban on shared runtime code or bundled VM’s. Adobe’s iPhone packager is built around an “ahead of time compiler” (what we old-schoolers used to just call a “compiler”) for SWF files. If you request the AIR packager build an iPhone application, it will not build a bundle that will be executed by a runtime engine. Instead, your SWF will be precompiled into a runtime-free iPhone executable, ready to be signed and installed to a hardware phone.

And this developer workflow is not unique to the Adobe Packager. Novell’s Mono for iPhone precompiles executable applications that would normally use a shared .NET VM on other systems.

There are a couple of things you lose with this ahead-of-time compile approach, necessitated by using a native code compiler rather than a VM. For one, you bypass Xcode so your application will not run on the iPhone simulator. Internally, the iPhone simulator is an API emulator and not an ARM processor emulator, so it cannot run executable files created with the packager or any other authoring tool that directly creates ARM executable files.

Secondly, you lose the ability to stream in and execute external SWF files. And this can be a pretty significant problem depending on the application you are building. If you are building a game that is entirely self-contained and does not stream in resources as SWF, then you should not have a problem. Some Flash-authored content, though, like the popular Club Penguin kids’ MMORPG, is built as a “shell” that streams in all of its content (games, assets, locations) as SWF on an as-needed basis. Such a system is only do-able if you have a VM on the client.

But again, if your game doesn’t plan to stream in external SWF content and you have an actual hardware iPhone or iPod Touch for testing, there’s little reason you shouldn’t be able to make a game in Flash.

Furthermore, you should be able to make a game that can be compiled for several mobile platforms with few or no changes.

How to Package

While it’s done a bit differently between Android and iPhone, the packaging step is conceptually similar.
  • Create a SWF file using Flash or Flex. If you want to talk to the phone’s features, use the AIR native class library. Note that AIR only contains the second-generation AS3 VM, so it cannot work with old AS1 or AS2 code. Unless you have an old game you are porting to mobile, this should not be much of a problem.
  • Create an XML file containing a description of the application. This file contains things like the application’s name, version number, path to icons, security descriptor, orientation, etc.
  • Run the packager. In all cases, the packager is a console application that can be run from a build script or from within the Flash IDE. The packager takes the XML description, SWF, and any other resources (like the icon PNG files) and builds the runtime file.
  • Copy your executable to your phone and run it.
For the Android, you will need the Android SDK installed, as it includes the utilities to sign the code. This SDK is a free download. Since Androids are basically “self-jailbreaking” with a check of the “allow non-Market applications” checkbox in your device’s settings, you can generate your own signing certificate and then copy your application to the phone.

For iOS devices (iPhone, iPad, and iPod Touch), you will need to be a member of the Apple Developer Program to generate Apple-blessed code-signing certificates. While the build and process for iOS is similar to Android, actually generating and downloading the certificate is a weird multi-step process that I only figured out via trial and error. Once packaged, you copy your game IPA file to your connected test device via iTunes.

Also note that the iPhone packager, since it contains an extra step of running an ahead-of-time compiler written in Java, is a lot slower than the Android packager. Packaging an Android or Playbook application basically entails zipping up your SWF with an executable stub, some icon resources, and a manifest file that the packager generates, so it is a quick process.

Building An Application

Beyond the build process, actually writing your game is exactly like writing a web-based game in Flash. You can build and test your game using the Flash IDE just as you would a web game. When you are ready to deploy to a mobile device, use the appropriate packager to build a mobile app.

But it isn’t all easy. You do have to take into account device performance as well as screen limitations and limitations imposed by finger-based input.

In my experience, input imposes the most design limitations. While Flash will tell you “The user just tapped on point (175, 192)”, you should assume that means “The user intended to tap on something somewhat near point (175, 192), so look for it”. Mice and Styluses are accurate to within a pixel or two, but fingertips aren’t. So make sure you design and code with that in mind.

And such design decisions are really dictated more by the game than any programming. A Tic Tac Toe game should work on any phone screen without any changes, as the squares would be quite large. A 20x20 Go board, on the other hand, could be quite frustrating. The individual board-squares would be quite a bit smaller than the smallest fingertip, and your users would likely find themselves accidentally tapping on the wrong square.

And games tackle this problem differently. Some games zoom in on the board when it is time to click on a cell. Some games scroll around. Some games pop up tips explaining what you’re about to click (like most mobile keyboards). It is probably best that you play a few mobile games before you settle on your input scheme, as a natural feeling input scheme is often the difference between an excellent game and a frustrating one.

For my example, I designed my game “Hexapies”, which is a simple “paint the board” game, to be mobile-friendly.

Attached Image: image05.jpg

Figure 1: Hexapies

The input in the game is quite simple, consisting of five large colored pies at the bottom of the screen. Clicking on a pie colors the “seed” pie, connecting to any adjacent pies. Pies that aren’t available for tapping partially hide themselves so it’s obvious.

Note that the click-able pies are along the bottom of the board. This placement wasn’t chosen randomly. Keeping the input items at the bottom keeps your hand from obscuring the board every time you make a move. If you want an example of how placement can hamper gameplay, try out any of a hundred Windows Solitaire knockoffs for mobile phones. Virtually all of them keep the same layout as Windows Solitaire even though such a layout is not mobile friendly. Every time you drag a card, you cover the entire board with your hand, and you find yourself having to drag the card off to the side to find your destination. A much better solution would be to have the cards along the bottom and have them “grow” upwards, but few games have that option, opting instead for familiarity with the original.

Real Production!

Okay, enough pontificating. Here is a real project. One game I have been developing and re-developing forever is “Brain Bones”. It is a dice game that I thought it would be a good fit, as the screen is about the right size for mobile, and the controls are simple -- you have five dice to swap around and a big “play this combination” button. So I decided to make a mobile-friendly version as well as a version that I could move to various platforms. Here is the game in production in the Flash IDE.

Attached Image: image01.png

Figure 2: Brain Bones in Flash. My biggest tip for using the Flash IDE is to put “one really bigass monitor” in your budget, as there are a lot of panels you will want to use.

While I like the idea of building stuff directly from the IDE, it really was not practical for the amount of building I was doing. I ended up writing a big batch file and some template XML files. My batch file then ran all of the command-line bits, most notably the AIR packager ADT, to package each game.

(and yes, I know I should be more state-of-the-art and use ANT. I’ll learn it soon. I promise)

And then I tested. Most testing involved building features that I could turn on and off for each platform. For example, you may notice that my desktop games shown below have a volume-slider on the screen and the mobile games do not. This is because most mobiles have hardware volume buttons, and it is not good form to duplicate that mobile feature.

Also, Androids have a hardware “back” button that I could override and use as a “return to main menu” function, so I wrote a little code for that and enabled it on those phones.

Attached Image: image07.jpg

Brain Bones running on the Playbook Simulator.

Attached Image: image03.jpg

Brain Bones running on a Motorola Droid


Attached Image: image04.jpg

Brain Bones running on an iPod Touch 4


Attached Image: image02.jpg

Brain Bones running on a Barnes & Noble Nook Color


Attached Image: image00.jpg

Brain Bones running on Windows as an AIR application. Note the volume slider in the lower right. It’s not there on devices with hardware volume buttons.


Attached Image: image08.jpg

Brain Bones running on a Mac as an AIR application


Attached Image: image06.jpg

And finally, just to be gratuitous, the Brain Bones SWF running in the Chrome web browser as a web app.

Things I Learned

ImageMagick Is A Good Thing - One thing I learned early on is that every platform has its own icon requirements. While all icons were the same format (PNG), every platform had its own preferred sizes. If I didn’t want to spend a half hour in a paint program resizing icons every time I made a change, I needed a way to automate this.

And ImageMagick fit the bill. ImageMagick is a free set of cross-platform command-line tools to do stuff with images. And one of those tools is “convert”, which resizes images and saves them back out.

The largest icon size I would need is 512x512 pixels (No, really. The iPad uses an icon this big), so I drew all my icons this big and made a little batch file that shrunk that mega-icon to the other NINE sizes I needed.

Dropbox is great for Android, iOS not so much- The final step in my batch-build was to copy every runtime, AIR, APK, BAR, and IPA file to my Dropbox folder. From there I could open the Dropbox app on my Android test devices and directly download and install the APK file, thus removing the need to cable all my Android test devices to my computer every time I wanted to test the game.

And while the iOS Dropbox app could see my brainbones.IPA file just fine, iOS flat refused to install or run it. Apple’s policy is that the only way to put an IPA file on a test device is via iTunes, and they’re sticking with that.

Installing to the Playbook Simulator was a matter of putting the simulator into “developer mode” and telling the Playbook BAR packager to send the BAR file to the Simulator’s IP address. This process worked very simply, although it RIM has made the process into a more complicated “development certificate” affair with actual hardware devices.

(and if you don’t yet have a dropbox account, go get a free one here, as I get a little extra space as a referral bonus, thankyouverymuch)

Flash Professional CS5.5

Recently shipped is the new Adobe CS5.5 suite, featuring improvements and new features in several tools. The bulk of the new features and improvements are designed to improve development for mobile devices. I recently got a one-on-one with someone from the Flash team and got a sneak-peek at the new features.

Here are the ones I found that stood out as being helpful for my own development process.

My Flash CS5.5 Likes

(note that Flash CS5.5 is being released as this article is being published. I should have a more in-depth review in a bit)

Incremental Compilation- While it’s a good idea to store your sound files in an uncompressed high-bitrate format, that’s not good for deployment. 44 kHz stereo WAV files sound great and don’t lose any sound information, but they’re way too big for mobile or web-streaming.

Flash has long had the ability to store uncompressed sounds in its project file and then compress them at compile-time to a compact format. You can tell the compiler to compress all sounds to the same format and bitrate, or you can compress each sound individually. If you are setting compression levels for each sound, you can listen to sounds without recompiling, so you can find a good balance between quality and size for each individual sound. Then the sounds are compressed into the SWF at compile-time for production testing.

Problem is, compressing and resampling big WAV files into compact lossy formats is slow, and the tradeoff for this convenience is a long wait during compiles. About 95% of the compile-time for my Bulldozer game is compressing the game’s theme music into a low-bitrate mono MP3.

Flash CS5.5 finally added incremental compilation for sound and font files. Rather than re-rendering sounds and fonts every compile, the compressed results are now cached in the project file. If you, like me, like the convenience of letting Flash compress your sounds at compile-time, this is most welcome.

Export As Bitmap - If you read the development blogs from fellow mobile Flash developers, you have learned to avoid doing a lot of vector stuff in mobile Flash. While Flash was originally designed as a vector renderer, Flash also handles bitmaps just fine.

Problem is, Flash does not have a bitmap editor. If you want a game with bitmap space invaders, you will need to draw them outside Flash and import them. You can leave your invaders as vectors and use the Flash engine’s “cache as bitmap” feature, but that still leaves the work of rasterizing to the Flash runtime. The new “Export As Bitmap” feature converts vector objects to bitmaps at design-time rather than run-time.

Visible Property - This is one of those “why didn’t they implement this six versions ago” features. While Flash DisplayObjects have had a “visible” attribute since forever, the attribute was only something that you could set at runtime. If you place an object on the stage at design-time, but you want it to be invisible (like a wall at the edge of the screen for collision detection), you had two options:
  • Set the alpha property to zero. This works, but it’s not good practice because, while you can’t see the object, it is still in the rendering pipeline and is included in rendering and bounding-box calculations. And if you are developing for a CPU-constrained platform, you do not want to spend time drawing things you can’t see.
  • Set the visible property to false at runtime. This is much better practice than setting alpha to zero, but you have to remember to code for it.
You now have a “visible” checkbox in the property inspector, so this minor hassle is now gone.

Better Publish-For-Mobile dialogs- While I chose to build my XML descriptor files manually, Flash does have a couple of “wizard” style dialogs where you can set your descriptor properties in a friendlier fashion. The Android one has been improved to allow Flash to directly deploy and run an APK file on a USB-connected device without moving to the command line.

And if it seems odd that you can target Android, iOS, Windows, Mac, and Linux, but not Playbook, this will be addressed soon.

Shared Libraries- All of the graphics and sounds that make up your game exist in your Flash project in the “Library”. While I ended up making all of my platforms out of a single project, I could have broken it up into more than one project. For example, if I wanted to “tune” my graphics for each platform or have higher bitrate sounds on higher quality devices, I could have done that with multiple projects. Problem is, each project has its own assets, so anything updated in one project would need to be updated in the rest. Flash CS5.5 addresses this by allowing you to share and synchronize symbols among multiple documents inside a project folder.

My Flash CS5.5 Wish List

Components - While Flex is going to see much-improved mobile components (no surprise there. 90% of Flex IS components), Flash’s current set of “works good on the desktop, but not on your phone” components are still there.

I was told that the plan is to usher people to some quality third-party mobile components for Flash. I would like to see some more effort on this, as things are currently fragmented. For example, AS3Flobile has a nice Android skin (which I have tried), and MinimalComps has an iOS skin (which I have not yet tried), but the two libraries are incompatible and would require me to support two different codebases to use both.

These third-party component libraries are nice, but I haven’t found one yet that’s complete to my satisfaction. And by that, I mean skinned for desktop, iOS, Android, and Playbook so that I can make my big collection of Brain Bones’s look and work even better on each device with nice native-looking controls on each.

Conclusion

Flash has definitely arrived on mobile. Pretty-much every mobile device out there supports Flash to one extent or another (except Windows Phone 7, what gives?)

It’s not only possible to quickly build a high-quality multiplatform game with Flash, but it’s not all that difficult.

Excerpt: Game Development Essentials 3rd Ed.

$
0
0
To date, Game Development Essentials: An Introduction has been adopted by more than 50 game development programs in the U.S. including Indiana University, Ohio University, Texas State Technical College, Portland Community College, and the International Academy of Design & Technology. Books in the series have been translated into several languages, with the second edition of Game Development Essentials: An Introduction alone generating more than $1 million in sales.

“The drive to make games can easily be thwarted by overly technical ‘how-to’ guides and dry textbooks loaded with industry jargon,” says Jeannie Novak, lead author and series editor. “Game Development Essentials: An Introduction is an accessible, ‘big picture’ introduction needed to fully grasp what making games is all about. The book’s four-color glossy design, captivating screenshots, exclusive industry profiles, and fresh content have introduced tens of thousands to the joys of game development.”

New for the 3rd edition:
  • Revised profiles, tips, and quotes from industry professionals and educators
  • New and updated game screenshots, photos, illustrations, and diagrams
  • Expanded sections on the newest trends in game development including mobile, social, and serious games
  • Coverage of new console and mobile platforms including the PlayStation Vita, Wii U and Nintendo 3DS
  • Discussions of new technologies -- including 3D, motion control, augmented reality, game engines, and development tools
CHAPTER 6 - Gameplay: creating the experience

Key Chapter Questions
  • How are a game’s challenges and strategies associated with gameplay?
  • What are interactivity modes and how do they relate to gameplay?
  • What is the relationship between gameplay and story?
  • What is the difference between static and dynamic balance?
  • How can the Prisoner’s Dilemma and the tragedy of the commons be applied to cooperative gameplay?
What makes games different from other forms of media? It can be argued that games allow for more interactivity than other media. In Chapter 4, you learned about what motivates people to play games. Did you notice that most (if not all) of the reasons had something to do with the process of actually playing the game? Players seem to tie in their motivations with doing, or engaging in, some activity. In Chapter 5, you learned that gameplay is actually a storytelling device that is unique to game development. The experience of playing the game is really what allows the story to unfold.

Rules of Play

Gameplay can be defined as choices, challenges, or consequences that players face while navigating a virtual environment. Now that you understand some of the basic elements of story structure and character development, apply these to gameplay. Think about how challenges in a game are often linked together—almost as if they represent plot points in a story. For each challenge (or plot point), consider the many strategies that can be used by a player (or character in a story) to overcome it. It can be argued that the gameplay is what truly makes a game compelling.

All games contain rules. Even the first popular arcade game, Pong, was equipped with the simple instructions, “use your paddle to avoid missing ball for high score.” Many games contain rules that are much more complicated. These rules are documented in an instruction manual (and also often onscreen) to aid play. For more complicated games, strategy guides that provide gameplay tips are available for players to purchase. Players gravitate toward in-game tutorials most often, though—and developers have found clever ways of including immersive tutorial modes that involve the game’s storyline and characters to help “train” new players. The rules of a game define the actions or moves that the players may make in the game (and also those that they cannot make). To formulate rules for a game, it’s important to first understand the conditions or terms of the game. The rules of the game should be communicated to the players. Although this can be accomplished through in-game tutorials and hints, an instruction manual often accompanies the game.

Gameplay and story are the same. The best game systems tell a story through the system itself. We really hit home runs when gameplay goals and story emotional goals intersect.

—Chris Klug (Faculty, Entertainment Technology Center, Carnegie Mellon University)


Victory Conditions

Attached Image: 06-01 WiiFitPlus.jpg

Victory exclamation in Wii Fit Plus (Courtesy: Nintendo)


A game’s victory conditions correspond to how players win the game. Is there only one winner, or can there be several? What does a player have to do to win? Does the player have to rescue a kidnapped family member, slay a dragon, save the community from a disease outbreak, defeat an alien race, or solve the mystery of a friend’s death? At what point in the game can it be said that this victory condition has been met? In the classic two-person game, Battleship, you know you’ve won when your opponent says, “You’ve sunk my battleship!”

Many puzzle games have no victory condition. In Tetris, the game just gets increasingly difficult until the player decides to stop. Any notion of victory stems from comparing your game score to others. (This is like the high score technique used in arcade games.) Process sims usually don’t have any explicit victory conditions, but the ability to help your resources improve through the game is most certainly a type of ongoing victory. In The Sims, you maintain a victory condition as long as your Sim doesn’t die. Multiple victory conditions can be incorporated into a game for replayability and to appeal to different playing styles. For example, in Civilization IV, two of the victory conditions are conquering the world (which appeals to players who prefer strategic warfare) and achieving a dominant culture (which appeals to players who prefer construction and management activities).


Allen Varney on the Importance of Gameplay 


Attached Image: Varney, Allen GDE3.jpg

Allen Varney - designer & writer (Courtesy: AV)

Allen Varney is a freelance writer and game designer in Austin, Texas. In addition to his computer game design work for Origin Systems, Looking Glass, and Interplay, Allen designed an online business leadership simulation—Executive Challenge—which has been utilized by major companies and business schools nationwide. In the paper-and-dice role-playing arena, Allen is best known as the designer of the 2004 edition of the classic satirical science-fiction role-playing game, Paranoia.

A good game design defines and explores an unstable boundary between decision spaces. Now, whole categories of computer games—seduced by 3D graphics—minimize interesting gameplay decisions in favor of environmental exploration or minimally interactive narrative. These are fine recreations, but not really games. Although many players in online role-playing games enjoy the standard level grind in the same recreational way outdoorsy folks enjoy whittling (as RaphKoster observed), that “gameplay” doesn’t contribute much to the game design discipline.


Using Tabletop Games in Gameplay Design

Trying to understand the nature of a gameplay experience directly from a video game is akin to trying to understand an internal combustion engine while it’s running at 60mph! A tabletop game allows you to break down all the components of the game and see how all sections (mechanics, rules, characterization, player risk/reward structures, psychological paradigms) interrelate. Good designers understand instinctively that the platform must always fit the task at hand. When constructing a gameplay experience, it is crucial to select a way of depicting it so that you can “see” how the elements work in the best context. Just as some stories are best told in the form of a novel and others are best told in the language of film, certain game elements fit best into different modes. This allows you to shift the gameplay fluidly from platform to platform as the situation demands. Good design is like kendo: When the object is to win, the weapon you use should be the one that will best accomplish that goal.


—Mike Pondsmith (Founder, Owner & Lead Designer, R. Talsorian Games; Senior Lecturer,
Game Software Design & Production, DigiPen Institute of Technology)

Loss Conditions

Attached Image: 06-02 Torment.jpg

Loss indicator in Torment. (Courtesy: FluidPlay)


A game’s loss conditions specify how players lose the game. Two types of loss conditions are implicit and explicit. Losing because you’re not the first to achieve victory is an implicit loss condition—common in games that require competition between the player and other players or non-player characters (NPCs). Losing because your character dies or runs out of vital resources is an explicit loss condition—common in construction and management games such as process sims.

The Dynamic Language of Games

Only the active contribution of the players can determine the actual outcome of the game, the specificity of the experience. I have noticed that it is very hard for students to get past this aspect of game design; the fact that the player input will intrinsically change the nature of what they’ve created. But once they do understand this, and start thinking about games as a dynamic language, rather than trying to force a particular experience on the players, they realize just how exciting this type of entertainment can be—both for players and designers.


—Tracy Fullerton (Associate Professor, USC School of Cinematic Arts;

Director, Game Innovation Lab)


Emotional Gameplay

Create mechanics that can attain the sweet spot of challenge and reward as well as accommodate multiple play styles. Then wrap those mechanics up in a blanket of story, character development, and/or emotional ties. Story provides a comforting security blanket as the player mentally traverses the rules and mechanics of the game. And, with any security blanket, players form an emotional attachment -- and when the rules and mechanics either fail to amuse/stimulate or reach a plateau (think grind), the player can always latch on to this blanket until they get to the next gameplay challenge.

— Jennifer F. Estaris (Senior Game Designer, Nickelodeon Virtual Worlds)


Story and character development interact on a very deep level. The more connected players feel to a character, the more invested they are in the gameplay. When this relationship is created effectively, developers can really pull at certain strings to create certain emotions in the player. When there isn’t a relationship to the character, the gameplay can feel stale; it can still be fun, but players will be less invested – and less likely to share their experiences with others.

—Nathan Madsen (Composer & Sound Designer, Madsen Studios LLC)


From a ludological perspective, experiencing gameplay includes interacting with game designs to perform cognitive or motor tasks that can trigger various emotions. The interesting part is how these emotions arise, since they can be triggered by player motivations, performance of the game task or by closure through completion of tasks. I would argue that the most significant and most memorable gameplay elements are therefore those that have a strong emotional impact on us. This can be the addition of a new skill or weapon or the pure joy of performing wall jumps with a lively animated character.

—Dr. Lennart E. Nacke (Assistant Professor, Faculty of Business and Information Technology,
University of Ontario Institute of Technology)


Final Fantasy VII:Gameplay as an Emotional Device


Attached Image: 06-41 FFVIIsephirothkillsaeris.jpg

(Courtesy: Sony Computer Entertainment America)


In games, players are very different from readers when it comes to how they care about characters. In a written story, how much we care about a character generally involves how sympathetic they are, how much we can relate to them personally, and how much time we’ve spent investing seeing the world through their eyes. This is less so with games—where we primarily care more about characters the more useful they are to us in the game. The reason so many gamers cited the death of Aeris in Final Fantasy VII as the first time a game made them cry has as much or more to do with losing an essential healer as it did with losing a cherished love interest in the story. Players are still moved by the standard literary hooks, but you have to get the gameplay hooks in first or they just aren’t going to care in the same way.

—Lars Doucet (educational game designer)


Interactivity Modes


The concept of interactivity was introduced in Chapter 5 as an element of game storytelling. There are several types of interactivity that affect the gameplay. In each of these modes, the interactive element originates with the player—which illustrates how important the player’s decisions are in the gameplaying process.

Player-to-Game

Attached Image: 06-31 Tekken6.jpg

Player-to-game interactivity includes how the player interacts with the game’s computer-generated characters (such as in Tekken 6).
(Courtesy: Namco Bandai Games America Inc.)


In Chapter 2, you learned about player modes associated with the number of people playing the game. In single-player mode, the player is interacting only with the game itself and the platform. Even though the non-player characters (NPCs) might exhibit many human characteristics (and the player might sometimes think they are human!), they are still generated by an artificial intelligence (AI) system. Player-to-game interactivity is a very common form of interactivity, especially when it involves single-player mode. Player-to-game interactivity involves issues such as the game’s spatial representation, mapping, environment, atmosphere, and content. Multiplayer games utilizing the player-to-game interactivity mode are really expanded single-player games, since the players do not interact with each other (e.g., Bingo).

Player-to-Player

Attached Image: 06-03 StarTrekOnline.jpg

Team player-to-player interactivity occurs in games such as Star Trek Online. (Courtesy: Cryptic Studios)


In multiplayer mode, players are not only interacting with the game, but with each other. Player-to-player interactivity is the connection between players: how they communicate with each other and ways in which they play the game together (which could include cooperative and/or competitive behavior). As you’ve learned with massively multiplayer online games (MMOs), developers can only create the potential of player-to-player interactivity, but cannot easily predict how players will actually interact during the game. Competition between players can be structured in several ways. One-on-one player competition is common in fighting games and classic tabletop games such as chess. Unilateral competition involves two or more players competing against one player (e.g., tag, dodgeball). In the board game, Scotland Yard one player is the criminal, while the other players are detectives. The game maintains a balance between the criminal and the group of detectives; the criminal has all the information associated with the game, while the detectives cooperate with each other as a group to catch the criminal. Multilateral competition involves three or more players directly competing with each other (e.g., Monopoly). This pattern reflects most multiplayer games. However, many MMOs allow players to cooperate with each other by forming teams or guilds while competing against non-player characters (NPCs). (The tension between cooperation and competition will be explored later in this chapter.) Traditional team sports such as soccer, football, and baseball involve team competition, with equal groups of players competing against each other.

Player-to-Developer

Attached Image: 06-32 TheSims3.jpg

Player-to-developer interactivity occurs in official player forums, as shown in The Sims 3. (Courtesy: Electronic Arts)


It is also possible for players to interact with those who have actually developed the game. Player-to-developer interactivity is most commonly illustrated in chat rooms and discussion forums available on the game’s website. Many developers take great care to read comments and concerns from the players, and they will often participate in the conversations directly.

Player-to-Platform

Attached Image: 06-07 WiiSports.jpg

Players interact with their Wii remotes (input devices) while playing games such as Wii Sports. (Courtesy: Nintendo)


The player-to-platform interactivity mode is the connection between a player and the game platform’s hardware and software. Issues involved in player-to-platform interactivity include the system’s graphics or sound capabilities, input devices, memory, battery, and storage.


Kevin D. Saunders on GameplayMechanics in Quest Design 


Attached Image: Saunders, Kevin GDE2-3 GID author.jpg

Kevin D. Saunders - Creative Director, Alelo (Courtesy: KS)


Kevin D. Saunders programmed his first game, a port of Intellivision’s Astrosmash, on a ZX81 at the age of six. His interest in programming (and games) continued through college, where he worked on developing artificial intelligence systems for natural language processing. His official career as a game designer evolved from his graduate research in environmental engineering. This research included lab experiments that required hourly monitoring over two- to three-day periods. These lengthy experiments gave Kevin the time to explore the world of online games and led to an opportunity to work on Nexon’s Nexus: The Kingdom of the Winds, which launched in 1998 and became one of the world’s earliest massively multiplayer online games. Kevin subsequently designed and produced Shattered Galaxy, the world’s first massively multiplayer online real-time strategy game and winner of the Best Multiplayer Strategy Game and Most Innovative Game awards from GameSpot in 2001. Kevin worked on real-time strategy games at Electronic Arts before joining Obsidian Entertainment in 2004. While at Obsidian, he transitioned from game design to production and led the development of several role-playing games. He has been credited on seven titles, five with composite review scores of at least 80%. In 2009, Kevin joined Alelo, a serious games company, as Creative Director. Kevin earned his Bachelor of Science and Master of Engineering degrees from Cornell University.

Quests are powerful tools in the game designer’s arsenal. They can provide the player with short- and long-term goals, both of which are important motivators that keep the player playing. They can enrich the game world by expanding and communicating its story to the player. They lure and guide the player into experiencing the world we’ve created for them, in terms of both visuals and gameplay.

The first priority in a quest’s design is that it needs to be rewarding for the player. The player should be given a good reason to undertake the quest. The magnitude of the rewards should generally be aligned with the quest’s difficulty and duration. Because different players are motivated by different things, the ideal quest should incorporate as many types of incentives as possible. Some sort of material reward is generally a necessity, such as an item that is likely to be an improvement for the player and an appropriate amount of experience points. Through completing quests, players should feel as though they are advancing through the game.Other incentives are less tangible, such as learning more about the game world or exploring and seeing the visual beauty of a new environment. Exposure to a new type of gameplay or a new feature is another possibility. For example, if interactive environment objects (such as levers) are added to a game that didn’t previously have this feature, a quest could be used to encourage the player to experience this improvement, which both makes the quest more interesting and advertises the new feature.In considering a quest’s rewards, I would ask myself the following question: “What about this quest is going to cause the player to want to tell his friends about what they just experienced?” A good quest would provide at least one obvious answer to this question.

A second important consideration is the quest’s clarity. Quests serve to give the player direction. While many players enjoy having an open world to play in, most also want structure – they want to be told what they should be doing. A quest should make clear to the player what actions they can take to make progress toward completing it. For example, if a quest involves slaying a particular enemy, the player should be told where to find them. (Note that game interface features, such as markers on mini-maps, messages about quest progress, and a well-organized list of current quests, can aid in this goal.)

A third priority in quest design is feasibility. Any design, quests included, must be kept within the scope of the project. A quest’s design should be consistent with the design of the region to which it belongs and the direction of the game in general. For example, a quest shouldn’t call for the creation of a new creature or a new gameplay feature unless those aspects are part of the overall vision for the design. While it is possible for a quest idea to motivate other elements of the design, in general quests should be designed to work within the confines that have been set.


Game Theory

Much of gameplay applies elements of classical game theory—which focuses on the types of conflicts that exist in games, and how players might respond to these conflicts. Game theory applies to games that contain two or more opponents. (One of the opponents could be an NPC that is not controlled by a player, but by the game itself.)Understanding some of the basic elements of game theory can help you ensure that the player is challenged when playing the game. These challenges are closely tied to the story’s plot, and both heighten the dramatic tension in the game.

Zero-Sum

Attached Image: 06-06 Chess (stock).jpg

Chess is a classic example of a zero-sum game. (Courtesy: Getty Images)


Zero-sum (ZS) games involve situations where players have completely opposing interests. In chess, for example, each player’s goal is to win the game. Since there can be only one winner, it is impossible for both players to ultimately get what they want. Therefore, ZS games can only involve competitive behavior.

Non Zero-Sum

Attached Image: 06-05 GuitarHero5.jpg

Games that involve cooperation such as Guitar Hero 5 are non zero-sum games. (Courtesy: Activision)


Non zero-sum (NZS) games involve situations in which players do not have completely opposing interests. These types of games are common in MMOGs where players form teams or guilds to compete against NPCs. In this case, the players are cooperating with each other (while competing against common enemies). This scenario gets more complicated when players are considered enemies, but they must cooperate with each other to ultimately win.

Although this might at first sound highly unusual, this situation is quite common in real life. For example, competing businesses often cooperate with each other to achieve their respective goals. Why do malls contain more than one department store? A combination of cooperation and competition (known as coopetition) describes this type of behavior.

In designer Reiner Knizia’s Lord of the Rings board game, players (as Hobbits) compete and cooperate with each other simultaneously. Although only one Hobbit can win the game, no player wins if Sauron (represented by a black token with a menacing red “eye”) gets close enough to any of the Hobbits to steal the ring. The structure of this game allows for a tension between cooperation and competition.

Prisoner’s Dilemma

Attached Image: 06-08 PrisonerDilemmaDiagram.jpg

The Prisoner’s Dilemma payoff matrix shows four possible outcomes. (Courtesy: Diagram by Per Olin)


The classic game theory example known as the Prisoner’s Dilemma illustrates what happens when all players try to compete with each other in an NZS situation. As you will see, the result can be disastrous for all:

In the Prisoner’s Dilemma, there are two players involved. You and your partner in crime are arrested on suspicion of theft, but the authorities have no proof. You are each placed in a cell and questioned. You are each offered a deal: squeal on your partner, and you will be released. If you don’t squeal, the authorities threaten to put you in prison for five years. Since you are separated from your partner, you have no idea what deal has been offered to him—if any. You have two choices: cooperate with your partner and keep your mouth shut, or compete with your partner and squeal. Not given any additional information, which option would you choose? What happens if you both decide to squeal on each other? Would you both go free? That doesn’t make much sense to the authorities. What if you both decide to cooperate by keeping silent? Does this mean that both of you will be put in prison for five years? But neither of you really confessed to the crime, so how could this be? There are four possible outcomes to this dilemma, based on how you and your partner decide to respond:
  • Reward: You are both rewarded for cooperating with each other. (Neither of you confessed to the theft, and the authorities can’t prove that either of you were involved in the crime.) You are hounded by the authorities for a year until they finally give up (or you are kept in jail as long as possible before your lawyers come to get you!). You both earn 3 points and spend only 1 year in jail.
  • Punishment: You are both punished for squealing on each other. (The authorities now know that both of you were involved.) You don’t have to stay in jail for five years, but three is bad enough! You both earn only 1 point and must spend 3 years in jail.
  • Temptation: You decide to squeal, but your partner keeps quiet. (The authorities have what they need on your partner.) This is the best possible outcome for you personally, but your partner suffers. You earn 5 points and are free to go.
  • Defeat: You decide to keep quiet, but your partner squeals on you. (The authorities have what they need on you.) This is the worst possible outcome for you, but your partner is home free. You don’t earn any points and must spend 5 years in jail.
Each player has two choices (cooperate/keep quiet [C] or defect/squeal [D]), but each must make the choice without knowing what the other will decide. If a player chooses D, that player will either earn 1 or 5 points. If a player chooses C, that player will either earn 0 or 3 points. If both players choose D, they will both do worse than if they both had chosen C.

The preceding scenario illustrates one “turn” in a game that could have many possible turns. A game like this could also be played in real time, where both players lodge their decisions simultaneously. What do you think would happen initially? What if one player gets betrayed by the other on the first turn? Perhaps the player who just lost five years might think, ‘I’m certainly not going to cooperate next time!’ When a player decides to make the same decision the other player did on the previous turn, that player is engaging in a strategy known as tit for tat. This strategy could continue endlessly until both players are consistently competing with each other (losing 3 points per turn). The reverse could also happen: A player could risk cooperating with the other player, who might follow suit and cooperate.

A variation on the tit for tat strategy is known as tit for two tats. In this variation, a player would copy the other player’s strategy only if that player used it twice in a row. Let’s say Player A cooperated the first time, but B defected. Player A might initially think, ‘I’m not going to get fooled again!’ However, Player A might reconsider—giving Player B one more chance to cooperate. If Player B defects again (twice in a row—or “two tats”), Player A will subsequently copy Player B’s strategy—and defect the third time. If Player B cooperated, however, then Player A would continue to cooperate.

Tragedy of the Commons

Attached Image: 06-33 VIkingLongboat.jpg
Attached Image: 06-34 ISP 3482477 TrafficJam.jpg

A tragedy of the commons will occur if everyone in a Viking ship stops rowing—since the ship would never reach its destination. Similarly, if everyone
stops to look at an accident cleanup at the side of the freeway, a traffic jam will result.
(Courtesy: Illustration by Ben Bourbon, iStock Photo)


A related problem in game theory is known as the tragedy of the commons. This is a social trap in which a rational decision based on resources leads to an irrational result. As a real-world example, you might see an accident cleanup at the side of the freeway and slow down to take a closer look. This decision is rational in that it satisfies your curiosity and doesn’t hurt anybody. However, to catch a glimpse of the accident, you have to slow down and drive under the speed limit. By doing this, you alert other cars behind you to do the same—changing the flow of traffic. If everyone behind you followed your lead and did the same thing, this could cause a collective “disaster” (a major traffic jam).

Similarly, the rational decision to not vote during an election won’t hurt anybody. What could one vote possibly do to change things? However, if everyone made this same rational decision, there would be no election. In games involving closed systems with limited resources, players could hoard all the resources for themselves—which could result in inflation and an imbalanced economy.


Bjorn Billhardt on “Serious” Gameplay 

Attached Image: Billhardt, Bjorn GDE3.jpg

Bjorn Billhardt - Founder & Chief Executive Officer, Enspire Learning (Courtesy: BB)

Bjorn Billhardt is the founder and CEO of Enspire Learning, an educational simulation development company based in Austin, Texas. Bjorn previously worked as a consultant and corporate trainer at Dutch software company, BAAN—where he conducted training classes in Europe and the United States—and at McKinsey & Company, a strategic management consulting firm. A native of Hamburg, Germany, Bjorn holds an MBA from Harvard Business School and dual undergraduate degrees (Bachelor of Arts and Bachelor of Business Administration) from the University of Texas.

Some important gameplay components in educational games (a subset of the “serious” games genre) include:

a) creating team-based competition among learners

b) providing challenging decisions and trade-offs around learning objectives

c) allowing learners [players] to ‘build’ and ‘level-up’ in the context of learning experience; and

d) designing an experience that one doesn’t need to play multiple times in order to become proficient (e.g., educational games for adults are often played only once).


Challenges

Gameplay involves a series of challenges that are linked together. The types of challenges that occur in a game are often related to the game’s genre. In fact, players who focus on playing particular genres have come to expect certain challenges to occur in these games, and they might deem a game inappropriate if the challenges don’t match the genre.

Implicit & Explicit

An explicit challenge is intentional, immediate—and often intense. In an action game, an explicit challenge might involve the exact timing required to jump over rolling barrels or onto a moving platform. In an adventure game, the appearance of a locked door always suggests the challenge of unlocking it.

An implicit challenge is not specifically added to the game but is an emergent feature of the game itself. Examples include determining how to divide resources or deciding which units to deploy first in a strategy game.

Attached Image: 06-12 NeedForSpeed-Shift.jpg
Attached Image: 06-13 NeedForSpeed-Shift.jpg

Challenges in Need for Speed: Shift are both explicit (win races, beat others) and implicit (tune your car to optimize it for each race).

(Courtesy: Electronic Arts)


Perfect & Imperfect Information

When perfect information is provided, the complete state of play is known to the players at all times. Perfect information yields logical challenges, where players assimilate the information and use it to decide on the best course of action. In chess, both players are always aware of the state of the board and the position of all the pieces. This allows players to come up with strategies that will yield the maximum benefit.

With imperfect information, players are provided with only a fraction of the information needed to make the best decision. In contrast to the logical challenges in games with perfect information, the challenges in these games also require inference (or the ability to make a guess about the nature of the missing information).


Attached Image: 06-14 BackgammonIllo.jpg
Attached Image: 06-15 PokerIllo.jpg

Board games such as backgammon provide perfect information to the players, while card games such as poker
provide imperfect information to the players. (Courtesy: Illustration by Ben Bourbon)


In closed-hand card games, all players are provided with incomplete information—since no player can see any other player’s hand. Mastermind centers around this idea. Player A hides information (order of four pegs with six possible colors) from Player B, who spends each turn making inferences about the hidden information as Player A provides feedback after each of B’s turns. Sometimes, the game platform can affect the amount of information supplied. In Chapter 2, you learned that console games involving local play cannot display complete information due to the limitations of sharing one screen.
A standard way to graphically represent incomplete information in a strategy game is through a fog of war—in which each player cannot see enemy units that are beyond the sight range of their own units. The player uses inference to estimate the location of the enemy units. The tension in the Prisoner’s Dilemma game theory example results from imperfect information given to the two players about each of their decisions.

Attached Image: 06-18 SidMeier\'sCivilizationV.jpg

Fog of war is a common way of graphically representing incomplete information in a strategy game such as Civilization V. (Courtesy: Firaxis)


Imperfect information is commonly used in games because it challenges players to interact with and participate more in the game world. It also ties in with story components to create an element of mystery in the game. With perfect information, there wouldn’t be any detective stories, spy thrillers, soap operas—or any stories with unexpected plot twists (think The Sixth Sense or The Usual Suspects). Imperfect information draws players into the game through human nature—appealing to our curiosity!

Intrinsic & Extrinsic Knowledge

Intrinsic knowledge is gained from within the game world. For example, a player could discover the purpose of a magical machine after getting some information from an alchemist NPC in the game. The memory of spells, combination moves, maze layouts, and character personalities throughout the game is also a form of intrinsic knowledge. Games that completely rely on memory include the Simon musical imitation game discussed in Chapter 1.

Extrinsic knowledge is gained outside the game world and applied to the game. This type of knowledge can add an element of reality to the game and often involves facts such as “wood floats,” “ice melts,” “paper burns,” “diamonds cut glass,” and “a magnifying glass focuses light.” These common sense facts can be used to solve various puzzles or meet challenges in the game. If your character possesses a magnifying glass or lens and some paper, you could direct sunlight onto the paper with the lens and start a fire. Similarly, if you are trapped in a glass room, you might use a diamond amulet to cut through the glass. Players must rely on this type of knowledge completely to play trivia games. Another form of extrinsic knowledge involves a player’s understanding of legends referred to in the game. For example, a mirror could be used in a game to detect a vampire.

Attached Image: 06-17 Braid.jpg

Platformers such as Braid typically require intrinsic knowledge and skills to achieve success. (Courtesy: Hothead Games)


Attached Image: 06-35 Minecraft 3942746_f520.jpg

In Minecraft, players apply extrinsic knowledge (e.g., wood burns, ore melts) in order to build anything they can imagine—including
shelters that protect them from the monsters that come out at night! (Courtesy: Mojang AB)


Minecraft is not a game but a genre that embraces creativity, cares more about experience than rules, and lets people experience the joy of collaboration. If you apply this to every game you play, think of the worlds and experiences that are possible.

—Mark Terrano (Design Director, Hidden Path Entertainment)

Spatial Awareness

Attached Image: 06-20 MysticMine.jpg

Players navigate through mineshafts in Mystic Mine. (Courtesy: Koonsolo)


In spatial challenges, players usually have to navigate through environments. These challenges are very common in puzzle games and vehicle sims—where the entire gameplay experience depends on the ability to understand spatial relationships to reach a destination.

Pattern Recognition & Matching

Attached Image: 06-19 Chuzzle.jpg

In puzzle games such as Chuzzle, players match patterns based on colors and sequences. (Courtesy: PopCap)


Pattern recognition and matching challenges are common in puzzle games such as Tetris, where the blocks fall too fast for players to make conscious decisions about where to put them. The process by which we subconsciously match or recognize patterns is related to learning theory. This behavior is common in a lot of action games, where players simply don’t have time for reflective thought and must rely on automatic thinking to master the game. It’s no wonder that players fall into trances while playing these games!

Resource Management

Many games allow players to manage settings and actions associated with their resources or characters. This resource management (referred to as micromanagement in games that involve a high level of detail) is one way to allow the player to have many options in the game. For example, let’s say a player’s character is being threatened by several opponents. The player must decide how the character will respond to this threat. If the character has a series of powers and types of weapons, and can target only one opponent at a time, the player must choose which power to use, which weapon to use, and which opponent to target.

Attached Image: 06-21 FIFAManager11.jpg

In sports management games such as FIFA Manager 11, players must carefully manage resources
(e.g., team members) in order to progress. (Courtesy: Electronic Arts)


Resource management can get particularly exhausting when it’s combined with multitasking, in which players must make these choices simultaneously. This is often found in real-time games, such as real-time strategy (RTS) games and first-person shooters (FPS), which involve reaction challenges. In Warcraft 3, hero units have many abilities; this requires a player to micromanage them in battle if they want to maximize their effectiveness. However, only one hero can be controlled directly at a time—forcing the player to multitask. In an FPS, multitasking might involve players having to steer vehicles while shooting at targets that are moving quickly around the game environment. In Halo, this multitasking is removed—since the driver can only drive, while another player rides “shotgun” and shoots. This way, neither player is driving and shooting simultaneously.

Reaction Time

Action games challenge a player’s reaction time. This is especially significant when the speed at which a player responds to a challenge is directly related to the speed at which the player’s character reacts in the game. This could mean life or death for the character if slow reaction time results in a missed opportunity to defeat the enemy or take the treasure before it vanishes.

Attached Image: 06-22 PrinceOfPersia-WarriorWithin.jpg

In Prince of Persia: Warrior Within, players must react quickly in response to challenges. (Courtesy: Ubisoft)


Challenges & Game Goals

All the challenges discussed can be applied to specific goals within the game itself:
  • Advancement: Reaching a higher level in the game. Each successive level might increase in difficulty—as in many arcade and puzzle games. “Leveling up” could also allow your character to be more powerful, as in many RPGs.
  • Race: Accomplishing something before another player does; this is a reaction-time challenge associated with some action and multiplayer puzzle games.
  • Analysis: Applying mental processes to solving riddles and cryptic codes. This is a mental challenge that involves almost every other type of challenge—and it’s used most widely in puzzle and adventure games.
  • Exploration: Moving into new areas and seeing new things; satisfies the curiosity of the player, and it’s popular in adventure games and RPGs.
  • Conflict: Disagreements or combat between characters; used in almost all game genres to provide dramatic tension.
  • Capture: Taking or destroying something belonging to an opponent without being captured or killed in return; remains one of the most overarching game goals across all genres (including action and RTS games).
  • Chase: Catching or eluding an opponent—often by utilizing either quick reflexes or stealth strategies; popular in action and stealth games.
  • Organization: Arranging items in a game in a particular order—often by utilizing spatial and pattern-matching strategies; common in most puzzle games (e.g., Bejeweled, Tetris) and in strategy games with a great deal of resource management tasks.
  • Escape: Rescuing items or players and taking them to safety—often involving analytical reasoning and resource management.
  • Taboo: Getting the competition to “break the rules”—often involving physical or emotional stamina (e.g., Twister, Don’t Break the Ice).
  • Construction: Building and maintaining objects—common in process simulations; involve resource management and trade.
  • Solution: Solving a problem or puzzle before or more accurately than the competition does—involving analytical reasoning and knowledge application. This goal is common in adventure games, which incorporate a lot of detective work.
  • Outwit: Applying intrinsic or extrinsic knowledge to defeat the competition.
Escapism & Challenge

Different genres of games emphasize either escapism or challenge over the other, but every game is ultimately judged by how well it delivers each of them. Escapism is the power to transport the player into a narrative—whether it’s driving a race car, napalming hostile aliens, or being a make-believe mayor of a town named after your cat. Graphics, sound, story, and writing are essential to good escapism. Challenge is self-explanatory, but where many games go wrong is their failure to comprehend what kind of challenge best matches the product. Hardcore players are a vocal minority, and a game that is too challenging stops being good escapism and starts becoming work.


—Matt MacLean (Lead Systems Designer, Obsidian Entertainment)


Emergent Gameplay

Designing for emergence is like building a sandbox. If you give players a set of tools (mechanics) and a big area to play in (the game), they will figure out what they’ll build in the “sandbox”—and how they’ll play the game. [
Note: In philosophy and systems theory, “emergence” refers to the way complex systems and patterns arise out of relatively simple interactions. Emergent gameplay is a creative use of a game in ways that were anticipated or planned by the game’s development team.]


—Troy Dunniway (Vice President & General Manager, Globex Studios)


Balance

A game is balanced if players perceive that it is consistent, fair, and fun! The ease of winning the game also increases as the players’ skills increase. Random events (e.g., a meteor hitting the area, destroying a player’s resources) can still occur in the game that might decrease a skilled player’s chance of winning. However, a better player should be more successful in general at the game than a less-skilled player—unless the game is based purely on luck instead of skill. To implement this balance, a game often has to be tweaked during the testing process (discussed in Chapter 11). To set up a balanced system for players, the gameplay needs to provide:
  • Consistent challenges: Players should experience gradually more difficult challenges.
  • Perceivably fair playing experiences: Players shouldn’t be doomed from the start through their “mistakes.”
  • Lack of stagnation: Players should never get stuck with no way to go on.
  • Lack of trivial decisions: Players should be required to make only important decisions in the game, even in games that incorporate micromanagement.
  • Difficulty levels: Players should have a choice of difficulty or the level should adjust to the player’s ability throughout the game.
Static Balance

Static balance is associated with the rules of the game and how they interact with each other. This type of balance does not depend on time and exists before the game is played. For example, the rules might indicate the relative strengths of units in a war-strategy game. Players might use this information as a reference when deciding what units to deploy during the game. Static balance can be ensured by applying obvious strategies, symmetry, trade-offs, resource combination or feedback.

Obvious Strategies


Attached Image: 06-36 Warhammer40,000-DawnofWarII.jpg

In Warhammer 40,000: Dawn of War II, units have more strength than others in certain situations. (Courtesy: THQ)


A game should contain one or more obvious strategies, which are superior to other possibilities under many circumstances. In Advance Wars, each character has specific strengths and weaknesses. When a player is controlling a certain character, part of that player’s strategy is to make decisions that correspond to that character’s strengths. One of the game characters, Max, has powers that give his tanks more firepower—while his indirect-damage artillery vehicles are comparatively weak. When given the option to deploy tanks, those who are playing “Max” will attempt to do so—unless other circumstances arise that make this an unwelcome decision.
Creating Meaningful Choices

The most important task for any game designer is to create meaningful and interesting choices for players. The nature of what makes a choice meaningful is something that varies widely from game to game. Is it a meaningful choice when I decide how to dress my character in a role-playing game? When I choose how many units to create for production and how many for combat in a real-time strategy game? When I determine how to use my roll in backgammon? All of these examples present good, interesting choices for players. Yet they don’t offer us easy solutions for designing such choices in our own games. Studying how other games create choice is one way to learn; another way is to design by setting
player-experience goals, rather then feature-driven goals (e.g., “the game will encourage shifting alliances between groups of trading partners,” rather than “players will be able to trade resources”). With this goal in mind, the game can be tested to see when the player experience works as described (e.g., when players are making interesting choices about who to trade with and when to break an alliance with a partner). Learning how to create choices like this means getting inside the head of the player—not focusing on the game as you designed it. When you’re just beginning to design games, one of the hardest things to do is to see beyond the game you envisioned to the actual game the players are playing. What are they thinking as they make choices in your game? How are they feeling? Are the choices you’ve offered as rich and interesting as they can be? Asking these types of questions means opening up your design process to player feedback—and this is a difficult, emotional process for most designers.


—Tracy Fullerton
(Associate Professor, USC School of Cinematic Arts; Director, Game Innovation Lab)


Symmetry

Symmetry, the simplest way to balance a game, involves providing each player and NPC with the same starting conditions and abilities. This ensures that the outcome of the game will depend only on the relative skill levels of the players. This often works well in abstract puzzle games, but it would be difficult to achieve successfully in a real combat simulation. It’s neither natural nor realistic for opposing armies to have the same exact troops and abilities—and it can make the game much less exciting. However, symmetry is used often in RTSs such as Age of Empiresand it could work quite well in a participatory sim such as a team sports game. In the real world, teams do start with more or less the same external resources (although the skill level of each team member differs).

Attached Image: 06-23 AgeOfEmpiresMythologies.jpg

In Age of Empires Mythologies, players begin the game with the same resources. (Courtesy: THQ)


Symmetry is associated with the relationships between resources. There are two types of symmetric relationships: transitive and intransitive.

A transitive relationship is a one-way relationship between two or more resources. For example, you could construct a set of characters [A, B, and C] in which A is more powerful than B, who is more powerful than C, who is not more powerful than anyone. Since this relationship is hierarchical, you can easily apply this relationship to a world with a caste system in which the royalty [A], merchants [B], and peasants [C] interact.

One way to utilize this relationship is to have all characters begin as Cs (or to initially give the players access to C-level units or abilities). As a player’s skill level increases during play, the player graduates to a B, and so on. In this case, all players start with the same conditions (symmetry)—but some variation occurs in the game if players advance up the food chain at varying speeds. This is a form of character advancement discussed in Chapter 5.

Game theorists often refer to an intransitive relationship as “rock paper scissors” (RPS)—from the game of the same name. In RPS, rock beats scissors, which beats paper—which, in turn, beats rock. This relationship differs from the transitive in that it is circular rather than linear—with each resource having the ability to defeat and be defeated by another. This relationship can’t be hierarchical in the classic sense, since the weakest characters are able to beat the strongest.

Attached Image: 06-24 HeirarchicalDiagram.jpg


Attached Image: 06-25 RockPaperScissorsDiagram.jpg

A hierarchical caste system is a type of linear, transitive relationship—whereas a rock-paper-scissors
system is a type of circular, intransitive relationship. (Courtesy: JN)


However, story elements can work with gameplay in this case. For example, the transitive caste system we set up could be turned into an RPS (intransitive) relationship if the peasants [C] were given special powers, abilities, or knowledge that would enable them to defeat the royalty [A]. For example, they could storm the castle unnoticed! In this example, A beats B, B beats C, and C beats A. This gameplay device works better if the relationships between the resources varies throughout the game. For example, what if the peasants [C] were no longer able to defeat royalty [A]—but they somehow developed the ability to defeat the merchants [B]? To keep the intransitive relationship, the abilities of the other characters would have to change as well—so that A beats C, C beats B, and B beats A. (Be careful: This could result in some serious story continuity problems!) Intransitive relationships can also be defined by the actual abilities of the resources. For example, archers [A] might defeat infantry [B] because they are quicker; infantry [B] might defeat cavalry?[C] because they have heavy armor; and cavalry [C] might defeat archers [A] because they can get to them before they have a chance to fire their bows enough times.

Trade-Offs

Attached Image: 06-26 Crysis2.jpg

In Crysis 2, players can shift between three modes: power (more power and ability to move quickly—but less protection and no invisibility),
cloak (less power but ability to become temporarily invisible), and armor (shown—less power but more protection).
(Courtesy: Electronic Arts / Crytek)


Not all relationships involve transitions between inferior and superior characters or resources. In fact, it’s more common for some to be better than others in some ways. For example, in The Sims, expensive furniture is more aesthetic—but cheap furniture is more comfortable. To make a decision on which furniture your character will purchase, you have to weigh trade-offs. When players are provided with options that aren’t entirely positive or negative, they face a decision-making puzzle.

Combination

Attached Image: 06-30 AdvanceWars-DualStrike.jpg

In the Advance Wars series (Advance Wars: Dual Strike, shown), players can join two resources (such as tanks) that have been
weakened by combat and form a “new” unit that contained their combined strength. (Courtesy: Nintendo)


Players can sometimes combine resources or characters to meet a challenge. For example, in Advance Wars,players can join two sets of troops that might have been weakened by combat. Combining these troops adds the power of both so that the new entity is stronger.

Feedback

Attached Image: 06-27 SimCityDeluxe.jpg

In SimCity Deluxe, random events such as alien attacks can affect the game’s balance. (Courtesy: Electronic Arts)


As a game progresses, it can get out of balance and fall back into balance. The tension between players can be increased with the aid of feedback. If one player is ahead in the game, for example, the game could get more difficult for that player—which would be negative feedback. This player could be advanced enough to be able to get resources from the other player—but there could be a high price for these resources.

On the other hand, if a player is behind in the game, challenges could get easier for that player—which would be positive feedback. An application of positive feedback involves ending the game once it’s clear that the game has been won. In some games, players can get to the point when they know they’re going to win—but they still have to play until the victory conditions are met. (For example, if a player has defeated all but one of the 1,001 monsters, that player will clearly win the game. However, if that one monster is hiding somewhere, the player could spend hours trying to find and defeat the creature.)

Completely random events should also occur in the game to keep it unpredictable, but these could throw a game off balance. For example, a volcano could erupt near one of the underdog player’s characters—which could severely affect this player’s ability to catch up.

Writing good characters and story that fit in well with the gameplay you want to create is the hardest—and the most audience engaging—part of game development.


— Frank Gilson (Senior Producer, Kabam)

Dynamic

Games begin with static balance—but once they’re set in motion by the players, a dynamic balance emerges. It is this dynamic balance that allows players to truly interact with the game. Players can interact with dynamic balance through destruction, maintenance, and restoration.

Destruction

Attached Image: 06-28 RedFaction-Guerrilla.jpg

In Red Faction: Guerrilla, players wreak havoc across Mars. (Courtesy: THQ)


In a destruction scenario, the game is initially balanced. However, instead of maintaining this balance, the player(s) act as the opposing forces and attempt to throw the game off balance.

Maintenance

Attached Image: 06-37 FarmTown.jpg

In Farm Town, the precursor to FarmVille, players maintain balance of their resources. (Courtesy: Slashkey)


In the case of maintenance, the game is initially balanced. Once the player(s) interact with the game, opposing forces emerge that threaten to throw the game out of balance. The object of the game is to prevent these forces from overrunning the system.

Restoration

Attached Image: 06-38 BioShock.jpg

In BioShock, players must take control of a world in anarchy. (Courtesy: Take-Two Interactive)


A restoration game is initially unbalanced and perhaps even chaotic. The object of the game is for the player(s) to move the system back into equilibrium—cleaning it up and making it orderly.

Developing Rich Characters Through Gameplay

The best game stories grow out of the gameplay itself. What defines a character is what actions he or she takes, so the gameplay is a great way to develop rich characters over time. At the same time, a great story can add context and meaning for gameplay actions the player take. Ideally, story and gameplay play off each other to create a rich and entertaining experience for the player.


— Anne Toole (Writer, The Write Toole)

Economies

Game economies are systems in which resources move around—either physically (from place to place) or conceptually (from owner to owner). Resources can be money, troops, characters, weapons, property, skills—anything that players can “own” in the game (information, too!). In an FPS, a primary resource is often ammunition that can be found or obtained by stealing it from dead opponents. This resource is consumed by firing weapons. Health points are other resources that are consumed by being hit—and are restored with medical kits. Since resources interact with each other, players can’t produce too much or too little of them—or the economy will be thrown out of balance. In process sims such as Black & White and The Sims Online, the game economy is balanced by nurturing and caretaking resources (characters); the focus in these games is on the characters and their needs.

In persistent-state world (PSW) economies, players can collect and trade items of value. Since thousands of people can react in ways the developer can’t possibly anticipate, it’s difficult to design and adjust (fine-tune) a PSW. Ultima Online was originally designed to have a completely self-contained, closed economy with a fixed number of resources. Players, acting in a way that had not been anticipated by the developers, hoarded objects without using them. Resources were depleted, which caused an inflation in the game economy (in which the hoarders could charge ridiculously high fees for these objects). Developers eventually had to do away with the closed system and adopted an open economy in which new resources were spawned.


Titus Levi on the Flexibility of Multiplayer Economies

Attached Image: Levi, Titus GSD GDE2-3.jpg

Titus Levi - Associate Professor, United International College (Courtesy: Kathleen Pittman)


Titus Levi is an economist working as a consultant for individuals and organizations working in the arts and media industries. His clients include Interep, Susquehanna, and the Durfee Foundation. Titus has been a faculty member at the University of Southern California’s Annenberg School for Communication—where he taught classes in business strategies and conducted research on the economics of the radio industry. His work in radio has spanned more than a decade, including serving as program host and producer for KUSC-FM and KPFK-FM. Titus also worked as a freelance journalist, most significantly writing for Keyboard Magazine’s new talent column, “Discoveries.” He has also been an arts administrator, organizing and producing concerts for the California Outside Music Association and the Los Angeles Festival.

Game economies add flexibility to the game experience. By adding in side bargains and incentives to create new systems, players, and so on, the game continues to change and adapt. Economies also give players more reasons or incentives to continue playing the game—due to their dynamic nature, providing novelty and discovery. This means that you don’t get bored!


The EverQuest Economy

In MMOs, characters gain skills and objects they can trade with other players using the game’s currency. In 2001, some
EverQuest players decided to take the economy outside the game and began selling their assets for real money through auction and trading sites such as eBay. Economist Edward Castronova studied thousands of EverQuest transactions initiated through eBay to determine the real-world economic value generated by the inhabitants of Norrath—the fantasy world of EverQuest. The verdict? In 2002, Norrath’s gross national product (GNP) was $135 million ($2,266 per capita). (If Norrath were a real country, it would have been the 77th richest in the world—just behind Russia!)


Edward Castronova on MMO Game Economies 

Attached Image: Castronova, Edward GDE2-3.jpg

Edward Castronova, PhD - Associate Professor of Telecommunications, Indiana University (Courtesy: EC)


Edward Castronova obtained a BS in International Affairs from Georgetown University in 1985 and a PhD in Economics from the University of Wisconsin–Madison in 1991. During this time, he spent 18 months studying German postwar reconstruction and social policy at universities and research institutes in Mannheim, Frankfurt, and Berlin. After graduating, he held professorships in political science, public policy, and economics at the University of Rochester and at California State University, Fullerton. Since the fall of 2003, Edward has been an Associate Professor of Telecommunications at Indiana University. He is the author of Synthetic Worlds: The Business & Culture of Online Games (University of Chicago Press.) His paper, “Virtual Worlds,” is the most downloaded economics paper at the Social Science Research Network.

In the multiplayer context, all economic theories can be effectively applied to games. Economics is about the interactions of human beings—so if human beings meet up in a game world, economics takes place. Economies are critical elements of immersion. Designed well, they sit in the background unnoticed and give a constant sense of value—and hence, reality—to every object in the game. Designed poorly, they are obvious at every turn—and make worthless items seem valuable (and make valuable items seem worthless).

The laws of game economics are the same as in the real world—just under rather unusual circumstances. There are thousands of real-world economic situations that could be adapted well into game environments: different monetary institutions; auctions under different rules; population response to shortages; production teams; income redistribution effects; tax effects; location decisions and urban development—and on and on!


Gameplay & Documentation

Now that you’ve learned about gameplay elements, you have everything you need to create a concept document, proposal or game design document (discussed in more detail in Chapter 11). You’ll want to blend both story (Chapter 5) and gameplay elements together—identifying points in your storyline where challenges might occur, and creating a variety of strategies that player characters can use to address each challenge. Consider interaction modes, game theory, and ways to keep your game balanced. Do you see gameplay as a game element that is distinct from story, or do you see an integration of these two components? Analyze a few existing games for story and gameplay elements to determine whether they’re separate or interdependent. Whether you separate or integrate gameplay with story, it’s important to understand the value of gameplay as the core design component of your game. Without strong gameplay design, a game cannot fully engage the players in the experience.

The gameplay elements discussed in this chapter exist in the game world—the environment of the game which contains the structures, terrain, objects, textures, and style of the game itself. Level design, discussed in the next chapter, focuses on creating the game world and incorporating gameplay into it. Gameplay and level design are closely related—and some aspects of the latter incorporate important game theory elements.

Source SDK: Making a single player mod

$
0
0

<a href="http://www.design3.com/ref/GDNET-2d37091e.html" target="_top"><img src="http://www.design3.com/affiliate/accounts/default1/banners/728x90-d3-GameDev2.png" alt="Get 50% Off design3" title="Get 50% Off design3" width="728" height="90" /></a><img style="border:0" src="http://design3.com/affiliate/scripts/imp.php?a_aid=GDNET&a_bid=2d37091e" width="1" height="1" alt="" />
This is an affiliate banner - registering with design3 will also benefit GameDev.net!


As most of you are probably aware, the Source Software Development Kit (SDK) has recently been made available for free. In honor of this release, the design3 team wants to exclusively share a tutorial with the GameDev community that will teach you how to make a single player mod for Half Life 2: Episode 2 (a game supported by the free Source SDK). Without further adieu, we present to you design3’s “Source Choreography & In-Game Cinematics” tutorial.


Source Choreography & In-Game Cinematics

In these 27 chapter videos you’ll explore Valve’s dynamic Faceposer toolset to develop choreographed NPC sequences. These will include custom dialog, facial animation, and blended gestures - each containing multiple actors, conditionals, and events.

Various sequences are then connected and additional interactivity can be integrated via the powerful input/output response system in Hammer for endless possibilities. You can even harness the in-game camera to dictate how players can, or should, experience the action as it unfolds.

Let’s get started...

First you’ll need to download the support files.

Chapter 1 - Getting Started

A detailed overview of what will be learned in the following chapters.

Chapter 2 - Creating A Mod In The SDK

Learn to create a mod for the source engine using the SDK.

Chapter 3 - Running The Game

Start up Half Life 2 and learn to activate the developer console.

Chapter 4 - Copying Server & Client Dlls

See how to copy the server and client DLLs into your own mod folder.

Chapter 5 - Extracting Content

Learn to extract materials and models for your mod using GCFScape.

Chapter 6 - Hammer Build Program

Modify your Build Program options to make your mod work in Half Life 2.

Chapter 7 - In-game Level Example

Check out an in-game playthrough example to see what you will be creating in the following chapters.

Chapter 8 - Hammer Level Example

A brief look at what you can create using the choreography and cinematic tools in the Source SDK.

Chapter 9 - Recording

Learn to create custom sounds for your games. Using Audacity, we'll record sound files and show you how to get them into your games.

Chapter 10 - Creating Sound Scripts

Create scripts so that your game can locate and play your custom sound files.

Chapter 11 - Creating Captions

Learn to create captions for your sound files. This allows players to read the dialog text and follow along to what is going on in your game more closely.

Chapter 12 - Overview & Setup

Familiarize yourself with the Face Poser tool within the Source SDK.

Chapter 13 - Lip Syncing

Using Face Poser, sync your character's lips to the dialog of your custom sound files.

Chapter 14 - Hammer Input Output System

Using the Object Properties menu, you'll learn to use outputs and inputs for Half Life 2.

Chapter 15 - Logic Choreographed Scene Setup

Learn how Face Poser communicates with Hammer to make your scene function properly.

Chapter 16 - Character Motion & Gestures

Using the info_target entity you'll learn to trigger your character's movements and gestures while building your scenes.

Chapter 17 - Combining Animations

In this chapter learn how to combine two animations to create completely new ones. This is useful if you don't plan to create your own custom animations for use in Half Life 2.

Chapter 18 - Adding Characters

Most scenes in your games will have more than one NPC interacting with your main character. In this section you'll learn to create additional characters and give them a part to play in your scene.

Chapter 19 - Facial Animations

Using flex sliders and custom expressions you'll learn to create unique facial animations for your characters.

Chapter 20 - Looping & Relays

Using the logic_choreographed_scene entity, learn about loops and relays that will further allow the player to interact with objects and triggers in the scene.

Chapter 21 - Troubleshooting Methods

Learn several ways to troubleshoot problems you might encounter while modding in Half Life 2.

Chapter 22 - Responses Systems

Create an AI response system that will fire off responses when a player interacts with an NPC.

Chapter 23 - Teleporters & Debug Points

While testing your maps and scenes its good to have debug points. These will allow you to test your map without triggering events that may occur further into your game level. This saves precious time when trying to debug problems and make fixes within your game.

Chapter 24 - Timing Cameras

Learn to set up cameras and trigger them with certain events. These cameras can be used to show multiple angles of your scene and events.

Chapter 25 - Console Commands & Map Locations

A list of other useful console commands and map file locations.

Chapter 26 - Level Walk Through 1

Part 1 of a recap walk-through, this video reviews the entire process of putting together the finished game level shown in the tutorial.

Chapter 27 - Level Walk Through 2

Part 2 of a recap walk-through, this video reviews the entire process of putting together the finished game level shown in the tutorial.


We hope you enjoyed the “Source Choreography & In-Game Cinematics” tutorial series. Please visit design3.com/source-engine for more Source tutorials covering topics such as:

Source Level Design
Source Machinima Choreography
Source Machinima Cinematography
Left 4 Dead Mapping
Custom Props & Animation with 3ds Max
Custom Props & Animation with Maya
Source Vehicle Scripting
Source Choreography & In-Game Cinematics
Source Creature Rigging
Modifying and Recompiling Source Characters
Portal 2 Mapping Basics

New Source content coming to design3

We’re currently working on a playable Portal 2 mod as well as a “Portal 2 Advanced Mapping” tutorial, which will be available soon at design3. Stay tuned and be sure to check it out!

<a href="http://www.design3.com/ref/GDNET-2d37091e.html" target="_top"><img src="http://www.design3.com/affiliate/accounts/default1/banners/728x90-d3-GameDev2.png" alt="Get 50% Off design3" title="Get 50% Off design3" width="728" height="90" /></a><img style="border:0" src="http://design3.com/affiliate/scripts/imp.php?a_aid=GDNET&a_bid=2d37091e" width="1" height="1" alt="" />


How To Make Games For The Absolute Beginner

$
0
0
In this article I’m going to be talking about the process behind actually making, testing and publishing a game. It’s aimed at the absolute beginner but there should be something of interest here for the intermediate level reader as well. I’m going to be concentrating on making game with Adobe Flash, but the general techniques are applicable to any platform.

Kinect Reception

$
0
0


License: Ms-PL

Posted Image
Introduction

The Idea: TV Screen in the Reception, When nothing happens (no one is in the reception) we can display videos on the screen but when someone enters the frame, show him the Kinect Image, and if the user is doing something funny, capture his image and save it.

The question is how can I know if the person is doing something funny?

For that, I've created Image AuthenticManager that contains a set of rules defining what positions or combinations are funny.

For example: If right hand position is higher than head position, then add 2 points, if the left foot position is crossing the right foot, then add an additional 2 points, etc.
When the user reaches the goal, we decide then to take his picture.

Before jumping to coding, let's talk about the application flow:
The main window is controlled by two Timers and the AuthenticManager:

SeriousTimer set to 10 secs and it starts Ticking as the Kinect Skeleton Event is first fired (this event will only work when the Kinect identifies a full person skeleton).
Inside the SkeletonFrameReady, we also have integer called _fpsCount that increases itself by 1 each time the SkeletonFrameReady is called after starting the SeriousTimer, this will help us to make sure the user is standing in front of the Kinect and not just walk by him.

Now how can the _fbsCount tell me that? ll we need to do is multiply the SeriousTimer seconds interval by the Minimum Fps (for example 10) and the _fpsCount should be bigger if the user stands in front of the Kinect.

In this case, the Timer will stop the Video feed and will display the Kinect Image.

IdleTimer by default is set to 30 seconds and each time the SkeletonFrameReady method is fired, we restart the IdleTimer.

So if there are no events for SkeletonFrameReady, the IdleTimer will return the Video feed.

JointID - AuthenticManager works with RuleObject that contains JointID Source and JointID Target (More about Joints - Kinect - Getting Started - Become The Incredible Hulk).
AuthenticManager is the heart of Kinect Reception application, this class will check if the user position is funny by your own rules.
Posted Image

What is Joint?


The data is provided from the Kinect application code as a set of points, called skeleton positions, that compose a skeleton structure.


public enum JointID
{
HipCenter = ,
Spine = 1,
ShoulderCenter = 2,
Head = 3,
ShoulderLeft = 4,
ElbowLeft = 5,
WristLeft = 6,
HandLeft = 7,
ShoulderRight = 8,
ElbowRight = 9,
WristRight = 10,
HandRight = 11,
HipLeft = 12,
KneeLeft = 13,
AnkleLeft = 14,
FootLeft = 15,
HipRight = 16,
KneeRight = 17,
AnkleRight = 18,
FootRight = 19,
Count = 20,
}


  • Vector - For Source and Target Joints, you also have to define the Vector to check X or Y against one another.
  • Operator - Do you expect the Source Vector to be Bigger or Smaller than the Target Vector?
  • Score - If the rule is true, what is the score for the rule.

Posted Image

Background

Since Microsoft has released the Kinect.NET SDK, I wrote many articles on that subject:

I think Kinect is very cool and I'm searching for more projects and good ideas for Kinect. A couple of days ago, I talked with my friend Guy Burstein and he came up with an idea for Kinect application, he said what if people will enter the Microsoft Israel reception and instead of video screen showing commercials, let's add something interesting with Kinect.

Using the Code

Using Kinect events, I can see when user enters the frame, using two timers I can check if the user is just passing by or is standing in front of the camera.

The below image describes the application flow, at the beginning the application will show random videos, when the Kinect Skeleton Event will raise then the Serious Timer will begin ticking, each tick based on the FPS rate will be aggregated to variable called NumTicks, when the Serious Timer completes we check if NumTicks is big enough based on the FPS, if so then we'll start the Idle Timer and switch to Kinect Image.

Idle Timer - Each time the Kinect Skeleton Event is raised, the Idle Timer will be restart, so if there is no one in front of the Kinect camera, the Idle Timer will switch back to Videos.

Posted Image
As you can see from the images below (or Full Video), when I moved my hands or legs, the Score Bar has changed based on the rules you defined:
Posted Image

Posted Image

Posted Image

You reached the Goal!!!

Posted Image

The entire application works with 4 managers:


  1. Kinect Manager
  2. Configuration Manager
  3. Video Manager
  4. Authentic Manager

Kinect Manager

I've shown how to get started with Kinect many times in my previous posts, but for this application, I've created a singleton class to handle everything related to the Kinect settings, from restarting the Kinect RunTime object to changing the camera angle.


public KinectManager()
{
try
{

KinectNui = new Runtime();

KinectNui.Initialize(RuntimeOptions.UseColor | RuntimeOptions.UseSkeletalTracking |
RuntimeOptions.UseColor);

KinectNui.VideoStream.Open(ImageStreamType.Video, 2,
ImageResolution.Resolution640x480,
ImageType.ColorYuv);

KinectNui.SkeletonEngine.TransformSmooth = true;
var parameters = new TransformSmoothParameters
{
Smoothing = 1.0f,
Correction = .1f,
Prediction = .1f,
JitterRadius = .05f,
MaxDeviationRadius = .05f
};
KinectNui.SkeletonEngine.SmoothParameters = parameters;

_lastTime = DateTime.Now;
Camera = KinectNui.NuiCamera;

IsInitialize = true;
StatusMessage = Properties.Resources.KinectReady;
}
catch (InvalidOperationException ex)
{
IsInitialize = false;
StatusMessage = ex.Message;
}
}


Another important method the KinectManager has is the CameraAngle control.

public void ChangeCameraAngle(ChangeDirection dir)
{
if (!IsInitialize) return;

try
{
if (dir == ChangeDirection.Up)
Camera.ElevationAngle = Camera.ElevationAngle +
Properties.Settings.Default.ElevationAngleInterval;
else
Camera.ElevationAngle = Camera.ElevationAngle -
Properties.Settings.Default.ElevationAngleInterval;

StatusMessage = Properties.Resources.KinectReady;
}
catch (InvalidOperationException ex)
{
StatusMessage = ex.Message;
}
catch (ArgumentOutOfRangeException outOfRangeException)
{
StatusMessage = outOfRangeException.Message;
}
}


Video Manager

The Video Manager has two specific types of Videos to play and the main Videos folders to pick random video each time.

Specific? When the user enters the Kinect Range, you can choose to play a specific video just before the Kinect Image will appear, and when the user leaves Kinect Range, you can choose to play the Out Video.

Define the type of video you want to play. If you ask for out video and there isn't one, return null - Stop Video and start showing Kinect Image. If you ask for in video and there isn't one, then return random video.

Posted Image

public static Uri GetVideo(VideoType type)
{
if (string.IsNullOrEmpty(Properties.Settings.Default.VideosLibraryFolder) ||
!Directory.Exists(Properties.Settings.Default.VideosLibraryFolder))
return null;
else
{
string value = null;
switch (type)
{
case VideoType.In:
value = Properties.Settings.Default.VideosLibraryInFile;
return string.IsNullOrEmpty(value) || !File.Exists(value) ?
CollectRandomMovie() : new Uri(value);
case VideoType.Out:
value = Properties.Settings.Default.VideosLibraryOutFile;
return string.IsNullOrEmpty(value) || !File.Exists(value) ?
null : new Uri(value);
default:
return CollectRandomMovie();
}
}
}
private static Uri CollectRandomMovie()
{
var movies = new ArrayList();

foreach (var filter in Properties.Settings.Default.VideoFilter)
movies.AddRange(Directory.GetFiles(Properties.Settings.Default.VideosLibraryFolder,
filter));

if (movies.Count == ) return null;

var rnd = new Random();
return new Uri(movies[rnd.Next(movies.Count)].ToString());
}


Configuration Manager
Kinect Reception allows you to set a range or rules to define what is considered Funny, the rule are based on Joint to Joint and each rule defines the Score if the rule applies.
Posted Image

The RuleObject contains the Source Joint and Target Joint, Vector to check for both, the operator (Bigger or Smaller) and the Score.

Posted Image

So what does the configuration manager do? It saves the rules. (Using MemoryStream to translate the Rule to string and then save it into the application resources.)

public static ObservableCollection Load()
{
var deserializer = new XmlSerializer(typeof(ObservableCollection));
try
{
var xs = new XmlSerializer(typeof(ObservableCollection));
var memoryStream =
new MemoryStream(Encoding.UTF8.GetBytes(Properties.Settings.Default.Rules));
var xmlTextWriter = new XmlTextWriter(memoryStream, Encoding.UTF8);
return (ObservableCollection)xs.Deserialize(memoryStream);
}
catch (Exception)
{
return new ObservableCollection();
}
}
public static void Save(ObservableCollection items)
{
try
{
var memoryStream = new MemoryStream();
var xs = new XmlSerializer(typeof(ObservableCollection));

var xmlTextWriter = new XmlTextWriter(memoryStream, Encoding.UTF8);
xs.Serialize(xmlTextWriter, items);

memoryStream = (MemoryStream)xmlTextWriter.BaseStream;
var xmlizedString = Encoding.UTF8.GetString(memoryStream.ToArray());

Properties.Settings.Default.Rules = xmlizedString;
}
catch (Exception ex)
{
throw new ArgumentException(ex.Message);
}
}


Authentic Manager

The Authentic Manager is the core of Kinect Reception, he will take all rules defined by you and check them against the Skeleton Joints.

The method below will extract the UnTracked joints and will make sure the joints quality are enough for calculation (We don't want the user moving out of the picture to be considered as funny Posted Image).

If the Skeleton Joints reach the Goal Score you define then an event will raise telling the main window to save the current Image and display for the user.

public void ChecksForAuthentic(JointsCollection joints)
{
if (_rules.Count == ) return;

var fixJoints =
joints.Cast().Where(
joint => joint.Position.W >= .6f &&
joint.TrackingState == JointTrackingState.Tracked).ToList();

var sb = new StringBuilder();
for (var index = ; index < _rules.Count; index++)
{
var rule = _rules[index];
var s = (from j in fixJoints.Where(joint => joint.ID == rule.Source) select j).
DefaultIfEmpty(new Joint() { TrackingState = JointTrackingState.NotTracked }).
Single();

var t = (from j in fixJoints.Where(joint => joint.ID == rule.Target) select j).
DefaultIfEmpty(new Joint() { TrackingState = JointTrackingState.NotTracked }).
Single();

if (s.TrackingState == JointTrackingState.NotTracked ||
t.TrackingState == JointTrackingState.NotTracked) break;

var sv = s.ToFloat(rule.SourceVector);
var tv = t.ToFloat(rule.TargetVector);

if (rule.Operator == Operators.Bigger && sv > tv)
{
Score = Score + rule.Score;
sb.AppendLine(string.Format("Bigger -> Source: {0}, Target:{1} , Vector:{2}",
rule.Source, rule.Target, rule.SourceVector));
}
else if (rule.Operator == Operators.Smaller && sv < tv)
{
Score = Score + rule.Score;
sb.AppendLine(string.Format("Smaller -> Source: {0}, Target:{1} , Vector:{2}",
rule.Source, rule.Target, rule.SourceVector));
}
}

if (Score >= _goal)
IsAuthentic(Score, sb.ToString());
}


About the Author

Shai Raiten is VS ALM MVP, currently working for Sela Group as a ALM senior consultant and trainer specializes in Microsoft technologies especially Team System and .NET technology. He is currently consulting in various enterprises in Israel, planning and analysis Load and performance problems using Team System, building Team System customizations and adjusts ALM processes for enterprises. Shai is known as one of the top Team System experts in Israel. He conducts lectures and workshops for developers\QA and enterprises who want to specialize in Team System.

My Blog: http://blogs.microso...il/blogs/shair/


License

This article was authored by Shai Raiten and reproduced for the benefit of our viewers under the terms of the Ms-PL license.

How to Do Gesture Recognition With Kinect Using Hidden Markov Models (HMMs)

Introduction to Game Development Using Unity 3D

$
0
0
This article by Ryan Henson Creighton, author of Unity 3D Game Development by Example, introduces you to Unity 3D—an amazing game engine that enables you to create games and deploy them to a number of different devices, including (at the time of writing) the Web, PCs, iOS platforms, and WiiWare, with modules for Android and Xbox Live Arcade deployment in the works. You'll play a number of browser-based Unity 3D games to get a sense of what the engine can handle, from a massively-multiplayer online game all the way down to a simple kart racer. You'll download and install your own copy of Unity 3D, and mess around with the beautiful Island Demo that ships with the product.

Technology is a tool. It helps us accomplish amazing things, hopefully more quickly and more easily and more amazingly than if we hadn't used the tool. Before we had newfangled steam-powered hammering machines, we had hammers. And before we had hammers, we had the painful process of smacking a nail into a board with our bare hands. Technology is all about making our lives better and easier. And less painful.

Introducing Unity 3D
Unity 3D is a new piece of technology that strives to make life better and easier for game developers. Unity is a game engine or a game authoring tool that enables creative folks like you to build video games.

By using Unity, you can build video games more quickly and easily than ever before. In the past, building games required an enormous stack of punch cards, a computer that filled a whole room, and a burnt sacrificial offering to an ancient god named Fortran. Today, instead of spanking nails into boards with your palm, you have Unity. Consider it your hammer—a new piece of technology for your creative tool belt.

Unity takes over the world
We'll be distilling our game development dreams down to small, bite-sized nuggets instead of launching into any sweepingly epic open-world games. The idea here is to focus on something you can actually finish instead of getting bogged down in an impossibly ambitious opus. When you're finished, you can publish these games on the Web, Mac, or PC.

The team behind Unity 3D is constantly working on packages and export opinions for other platforms. At the time of this writing, Unity could additionally create games that can be played on the iPhone, iPod, iPad, Android devices, Xbox Live Arcade, PS3, and Nintendo's WiiWare service. Each of these tools is an add-on functionality to the core Unity package, and comes at an additional cost. As we're focusing on what we can do without breaking the bank, we'll stick to the core Unity 3D program for the remainder of this article. The key is to start with something you can finish, and then for each new project that you build, to add small pieces of functionality that challenge you and expand your knowledge. Any successful plan for world domination begins by drawing a territorial border in your backyard.

Browser-based 3D? Welcome to the future
Unity's primary and most astonishing selling point is that it can deliver a full 3D game experience right inside your web browser. It does this with the Unity Web Player—a free plugin that embeds and runs Unity content on the Web.

Time for action – install the Unity Web Player
Before you dive into the world of Unity games, download the Unity Web Player. Much the same way the Flash player runs Flash-created content, the Unity Web Player is a plugin that runs Unity-created content in your web browser.

Go to http://unity3D.com.
Click on the install now! button to install the Unity Web Player.

Attached Image: 0546OT_01_01.png


Click on Download Now!
Follow all of the on-screen prompts until the Web Player has finished installing.

Attached Image: 0546OT_01_02.png


Welcome to Unity 3D!
Now that you've installed the Web Player, you can view the content created with the Unity 3D authoring tool in your browser.

What can I build with Unity?
In order to fully appreciate how fancy this new hammer is, let's take a look at some projects that other people have created with Unity. While these games may be completely out of our reach at the moment, let's find out how game developers have pushed this amazing tool to its very limits.

FusionFall
The first stop on our whirlwind Unity tour is FusionFall—a Massively Multiplayer Online Role-Playing Game (MMORPG). You can find it at fusionfall.com. You may need to register to play, but it's definitely worth the extra effort!

Attached Image: 0546OT_01_03.png

FusionFall was commissioned by the Cartoon Network television franchise, and takes place in a re-imagined, anime-style world where popular Cartoon Network characters are all grown up. Darker, more sophisticated versions of the Powerpuff Girls, Dexter, Foster and his imaginary friends, and the kids from Codename: Kids Next Door run around battling a slimy green alien menace.

Completely hammered
FusionFall is a very big and very expensive high-profile game that helped draw a lot of attention to the then-unknown Unity game engine when the game was released. As a tech demo, it's one of the very best showcases of what your new technological hammer can really do! FusionFall has real-time multiplayer networking, chat, quests, combat, inventory, NPCs (non-player characters), basic AI (artificial intelligence), name generation, avatar creation, and costumes. And that's just a highlight of the game's feature set. This game packs a lot of depth.

Should we try to build FusionFall?
At this point, you might be thinking to yourself, "Heck YES! FusionFall is exactly the kind of game I want to create with Unity, and this article is going to show me how!"

Unfortunately, a step-by-step guide to creating a game the size and scope of FusionFall would likely require its own flatbed truck to transport, and you'd need a few friends to help you turn each enormous page. It would take you the rest of your life to read, and on your deathbed, you'd finally realize the grave error that you had made in ordering it online in the first place, despite having qualified for free shipping.

Here's why: check out the game credits link on the FusionFall website: http://www.fusionfal...ame/credits.php.

This page lists all of the people involved in bringing the game to life. Cartoon Network enlisted the help of an experienced Korean MMO developer called Grigon Entertainment. There are over 80 names on that credits list! Clearly, only two courses of action are available to you:
  • Build a cloning machine and make 79 copies of yourself. Send each of those copies to school to study various disciplines, including marketing, server programming, and 3D animation. Then spend a year building the game with your clones. Keep track of who's who by using a sophisticated armband system.
  • Give up now because you'll never make the game of your dreams.
Another option
Before you do something rash and abandon game development for farming, let's take another look at this. FusionFall is very impressive, and it might look a lot like the game that you've always dreamed of making. This article is not about crushing your dreams. It's about dialing down your expectations, putting those dreams in an airtight jar, and taking baby steps. Confucius said: "A journey of a thousand miles begins with a single step." I don't know much about the man's hobbies, but if he was into video games, he might have said something similar about them—creating a game with a thousand awesome features begins by creating a single, less feature-rich game.

So, let's put the FusionFall dream in an airtight jar and come back to it when we're ready. We'll take a look at some smaller Unity 3D game examples and talk about what it took to build them.

Off-Road Velociraptor Safari
No tour of Unity 3D games would be complete without a trip to Blurst.com—the game portal owned and operated by indie game developer Flashbang Studios. In addition to hosting games by other indie game developers, Flashbang has packed Blurst with its own slate of kooky content, including Off-Road Velociraptor Safari. (Note: Flashbang Studios is constantly toying around with ways to distribute and sell its games. At the time of this writing, Off-Road Velociraptor Safari could be played for free only as a Facebook game. If you don't have a Facebook account, try playing another one of the team's creations, like Minotaur China Shop or Time Donkey).


Posted Image

In Off-Road Velociraptor Safari, you play a dinosaur in a pith helmet and a monocle driving a jeep equipped with a deadly spiked ball on a chain (just like in the archaeology textbooks). Your goal is to spin around in your jeep doing tricks and murdering your fellow dinosaurs (obviously).

For many indie game developers and reviewers, Off-Road Velociraptor Safari was their first introduction to Unity. Some reviewers said that they were stunned that a fully 3D game could play in the browser. Other reviewers were a little bummed that the game was sluggish on slower computers. We'll talk about optimization a little later, but it's not too early to keep performance in mind as you start out.

Fewer features, more promise

If you play Off-Road Velociraptor Safari and some of the other games on the Blurst site, you'll get a better sense of what you can do with Unity without a team of experienced Korean MMO developers. The game has 3D models, physics (code that controls how things move around somewhat realistically), collisions (code that detects when things hit each other), music, and sound effects. Just like FusionFall, the game can be played in the browser with the Unity Web Player plugin. Flashbang Studios also sells downloadable versions of its games, demonstrating that Unity can produce standalone executable game files too.

Maybe we should build Off-Road Velociraptor Safari?

Right then! We can't create FusionFall just yet, but we can surely create a tiny game like Off-Road Velociraptor Safari, right? Well... no. Again, this article isn't about crushing your game development dreams. But the fact remains that Off-Road Velociraptor Safari took five supremely talented and experienced guys eight weeks to build on full-time hours, and they've been tweaking and improving it ever since. Even a game like this, which may seem quite small in comparison to full-blown MMO like FusionFall, is a daunting challenge for a solo developer. Put it in a jar up on the shelf, and let's take a look at something you'll have more success with.

I bent my Wooglie
Wooglie.com is a Unity game portal hosted by M2H Game Studio in the Netherlands. One glance at the front page will tell you that it's a far different portal than Blurst.com. Many of the Wooglie games are rough around the edges, and lack the sophistication and the slick professional sheen of the games on Blurst. But here is where we'll make our start with Unity. This is exactly where you need to begin as a new game developer, or as someone approaching a new piece of technology like Unity.

Play through a selection of games on Wooglie. I'll highlight a few of them for your interest:

Big Fun Racing
Big Fun Racing is a simple but effective game where you zip around collecting coins in a toy truck. It features a number of different levels and unlockable vehicles. The game designer sunk a few months into the game in his off-hours, with a little help from outsource artists to create the vehicle models.

Posted Image

Diceworks
Diceworks is a very simple, well-polished game designed for the iPhone in Unity 3D. We won't be covering any iPhone development, but it's good to know that your Unity content can be deployed to a number of other devices and platforms, including the Apple iPhone or iPod touch, and the Nintendo Wii. The iPhone and Wii versions of the software cost an additional fee, but you can deploy your games to the Web, to the Mac, and to the PC for free using the indie version of Unity.


Posted Image

Diceworks was created by one artist and one programmer working together as a team. It's rare to find a single person who possesses both programming and artistic talent simultaneously; scientists say that these disciplines are split between two different lobes in our brains, and we tend to favor one or the other. The artist-programmer pairing that produced Diceworks is a common setup in game development. What's your own brain telling you? Are you more comfy with visuals or logic? Art or programming? Once you discover the answer, it's not a bad plan to find someone to make up the other half of your brain so that your game handles both areas competently.

At any event, with Diceworks we're definitely getting closer to the scope and scale that you can manage on your own as you start out with Unity.

It's also interesting to note that Diceworks is a 2D game created in a 3D engine. The third "D" is largely missing, and all of the game elements appear to exist on a flat plane. Nixing that extra dimension when you're just starting out isn't a half bad idea. Adding depth to your game brings a whole new dimension of difficulty to your designs, and it will be easier to get up and running with Unity by focusing on the X and Y axes, and leaving the Z-axis in one of those dream jars. With a few sturdy working game examples under your belt, it won't be long before you can take that Z-jar down off the shelf and pop it open. The games that we'll be dealing with in this article will stick to a two-dimensional plane, using three-dimensional models. Even so, certain games have taken this concept and ran with it: New Super Mario Bros. Wii locked its 3D characters to a 2D plane and wound up an extremely complex and satisfying platformer.

Walk before you can run (or double jump)
A common mistake that new game developers make is biting off more than they can chew. Even experienced game developers make this mistake when they get really excited about a project, or when they approach a new technology and expect to be immediately proficient at using it. The real danger here is that you'll sit down and try to create your dream—let's say it's a sword and sorcery RPG epic that combines all the best parts of Diablo, ChuChu Rocket!, and Microsoft Excel. When you've sunk days and weeks and months into it and it still looks nothing like the game you envisioned, you give up. You figure that since you failed at creating your dream game, you were never really cut out to be a game developer to begin with.

You owe it to yourself to start small! Rome wasn't built in a day, and neither was your dream kart racing game starring famous figures from Roman history. By taking smaller steps, you can experience success with a number of smaller games. Then you can take what you learn and add to it, slowly building your expertise until you're in a position to take that dream game jar off the shelf.

For now, let's keep our dream shelf fully stocked, and turn our attention to something small and achievable. Best would be to have a collection of working games that started out simply, and grew more and more complex as you got smarter.

There are real-world examples of games that began as simple, effective ideas and later grew into enormously complex and feature-rich titles. From small acorns, mighty multiplayer oak tree games grow.

There's no such thing as "finished"
Some game developers who produce content for fixed media such as game discs and cartridges are used to producing a gold master—the final build of the game—and calling it a day. One of the joys of deploying games to the Web is that they're never truly finished. You can continue tweaking your web games and modifying them until you end up with a far more fun and polished game than you started with.

If you follow Flashbang Studios on Twitter or if you read the studio's blog, you'll see that they're constantly modifying and improving their games, even years after they were "finished". At the time of this writing, Off-Road Velociraptor Safari was two years old, and the studio's Twitter stream revealed that they're still actively tweaking the game.

Likewise, we may start with some games that are really raw and unfinished at first. But as we learn more about how to program the crucial bits and pieces common to many games, we'll keep revisiting our rough, early games to add those pieces and improve them.

Stop! Hammer time
Now that you've seen some of what Unity can do, it's time to download the program and kick the tires! Unity indie version is available for the low price of free (at the time of this writing) from the Unity 3D website.

Explore Demo island
When Unity first opens, you should see a splash screen referring you to different tutorial resources and language guides. How helpful! Now close it. (Don't worry, it'll be there next time, unless you uncheck the Show at Startup box).

Because you chose to download the sample project, it should automatically load the first time you run Unity. Navigate to Window | Layouts | 2 by 3 to see the different panels that we're about to tour.

Attached Image: 0546OT_01_07.png

To try out the demo, click on the Play button at the top-center of the screen.

Posted Image

You can walk around the Island Demo using the WASD keys on your keyboard. Jump by pressing the Space bar. When you're finished exploring, click on the Play button again to end the demo.

Posted Image

The wonders of technology!
Unity contains all of the tools that you need to create an island similar to the one you see in this demo. It has terrain tools that let you model your level right inside the software. It contains a ready-made First Person Controller Prefab object you can plunk into the world with automatic WASD keyboard controls that will allow you to explore the terrain. Unity automatically takes care of the rendering (drawing), collisions, physics, and sound effects. That's one fancy hammer!

Wide-open worlds with Will
If you'd like to learn how to sculpt your own terrain in Unity, and to add 3D models, sounds, and interactivity to create a simple but functional 3D open-world game, check out, "Unity Game Development Essentials", Will Goldstone, Packt Publishing.


Much of what you see in the Island Demo can be built directly in Unity using the engine's terrain sculpting tools. The demo contains special models, like the bridge, which were imported from 3D software packages, including 3D Studio Max, Maya, or Blender. Certain elements, like the birds, have scripts attached to them that teach them how to fly. Scripts are lists of instructions that tell the items in the game world how to behave.

Let's take a quick look around the Unity interface and note a few points of interest.

The Scene window
The Scene window is where you can position your Game Objects and move things around. This window has various controls to change its level of detail. Use these controls to toggle lighing on and off, and to display the window contents with textures, wireframes, or a combination of both. You can use the colorful gizmo in the top-right corner to constrain the window to the X, Y, and Z axes to view the top and sides of your scene. Click on the white box in the middle to return to perspective view. This is what the Scene window looks like when you start a new project or create a new Scene. You can think of scenes as levels or stages in your game.

Posted Image

The Game window
The Game window shows you what your players will see. When you click on the Play button to test your game (as you just did with the Island Demo), the results of your efforts play out in this window. Toggle the Maximize on Play button to test your game in full-screen mode.


Posted Image

The Hierarchy
The Hierarchy panel lists all of the Game Objects in your Scene. Game Objects—cameras, lights, models, and prefabs—are the things that make up your game. They can be "tangible" things like the birds and the bridge in the Island Demo. They can also include intangible things, which only you as the game developer get to see and play with, such as the cameras, the lights, and colliders, which are special invisible shapes that tell the game engine when two Game Objects are touching.

The Island Demo Hierarchy contains Game Objects for the birds, the sea foam, the terrain, and the sun, to name a few. It also lists something called the First Person Controller Prefab, which has one of those invisible Colliders with a camera stuck to it. That's how the player can see the island. The demo lists something called Performance—an empty Game Object with a special script at ached to it that helps the demo run more quickly depending on the player's computer specs. So, Game Objects can include touchy-feely "physical" objects like birds and bridges, as well as behind-the-scenes intangible things like lights, cameras, and actions (scripts).

Posted Image

Click on a Game Object in the Hierarchy panel, and then hover your mouse over the Scene window. Press the F key on your keyboard, and the Scene window will automatically pan and zoom directly to that object. Alternatively, you can go to Edit | Frame Selected, which can be more reliable than using the keyboard shortcut. (I like to think of the F as standing for Focus to help me remember what this shortcut does).

The Project panel
he Project panel lists all of the elements that you'll use to create Game Objects in your project. For example, the Island Demo seagull Game Object is made up of a mesh that represents the seagull's shape, a material to depict its "skin" or coloring, and a script that controls its flight behavior. The seagull material itself could include a texture (image) file. All of these goodies are listed in the Project panel.

You got a lot of gull
The actual seagulls in the Island Demo are actually more complex than the ones in our simple example. To see what went into creating them, click on the gray arrow next to Birds in the Project panel. Then click on the arrow next to Seagull. Don't worry if you don't understand what you're seeing—the key here is to understand that the Project panel contains many of the elements, or ingredients, that go into making our Game Objects.


The Project panel displays the contents of a special folder called Assets. Unity automatically creates the Assets folder for you when you create a new project. If you drag a compatible file, like a 3D model, a sound effect, or an image into the Project panel, Unity copies it to the Assets folder behind the scenes, and displays it in the Project panel.

Posted Image

Don't mess with the Assets folder!
Unity stores metadata about the folder, and by moving stuff around or deleting things through your operating system, you may break your project. If you need to make changes, make them right inside Unity in the Project panel.


The Inspector
The Inspector is a context-sensitive panel, which means that it changes depending on what you select elsewhere in Unity. This is where you can adjust the position, rotation, and scale of Game Objects listed in the Hierarchy panel. The Inspector can also display controls to configure components that add functionality to Game Objects. Between the three main panels in Unity (Hierarchy, Project, and Inspector), the Inspector is where you'll likely spend most of your time because that's where you'll be tweaking and fiddling with every aspect of the elements that comprise your game projects.

Posted Image

This screenshot of the Inspector shows the components attached to the First Person Controller Prefab in the Island Demo: two scripts (FPSWalker and Mouse Look) and a Character Controller component. To see the same content on your computer, click to select the First Person Controller Prefab in the Hierarchy panel.

Invade Island Demo as a paratrooper
Let's use the Inspector panel to make a quick change to the start position of the player character. We'll begin the demo with the player 400 feet in midair, giving the player a beautiful bird's eye view of the action as he parachutes into the island.

The First Person Controller Prefab that you just clicked on represents the player in the game. It has a camera embedded in it that the player looks through, and a pill-shaped Character collider that tells the game engine when the player is touching other things in the Scene. The Character collider is what keeps the player from falling through the ground.

We can use the Inspector panel to change the start position of the player. In the Scene view, you should see the First Person Controller Prefab—it looks like a green pill with what looks like a speaker icon on top of it (this is blocking the Camera icon). If you don't see it, follow these steps:
  • Click to select the First Person Controller Prefab in the Hierarchy panel.
  • Navigate to Edit | Frame Selected to focus on the Game Object. Alternatively, you can hover your mouse over the Scene view and press the F key on your keyboard. The First Person Controller Prefab should swing into view.
  • Click on the Move button, which looks like four connected arrows.


    Posted Image


    A tripod of three arrows appears at the center of the Game Object. The blue Z- axis runs through where the player's belly button would be. The red X-axis runs perpendicular to the X-axis. And the green Y-axis runs straight up and down through the player as if the player was hanging by a piece of string tied to the top of her head. The Y-axis is the up or down axis that we want to adjust.


    Posted Image

  • You can click-and-drag the green Y-axis arrow to move the player up into the sky, but a better method is to change the Y-axis position in the Inspector panel. Expand the gray arrow next to Transform in the Inspector panel if it's not already open, and change the Y value under Position to 400.


    Posted Image

  • Now, when you press Play to test the game, your character will start way up in the sky, floating down to the island before making a soft, quiet landing. It's a good thing that the Unity people didn't write a fall damage script, otherwise we might have some crumpled legs to contend with!
Layers and layout dropdowns
Above the Inspector panel, you'll see the Layers and Layout dropdowns. Game Objects can be grouped into layers, much like in Photoshop or Flash. Unity stores a few commonly used layouts in the Layout dropdown. You can also save and load your own custom layouts.


Posted Image

Playback controls
These three buttons help you test your game and control playback. As you've seen, the Play button starts and stops your game. The Pause button works as expected—it pauses your game so that you can make changes to it on the fly. The third button is a Step-Through control; use it to advance frame-by-frame through your game so that you can more tightly control what's going on.


Posted Image

Changes you make while testing don't stick!
One of the more surprising features of Unity is that you can make changes to Game Objects and variables on the fly while you're testing your game. But it's important to know that the changes you make during testing will not "stick". Once you stop testing your game, the changes that you made during testing will revert to the state they were in before you clicked on the Play button. It's disheartening to make a number of changes to your game, only to realize that the Play button was on the entire time, and your changes will be lost. One way to avoid this problem is to toggle the Maximize on Play button in the Game window so that you'll be more aware of when you're testing and when you're not.


Scene controls
At the top-left of your screen, you'll see four controls that help you move around your Scene, and position Game Objects within it. These controls are mapped to the Q, W, E, and R keys on your keyboard. From left to right, they are:

Posted Image

  • The Hand tool (Q): Use it to click-and-drag around your scene. Hold down the Alt key on your keyboard to rotate the view. Hold down the Ctrl key (Windows) or the Command key (Apple) to zoom in and out. Your mouse wheel will also zoom the scene. Hold down the Shift key to pan, zoom, and rotate in larger increments to speed things up. This is a way for you to navigate around the game world. It doesn't actually impact the way the player sees the game. To modify the Game view, you need to use the Move or Rotate tools to modify the Camera position.
  • The Move tool (W): This tool lets you move the Game Objects around your scene. You can either drag the object(s) around by the X, or Y, or Z-axis handles, or by the square in the center for freeform movement. Holding down the Ctrl key will snap movement to set grid increments. We saw this tool when we were positioning the First Person Controller Prefab in the middle of the sky.
  • Rotate tool (E): Use it to spin your objects around using a neat spherical gizmo. The red, green, and blue lines map to the X, Y, and Z axes.
  • Scale tool ®: This tool works much the same as the Move and Rotate tools. Use it to make your Game Objects larger or smaller. Dragging an X, Y, or Z handle will non-uniformly scale (squash and stretch) the object, while dragging the gray cube in the center will uniformly scale it.
Don't stop there—live a little!
We've glanced briefly at the key elements of the Unity interface, but there's no need to stop poking around. Far beyond the scope of this article, there is a wealth of menu options, buttons, and controls that we haven't covered. Why not explore those menus or start randomly clicking on things that you don't yet understand? Now is the time to safely break stuff. You didn't work hard to create the Island Demo, so why not mess around with it a little bit?

Here are some things to try:
  • Select some of the Game Objects in the Hierarchy panel and move them around in the Scene window using the Scene controls. What happens when you put the bridge in the middle of the sky? Can you make one of the birds fly into a tree? What happens when you walk way out into the ocean while testing the game?
  • Randomly right-click in the three different panels and read through the context menu options to see what you're getting yourself into.
  • Poke around in the GameObject | Create Other menu. There's a whole list of interesting things that you can add to this scene without even touching the 3D modeling program.
  • What happens when you delete the lights from the scene? Or the camera? Can you add another camera? More lights? How does that affect the Scene?
  • Can you move the First Person Controller Prefab to another part of the island to change your starting position? How about starting on top of those two gigantic rocks on the beach?
  • Can you replace the audio files to make the seagulls sound like car horns?
  • Download a picture of kittens from the Internet and see if you can wrap it around the boulder model. Kittens rock! You can pull the kittens into your project using the Assets | Import New Asset option in the menu.

A tuner's paradise
The Unity 3D interface is designed to be customized. Not only can you define your own custom window layouts, but you can even write custom scripts to make certain buttons and panels appear inside Unity to speed up your workflow. That kind of thing is well beyond the scope of this article, but if you're the kind of person who really likes to get under the hood, you'll be happy to know that you can tweak Unity 3D to your heart's content—maybe add a few racing stripes and install an enormous pair of subwoofers in the back?


Summary
This article was all about getting a feel for what Unity can do and for what the program interface had to offer. Here's what we found out:
  • Massive 80 person teams, all the way down to tiny one- or two-person teams are using Unity to create fun games.
  • By thinking small, we'll have more success in learning Unity and producing fully functional games instead of huge but half-baked abandoned projects.
  • Different flavors of Unity help us deploy our games to different platforms. By using the free indie version, we can deploy to the Web, and the Mac and PC platforms.
  • The Unity interface has controls and panels that let us visually compose our game assets, and test games on the fly right inside the program!
I hope you've taken some time to thoroughly vandalize the Island Demo. Save the file by clicking on File | Save Project in case you want to come back and wreak more havoc a little later.

The Guide to Implementing 2D Platformers

$
0
0
This article was written by Rodrigo Monteiro and originally published on his own blog at Higher-Order Fun and reprinted on our site (thanks to Rodrigo) in order to provide everyone with this great resource.

Having previously been disappointed by the information available on the topic, this is my attempt at categorizing different ways to implement 2D platform games, list their strengths and weaknesses, and discuss some implementation details.

The long-term goal is to make this an exhaustive and comprehensible guide to the implementation of 2D platform games. If you have any sort of feedback, correction, request, or addition – please leave it in the comments!

Disclaimer: some of the information presented here comes from reverse engineering the behavior of the game, not from its code or programmers. It’s possible that they are not ACTUALLY implemented in this way, and merely behave in an equivalent way. Also note that tile sizes are for the game logic, graphical tiles might be of a different size.


Four Ways of Implementing

I can think of four major ways in which a platform game can be implemented. From simplest to most complicated, they are:

Type #1: Tile-based (pure)

Character movement is limited to tiles, so you can never stand halfway between two tiles. Animations may be used to create the illusion of smooth movement, but as far as the game logic is concerned, the player is always right on top of a specific tile. This is the easiest way to implement a platform game, but it imposes heavy restrictions on the control of character, making it unsuitable for traditional action-based platformers. It is, however, popular with puzzle and “cinematographic” platformers.


Attached Image: Flashback_tiles_2.png

Flashback, shown with tile boundaries

Examples: Prince of Persia, Toki Tori, Lode Runner, Flashback


How it works

The map is a grid of tiles, each one storing information such as whether it’s an obstacle or not, what image to use, what kind of footstep sound to use, and so on. The player and other characters are represented by a set of one or more tiles that move together. In Lode Runner, for example, the player is a single tile. In Toki Tori, the player is 2×2 tiles. In Flashback, which is unusual due to the smaller size of its tiles, the player is two tiles wide and five tiles tall (see image above) when standing, but only three tiles tall when crouching.
In this kind of game, the player will rarely – if ever – be moving diagonally, but, if he is, the movement can be decomposed in two separate steps. Likewise, he will likely only move one tile at once, but multi-tile movement can be done as multiple steps of one tile, if needed (in Flashback, you always move two tiles at once). The algorithm is then as follows:
  • Create a copy of the character where he’d like to move to (e.g., if moving one tile to the right, make a copy where every tile of the character is shifted 1 tile to the right)
  • Check that copy for intersection with the background and other characters.
  • If an intersection is found, the character’s movement is blocked. React accordingly.
  • Otherwise, the path is clear. Move character there, optionally playing an animation so the transition looks smooth.

This kind of movement is very ill-suited for traditional arc-shaped jumps – so games in this genre often have no jump at all (Toki Tori, Lode Runner), or only allow vertical or horizontal jumps (Prince of Persia, Flashback), which are nothing but special cases of linear movement.
Advantages of this system include simplicity and precision. Since the games are more deterministic, glitches are much less likely, and the gameplay experience is more controlled, with less of a need to tweak values depending on circumstances. Implementing certain mechanics (such as grabbing ledges and one-way platforms) becomes a breeze, compared to more complex movement styles – all you have to do is check whether the player tiles and the background tiles are aligned in the one specific way that allows for a given action.

In principle, this system doesn’t allow steps of less than one tile, but that can be mitigated in a few different ways. For example, the tiles can be a bit smaller than the player (say, a player is 2×6 tiles), or you can allow a visual-only movement to take place inside a given tile, without affecting the logic (which is the solution that I believe that “Lode Runner – The Legend Returns” takes).


Type #2: Tile Based (Smooth)

Collision is still determined by a tilemap, but characters can move freely around the world (typically with 1px resolution, aligned to integers, but see the note at the end of article regarding smoothing of movement). This is the most common form of implementing platformers in 8-bit and 16-bit consoles, and remains popular today, as it is still easy to implement and makes level editing simpler than more sophisticated techniques. It also allows for slopes and smooth jump arcs.

If you’re unsure which type of platformer you want to implement, and you want to do an action game, I suggest going for this one. It’s very flexible, relatively easy to implement, and gives you the most control of all four types. It’s no wonder that the majority of the best action platformers of all time are based on this type.


Attached Image: Mega_Man_X_tiles.png

Mega Man X, shown with tile boundaries and player hitbox.

Examples: Super Mario World, Sonic the Hedgehog, Mega Man, Super Metroid, Contra, Metal Slug, and practically every platformer of the 16-bit era


How it works

Map information is stored in the same way as with the pure tile technique, the difference is merely in how the characters interact with the background. The character’s collision hitbox is now an Axis-Aligned Bounding Box (AABB, that is, a rectangle that cannot be rotated), and are typically still an integer multiple of tile size. Common sizes include one tile wide and one (small Mario, morph ball Samus), two (big Mario, Mega Man, crouched Samus) or three (standing Samus) tiles tall. In many cases, the character sprite itself is larger than the logical hitbox, as this makes for a more pleasant visual experience and fairer gameplay (it’s better for the player to avoid getting hit when he should have than for him to get hit when he should not have). In the image above, you can see that the sprite for X is square-ish (in fact, is two tiles wide), but his hitbox is rectangular (one tile wide).

Assuming that there are no slopes and one-way platforms, the algorithm is straightforward:
  • Decompose movement into X and Y axes, step one at a time. If you’re planning on implementing slopes afterwards, step X first, then Y. Otherwise, the order shouldn’t matter much. Then, for each axis:
  • Get the coordinate of the forward-facing edge, e.g. : If walking left, the x coordinate of left of bounding box. If walking right, x coordinate of right side. If up, y coordinate of top, etc.
  • Figure which lines of tiles the bounding box intersects with – this will give you a minimum and maximum tile value on the OPPOSITE axis. For example, if we’re walking left, perhaps the player intersects with horizontal rows 32, 33 and 34 (that is, tiles with y = 32 * TS, y = 33 * TS, and y = 34 * TS, where TS = tile size).
  • Scan along those lines of tiles and towards the direction of movement until you find the closest static obstacle. Then loop through every moving obstacle, and determine which is the closest obstacle that is actually on your path.
  • The total movement of the player along that direction is then the minimum between the distance to closest obstacle, and the amount that you wanted to move in the first place.
  • Move player to the new position. With this new position, step the other coordinate, if still not done.


Slopes

Attached Image: Mega_Man_X_tiles_2.png

Mega Man X, with slope tile annotations

Slopes (the tiles pointed by green arrows on the image above) can be very tricky, because they are obstacles, and yet still allow the character to move into their tile. They also cause movement along the X axis to adjust position on the Y axis. One way to deal with them is to have the tile store the “floor y” of either side. Assuming a coordinate system where (0, 0) is at top-left, then the tile just left of X (first slope tile) is {0, 3} (left, right), then the one he stands on is {4, 7}, then {8, 11}, then {12, 15}. After that, the tiles repeat, with another {0, 3}, etc, and then we have a steeper slope, composed of two tiles: {0, 7} and {8, 15}.


Attached Image: Mega_Man_X_Slope_Tile.png

Detailed View of the {4, 7} tile


The system that I’m going to describe allows arbitrary slopes, though for visual reasons, those two slopes are the most common, and result in a total of 12 tiles (the 6 described previously, and their mirrorings). The collision algorithm changes as follows for horizontal movement:
  • Make sure that you step X position before Y position.
  • During collision detection (4 above), the slope only counts as a collision if its closest edge is the taller (smaller y coordinate) one. This will prevent characters from “popping” through the slope from the opposite side.
  • You might want to forbid slopes to stop “halfway through” (e.g. on a {4, 7} tile). This restriction is adopted by Mega Man X and many other games. If you don’t, you have to deal with the more complicated case of the player attempting to climb from the lower side of the slope tile – one way to deal with this is to pre-process the level, and flag all such offending tiles. Then, on collision detection, also count it as a collision from the lower side if the player’s lowest y coordinate is greater (that is, below) the tile’s offset edge (tile coord * tile size + floor y).
  • A full obstacle tile adjacent to the slope the character is currently on should not be considered for collision if it connects to the slope, that is, if the character (that is, his bottom-center pixel) is on a {0, *} slope, ignore left tile, and, if on a {*, 0} slope, ignore the right tile. You may have to do this for more tiles if your character is wider than two tiles – you might simply skip checking on the entire row if the player is moving towards the upper side of slope. The reason for this is to prevent the character from getting stuck at those tiles (highlighted yellow above) while still climbing the slope, as his foot will still be below the “surface level” by the time he comes into contact with the otherwise solid tile.


And for vertical movement:
  • If you’re letting gravity do its job for downhill movement, make sure that the minimum gravity displacement is compatible with slope and horizontal velocity. For example, on a 4:1 slope (as {4, 7} above), the gravity displacement must be at least 1/4 of the horizontal velocity, rounded up. On a 2:1 slope (such as {0, 7}), at least 1/2. If you don’t ensure this, the player will move horizontally right off the ramp for a while, until gravity catches up and drags him down, making him bounce on the ramp, instead of smoothly descending it.
  • An alternative to using gravity is to compute how many pixels above floor the player was before movement, and how many it is afterwards (using the formula below), and adjust his position so they’re the same.
  • When moving down, instead of considering a slope tile’s top edge as its collision boundary, instead, compute its floor coordinate at the current vertical line, and use that. To do that, find the [0, 1] value which represents the player’s x position on tile (0 = left, 1 = right) and use it to linearly interpolate the floorY values. The code will look something like:
    float t = float(centerX - tileX) / tileSize;
    float floorY = (1-t) * leftFloorY + t * rightFloorY;
  • When moving down, if multiple tiles on the same Y coordinate are obstacle candidates, and the one on the X coordinate of the player’s center is a slope tile, use that one, and ignore the rest – even though the others are technically closer. This ensures proper behaviour around the edges of slopes, with the character actually “sinking” on a completely solid tile because of the adjacent slope.

One-way platforms


Attached Image: Super_Mario_World_One_Way.png


Super Mario World, showing Mario falling through (left) and standing on (right) the same one-way platform


One-way platforms are platforms that you can step on, but you can also jump through them. In other words, they count as an obstacle if you’re already on top of them, but are otherwise traversable. That sentence is the key to understanding their behavior. The algorithm changes as follows:
  • On the x axis, the tile is never an obstacle
  • On the y axis, the tile is only an obstacle if, prior to the movement, the player was entirely above it (that is, bottom-most coordinate of player was at least one pixel above top-most coordinate of one-way platform). To check for this, you will probably want to store the original player position before doing any stepping.


It might be tempting to have it act as an obstacle if the player’s y speed is positive (that is, if the player is falling), but this behavior is wrong: it’s possible for the player to jump so he overlaps the platform, but then falls down again without having his feet reach the platform. In that case, he should still fall through.


Some games allow the player to “jump down” from such platforms. There are a few ways to do this, but they are all relatively simple. You could, for example, disable one-way platforms for a single frame and ensure that y speed is at least one (so he’ll be clear of the initial collision condition on the next frame), or you could check if he’s standing exclusively on one-way platforms, and, if so, manually move the player one pixel to the bottom.


Ladders


Attached Image: Mega_Man_7_Ladder.png

Mega Man 7, with tile boundaries, highlighted ladder tiles, and player ladder hitbox.

Ladders might seem complicated to implement, but they are simply an alternate state – when you’re in a ladder, you ignore most of the standard collision system, and replace it with a new set of rules. Ladders are typically one tile wide.
You can usually enter the ladder state in two ways:
  • Have your character hitbox overlap with the ladder, either on ground or on air, and hit up (some games also allow you to hit down)
  • Have your character stand on top of a “ladder top” tile (which is often a one-way platform tile as well, so you can walk on top of it), and hit down.

This has the effect of immediately snapping the player’s x coordinate to align with the ladder tiles, and, if going down from the top of ladder, move y coordinate so player is now inside the actual ladder. At this point, some games will use a different hitbox for the purposes of determining whether the player is still on the ladder. Mega Man, for example, seems to use a single tile (equivalent to top tile of the original character, highlighted in red in the image above).

There are a few different ways of LEAVING the ladder:
  • Reaching the top of the ladder. This will usually prompt an animation and move the player several pixels up in y, so he’s now standing on top of the ladder.
  • Reaching the bottom of a hanging ladder. This will cause the player to simply fall, although some games won’t let the player leave the ladder in this way.
  • Moving left or right. If there is no obstacle on that side, the player may be allowed to leave that way.
  • Jumping. Some games allow you to release the ladder by doing this.

While on the ladder, the character’s movement changes so, typically, all he can do is move up and down, and sometimes attack.


Stairs

Attached Image: Castlevania_Dracula_X_Stairs.png

Castlevania: Dracula X, with tile boundaries

Stairs are a variation of ladders, seen in few games, but notably in the Castlevania series. The actual implementation is very similar to that of ladders, with a few exceptions:
  • The player moves tile by tile or half-tile by half-tile (as in Dracula X)
  • Each “step” causes the player to be shifted simultaneously on X and Y coordinates, by a preset amount.
  • Initial overlapping detection when going up might look on the tile ahead instead of just the current overlap one.
Other games also have stairs that behave like slopes. In that case, they are simply a visual feature.


Moving Platforms


Attached Image: Super_Mario_World_Moving_Platform.png

Super Mario World

Moving platforms can seem a little tricky, but are actually fairly simple. Unlike normal platforms, they cannot be represented by fixed tiles (for obvious reasons), and instead should be represented by an AABB, that is, a rectangle that cannot be rotated. It is a normal obstacle for all collision purposes, and if you stop here, you’ll have very slippery moving platforms (that is, they work as intended, except that the character does not move along it on his own).


There are a few different ways to implement that. One algorithm is as follows:
  • Before anything on the scene is stepped, determine whether the character is standing on a moving platform. This can be done by checking, for example, whether his center-bottom pixel is just one pixel above the surface of the platform. If it is, store a handle to the platform and its current position inside the character.
  • Step all moving platforms. Make sure that this happens before you step characters.
  • For every character that’s standing on a moving platform, figure the delta-position of the platform, that is, how much it has moved along each axis. Now, shift the character by the same amount.
  • Step the characters as usual.


Other Features


Attached Image: Sonic_2_Loop.jpg

Sonic the Hedgehog 2

Other games have more complicated and exclusive features. Sonic the Hedgehog series is notable for this. Those are beyond the scope of this article (and my knowledge, for that matter!), but might be subject of a future article.


Type #3: Bitmask

Similar to “Tile Based (Smooth)”, but instead of using large tiles, an image is used to determine collision for each pixel. This allows finer detailing, but significantly increases complexity, memory usage, and requires something akin to an image editor to create levels. It also often implies that tiles won’t be used for visuals, and may therefore require large, individual artwork for each level. Due to those issues, this is a relatively uncommon technique, but can produce higher quality results than tile-based approaches. It is also suitable for dynamic environments – such as the destructible scenarios in Worms – as you can “draw” into the bitmask to change the scenario.


Attached Image: Worms_World_Party.png

Worms World Party, featuring destructible terrain

Examples: Worms, Talbot’s Odyssey


How it works

The basic idea is very similar to the tile (smooth) algorithm – you can simply consider each pixel to be a tile, and implement the exact same algorithm, and everything will work, with one major exception – slopes. Since slopes are now implicitly defined by the positioning between nearby tiles, the previous technique doesn’t work, and a much more complex algorithm has to be used in its place. Other things, such as ladders, also become trickier.


Slopes


Attached Image: Talbot_Bitmask_2.png

Talbot’s Odyssey, with the collision bitmask overlaid on top of the game.

Slopes are the primary reason why this type of implementation is very hard to get right. Unfortunately, they are also pretty much mandatory, as it’d make no sense to use this implementation without slopes. Often, they’re the reason why you’re even using this system.
This is, roughly, the algorithm used by Talbot’s Odyssey:
  • Integrate acceleration and velocity to compute the desired delta-position vector (how much to move in each axis).
  • Step each axis separately, starting with the one with the largest absolute difference.
  • For the horizontal movement, offset the player AABB by 3 pixels to the top, so he can climb slopes.
  • Scan ahead, by checking against all valid obstacles and the bitmask itself, to determine how many pixels it is able to move before hitting an obstacle. Move to this new position.
  • If this was horizontal movement, move as many pixels up as necessary (which should be up to 3) to make up for slope.
  • If, at the end of the movement, any pixel of the character is overlaping with any obstacle, undo the movement on this axis.
  • Regardless of result of last condition, proceed to do the same for the other axis.

Because this system has no distinction between moving down because you’re going downhill or because you’re falling, you’re likely to need a system counting how many frames it’s been since the character last touched the floor, for purposes of determining whether it can jump and changing animation. For Talbot, this value is 10 frames.


Another trick here is efficiently computing how many pixels it can move before hitting something. There are other possible complicating factors, such as one-way platforms (dealt in the exact same way as for tiled (smooth)) and sliding down steep inclines (which is fairly complex and beyond the scope of the article). In general, this technique requires a lot of fine tuning, and is intrinsically less stable than tile-based approaches. I only recommend it if you absolutely must have detailed terrain.


Type #4: Vectorial

This technique uses vectorial data (lines or polygons) to determine the boundaries of collision areas. Very difficult to implement properly, it is nevertheless increasingly popular due to the ubiquity of physics engines, such as Box2D, which are suitable for implementing this technique. It provides benefits similar to the bitmask technique, but without major memory overhead, and using a very different way of editing levels.


Attached Image: braid11.jpg

Attached Image: braid2.png


Braid (level editor), with visible layers (top) and the collision polygons (bottom)

Examples: Braid, Limbo


How it works

There are two general ways of approaching this:
  • Resolve movement and collisions yourself, similar to the bitmask method, but using polygon angles to compute deflection and have proper slopes.
  • Use a physics engine (e.g. Box2D)

Obviously, the second is more popular (though I suspect that Braid went for the first), both because it is easier and because it allows you to do many other things with physics in the game. Unfortunately, in my opinion, one has to be very careful when going this route, to avoid making the game feel like a generic, uninteresting physics-platformer.


Compound objects

This approach has its own unique problems. It may suddenly be difficult to tell whether the player is actually standing on the floor (due to rounding errors), or whether it’s hitting a wall or sliding down a steep incline. If using a physics engine, friction can be an issue, as you’ll want friction to be high on the foot, but low on the sides.

There are different ways to deal with those, but a popular solution is to divide the character into several different polygons, each with different roles associated: so you’d (optionally) have the main central body, then a thin rectangle for feet, and two thin rectangles for sides, and another for head or some similar combination. Sometimes they are tapered to avoid getting caught into obstacles. They can have different physics properties, and collision callbacks on those can be used to determine the status of character. For more information, sensors (non-colliding objects that are just used to check for overlap) can be used. Common cases include determinining whether we’re close enough to the floor to perform a jump, or if the character is pushing against a wall, etc.


General Considerations

Regardless of the type of platform movement that you have chosen (except perhaps for type #1), a few general considerations apply.


Acceleration


Attached Image: Mario_Metroid_Megaman_Acceleration1.png

Super Mario World (low acceleration), Super Metroid (mid acceleration), Mega Man 7 (high acceleration)

One of the factors that affects the feel of a platformer the most is the acceleration of the character. Acceleration is the rate of change in speed. When it is low, the character takes a long time to reach its maximum velocity, or to come to a halt after the player lets go of controls. This makes the character feel “slippery”, and can be hard to master. This movement is most commonly associated with the Super Mario series of games. When the acceleration is high, the character takes very little (or no time) to go from zero to maximum speed and back, resulting in very fast responding, “twitchy” controls, as seen in the Mega Man series (I believe that Mega Man actually employs infinite acceleration, that is, you’re either stopped or on full speed).

Even if a game has no acceleration on its horizontal movement, it is likely to have at least some for the jump arcs – otherwise they will be shaped like triangles.


How it works

Implementing acceleration is actually fairly simple, but there are a few traps to watch out for.
  • Determine xTargetSpeed. This should be 0 if the player is not touching the controls, -maxSpeed if pressing left or +maxSpeed if pressing right.
  • Determine yTargetSpeed. This should be 0 if the player is standing on a platform, +terminalSpeed otherwise.
  • For each axis, accelerate the current speed towards target speed using either weighted averaging or adding acceleration.

The two acceleration methods are as follows:
  • Weighted averaging: acceleration is a number (“a”) from 0 (no change) to 1 (instant acceleration). Use that value to linearly interpolate between target and current speed, and set the result as current speed.

vector2f curSpeed = a * targetSpeed + (1-a) * curSpeed;
if (fabs(curSpeed.x) < threshold) curSpeed.x = 0;
if (fabs(curSpeed.y) < threshold) curSpeed.y = 0;

  • Adding acceleration: We’ll determine which direction to add the acceleration to (using the sign function, which returns 1 for numbers >0 and -1 for <0), then check if we overshot.


vector2f direction = vector2f(sign(targetSpeed.x - curSpeed.x),
							  sign(targetSpeed.y - curSpeed.y));
curSpeed += acceleration * direction;
if (sign(targetSpeed.x - curSpeed.x) != direction.x)
	curSpeed.x = targetSpeed.x;
if (sign(targetSpeed.y - curSpeed.y) != direction.y)
	curSpeed.y = targetSpeed.y;


It’s important to integrate the acceleration into the speed before moving the character, otherwise you’ll introduce a one-frame lag into character input.

When the character hits an obstacle, it’s a good idea to zero his speed along that axis.


Jump control


Attached Image: Super_Metroid_Screw_Attack.png

Super Metroid, Samus performing the “Space Jump” (with “Screw Attack” power-up)

Jumping in a platform game can be as simple as checking if the player is on the ground (or, often, whether he was on the ground anytime on the last n frames), and, if so, giving the character an initial negative y speed (in physical terms, an impulse) and letting gravity do the rest.

There are four general ways in which the player can control the jump:
  • Impulse: seen in games such as Super Mario World and Sonic the Hedgehog, the jump preserves the momentum (that is, in implementation terms, the speed) that the character had before the jump. In some games, this is the only way to influence the arc of the jump – just like in real life. There is nothing to implement here – it will be like this unless you do something to stop it!
  • Aerial acceleration: that is, retaining control of horizontal movement while in mid-air. Though this is physically implausible, it is a very popular feature, as it makes the character much more controllable. Almost every platformer game has it, with exceptions for games similar to Prince of Persia. Generally, the airborne acceleration is greatly reduced, so impulse is important, but some games (like Mega Man) give you full air control. This is generally implemented as merely tweaking the acceleration parameter while you’re airborne.
  • Ascent control: another physically implausible action, but very popular, as it gives you much greater control over the character. The longer you hold the jump button, the higher the character jumps. Typically, this is implemented by continuing to add impulse to the character (though this impulse can incrementally decrease) for as long as the button is held, or alternatively by suppressing gravity while the button is held. A time limit is imposed, unless you want the character to be able to jump infinitely.
  • Multiple jumps: once airborne, some games allow the player to jump again, perhaps for an unlimited number of times (as in the Space Jump in Super Metroid or the flight in Talbot’s Odyssey), or for a limited number of jumps before touching the ground (“double jump” being the most common choice). This can be accomplished by keeping a counter that increases for each jump and decreases when you’re on the ground (be careful when you update this, or you might reset it right after the first jump), and only allowing further jumps if the counter is low enough. Sometimes, the second jump is shorter than the initial one. Other restrictions may apply – the Space Jump only triggers if you’re already doing a spin jump and just began to fall.

Animations and leading

Attached Image: Black_Thorne_Lead.png

Black Thorne, character doing a long animation before shooting backwards (Y button)

In many games, your character will play an animation before actually performing the action you requested. However, on a twitchy action-based game, this will frustrate players – DON’T DO THAT! You should still have leading animations for things such as jumping and running, but if you care about how the game responds, make those cosmetic only, with the action taken immediately regardless of the animation.


Smoother movement

Using integers to represent the position of the characters is wise, as it makes it faster and stable. However, if you use integers for everything, you will end up with some jerky motion. There are multiple solutions to this. These are a few:
  • Use a float for all computations and for storing position, and cast to int whenever you’re rendering or computing collisions. Fast and simple, but it starts losing precision if you move too far away from (0,0). This is probably not relevant unless you have a very large playfield, but it’s something to keep in mind. If it comes to it, you can use a double instead.
  • Use a fixed point number for all computations and position, and again cast to int when you’re rendering or computing collisions. Less precise than float and with a more limited range, but the precision is uniform and can, on some hardware, be faster (notably, floating point processing is slow on many mobile phones).
  • Store position as an integer, but keep a “remainder” stored in a float. When integrating position, compute the delta-movement as a float, add the remainder to the delta-movement, then add the integer part of this value to the position, and the fractional part to the “remainder” field. On the next frame, the remainder will get added back in. The advantage of this method is that you’re using an integer everywhere except for movement, ensuring that you won’t have floating point complications elsewhere, and increasing performance. This technique is also very suitable if you have some framework in which the position of the object has to be an integer, or where it is a float, but that same position is used directly by the rendering system – in that case, you can use the framework-provided float position to store integer values only, to make sure that the rendering is always aligned to pixels.
Viewing all 17625 articles
Browse latest View live


Latest Images

<script src="https://jsc.adskeeper.com/r/s/rssing.com.1596347.js" async> </script>