Quantcast
Channel: GameDev.net
Viewing all 17625 articles
Browse latest View live

Swept AABB Collision Detection and Response

$
0
0
Collision detection is an area of game development that scares most into using third party physics APIs due to its seemingly vertically-steep learning curve. Most programmers understand the axis-aligned bounding box (AABB) algorithm but have trouble transitioning to the more difficult algorithms such as SAT and GJK. Swept AABB is the middle player that will show a lot of the problems that can occur with normal AABB and help understand core concepts used in more advanced collision techniques.

Note:  This article assumes you understand the AABB algorithm. There is also a bit of vector math, but it won’t get overly complicated. Examples are done in C/C++ but can be easily converted to other languages. At the end, I have given source files for C/C++ and C#.


What is Swept?


AABB has a major fundamental problem that may not be visible at first. Take these 3 examples:


Attached Image: 01.png

Example 1: A normal AABB collision. The blue box is where the box is at the beginning of the frame. The green box is where the box is expected to be by the end of the frame. The aqua box shows where AABB will place the box after collision. The gray box is a static (unmovable) block that is tested for collision. This shows a normal collision. The box is moved to the nearest point that is not a collision. This is fine and is the expected result of AABB.


Attached Image: 02.png

Example 2 shows a similar collision where the destination is further on the opposite side. As you can see, AABB has placed the response box on the opposite side of the block. Logically, this makes no sense as it has magically passed through the object.


Attached Image: 03.png

Example 3 shows a destination that doesn’t collide with the object. AABB will assume that there was no collision and the moving box will move through it like there was no collision at all.

So when do these problems occur?

These problems usually appear when objects are moving fast and/or the program is running at a low frame rate. To avoid this, we need to somehow predict where the box travelled between each frame. This concept is called swept.

Implementing Swept AABB


In this implementation, we will assume that a box is defined by a position at the top-left corner of the box and a width and height. Now that we are taking swept into consideration, we also need to remember the velocity.

Note:  The velocity of an object is how far the object will move per second. If we multiply the velocity by the delta time, you will have the displacement that the object must move in this frame.


So we will define our box like so:

// describes an axis-aligned rectangle with a velocity
struct Box
{
	// position of top-left corner
	float x, y;

	// dimensions
	float w, h;

	// velocity
	float vx, vy;
};

vx and vy refer to the velocities, w and h are the box dimensions.

The function that will perform the test will look like this:

float SweptAABB(Box b1, Box b2, float& normalx, float& normaly)

The first parameter is the box that is moving. The second is the static box that will be tested against. The last two parameters make up the normal of the collided surface. This will be used later on when we want to respond to the collision.

Note:  A normal is the direction that an edge of an object is facing. Think of a perpendicular arrow pointing away from face at 90 degrees.


The return value is a number between 0 and 1 that indicates when the collision occurred. A value of 0 indicates the start of the movement and 1 indicates the end. If we get a value of 1, we can assume that there was no collision. A value of 0.5 means that the collision occurred halfway through the frame. This will also be used later to respond to the collision.


Attached Image: 04.png

Now, to first start the algorithm, we need to find the distance and time that it takes to reach a collision on each axis.

    float xInvEntry, yInvEntry;
    float xInvExit, yInvExit;

    // find the distance between the objects on the near and far sides for both x and y
    if (b1.vx > 0.0f)
    {
        xInvEntry = b2.x - (b1.x + b1.w);
        xInvExit = (b2.x + b2.w) - b1.x;
    }
    else 
    {
        xInvEntry = (b2.x + b2.w) - b1.x;
        xInvExit = b2.x - (b1.x + b1.w);
    }

    if (b1.vy > 0.0f)
    {
        yInvEntry = b2.y - (b1.y + b1.h);
        yInvExit = (b2.y + b2.h) - b1.y;
    }
    else
    {
        yInvEntry = (b2.y + b2.h) - b1.y;
        yInvExit = b2.y - (b1.y + b1.h);
    }

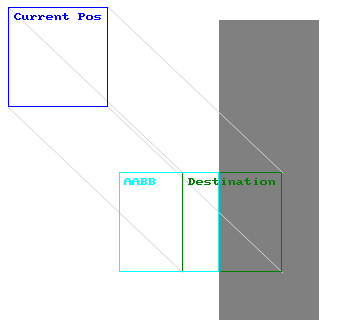
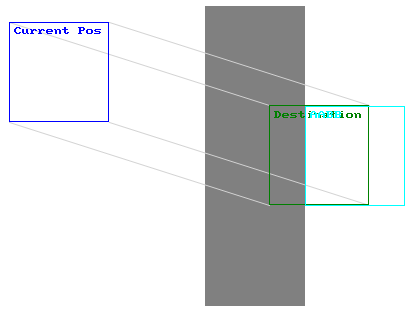
xInvEntry and yInvEntry both specify how far away the closest edges of the objects are from each other. xInvExit and yInvExit is the distance to the far side of the object. You can think of this is a being like shooting through an object; the entry point is where the bullet goes through, and the exit point is where it exits from the other side. These values are the inverse time until it hits the other object on the axis. We will now use these values to take the velocity into account.

    // find time of collision and time of leaving for each axis (if statement is to prevent divide by zero)
    float xEntry, yEntry;
    float xExit, yExit;

    if (b1.vx == 0.0f)
    {
        xEntry = -std::numeric_limits<float>::infinity();
        xExit = std::numeric_limits<float>::infinity();
    }
    else
    {
        xEntry = xInvEntry / b1.vx;
        xExit = xInvExit / b1.vx;
    }

    if (b1.vy == 0.0f)
    {
        yEntry = -std::numeric_limits<float>::infinity();
        yExit = std::numeric_limits<float>::infinity();
    }
    else
    {
        yEntry = yInvEntry / b1.vy;
        yExit = yInvExit / b1.vy;
    }

What we are doing here is dividing the xEntry, yEntry, xExit and yExit by the object’s velocity. Of course, if the velocity is zero on any axis, it will cause a divide-by-zero error. These new variables will give us our value between 0 and 1 of when each collision occurred on each axis. The next step is to find which axis collided first.

    // find the earliest/latest times of collision
    float entryTime = std::max(xEntry, yEntry);
    float exitTime = std::min(xExit, yExit);

entryTime will tell use when the collision first occurred and exitTime will tell us when it exited the object from the other side. This can be useful for certain effects, but at the moment, we just need it to calculate if a collision occurred at all.

    // if there was no collision
    if (entryTime > exitTime || xEntry < 0.0f && yEntry < 0.0f || xEntry > 1.0f || yEntry > 1.0f)
    {
        normalx = 0.0f;
        normaly = 0.0f;
        return 1.0f;
    }

The if statement checks to see if there was a collision or not. If the collision time was not within 0 and 1, then obviously there was no collision during this frame. Also, the time when the collision first entered should never be after when it exited out the other side. This is checked, and if it failed, then we assume that there was no collision. We specify 1 to indicate that there was no collision.

If there was a collision, our last step is to calculate the normal of the edge that was collided with.

    else // if there was a collision
    {        		
        // calculate normal of collided surface
        if (xEntry > yEntry)
        {
            if (xInvEntry < 0.0f)
            {
                normalx = 1.0f;
                normaly = 0.0f;
            }
	        else
            {
                normalx = -1.0f;
                normaly = 0.0f;
            }
        }
        else
        {
            if (yInvEntry < 0.0f)
            {
                normalx = 0.0f;
                normaly = 1.0f;
            }
	        else
            {
                normalx = 0.0f;
		        normaly = -1.0f;
            }
        }

        // return the time of collision
        return entryTime;
    }

Since all of our boxes are axis-aligned, we can assume that there are only 4 possible normals (one for each edge of the box). This simple test will figure that out and then return the collision entry time.

This is all of the code we will use for swept AABB but it won't work correctly in certain cases! That is because we need to implement broadphase (we will cover this soon). But, for now, there is a whole other step in a collision, and that is the response.

Responses


A collision response is how we want the object to behave after a collision. Before going into some of the different types of responses, we need to figure out the new point where the collision occurred. This should be easy now that we have our swept AABB function.

    float normalx, normaly;
    float collisiontime = SweptAABB(box, block, out normalx, out normaly);
	box.x += box.vx * collisiontime;
	box.y += box.vy * collisiontime;
	
	float remainingtime = 1.0f - collisiontime;


Attached Image: 05.png

Doing 1.0f – collisiontime will give us the remaining time left in this frame (0 to 1 value again). This will perform the collision correctly and might be enough for some uses. But if you try to move the box diagonally into the object (“hugging the wall”) then you’ll find that you can’t move. The moving box will not move at all. This is where the different responses can help.

Deflecting


This is most common in games like pong where there is a ball that bounces off objects.


Attached Image: 06.png

You will notice that when the objects collide, the moving object still has some velocity left in it. What will happen is that the remaining velocity will be reused to move it in the opposite direction, creating a bounce-like effect.

    // deflect
    box.vx *= remainingtime;
    box.vy *= remainingtime;
    if (abs(normalx) > 0.0001f)
        box.vx = -box.vx;
    if (abs(normaly) > 0.0001f)
        box.vy = -box.vy;

First we are reducing the velocity by our remaining time. Then we negate the velocity on whichever axis there was a collision. Pretty simple.

Push


Pushing is more of the traditional “wall hugging” concept where if you run towards a wall on an angle, you will slide along the wall.

Attached Image: 07.png

    // push
    float magnitude = sqrt((box.vx * box.vx + box.vy * box.vy)) * remainingtime;
    float dotprod = box.vx * normaly + box.vy * normalx;
    if (dotprod > 0.0f)
        dotprod = 1.0f;
    else if (dotprod < 0.0f)
        dotprod = -1.0f;
    NewBox.vx = dotprod * normaly * magnitude;
    NewBox.vy = dotprod * normalx * magnitude;

It reuses the remaining velocity and pushes it in the direction that is parallel to the collided edge. The first step is to calculate the magnitude of the velocity (this is a programmer version of the Pythagorean Theorem). The next step is performing the dot product with the velocity and the normal of the collided face. We must then normalize this scalar (because we are going to set our own distance). The final step is to multiply the normalized dot product, the switched normal and the magnitude.

Alternatively, you could normalize the velocity after calculating the magnitude, so then you don’t have to normalize dotprod.

Slide


The problem with the push technique is that it may push the object along faster than expected. A more realistic approach is to do sliding.


Attached Image: 08.png

This uses vector projection to find the equivalent position on the edge. This is a simpler approach than the push method.

    // slide
    float dotprod = (box.vx * normaly + box.vy * normalx) * remainingtime;
    NewBox.vx = dotprod * normaly;
    NewBox.vy = dotprod * normalx;

The first thing to remember is that we are swapping the normals around (swap x value with y value). We calculate the dot product, multiply it by the magnitude, and finally multiply it by the swapped normal value. And now we should have our projected velocity.

Broad-Phasing


The swept AABB algorithm runs pretty fast, but as more objects come into play, the performance will drop rapidly. A way to combat this is called broad-phasing. This is where you can do a faster, less accurate test to quickly determine if there isn’t a collision. There are a few techniques to do this (such as circular distance) but, because our objects are all axis-aligned boxes, it makes sense to use a box again.


Attached Image: 09.png

The black box around the outside shows us the broad-phase area. This is a box that we can perform a simple AABB test to check if there is a collision or not. Looking at the image, it is safe to say that if an object is not in this broad-phase area, it will not collide with the object. But just because it is within the broad-phase area, does not indicate that there is a collision. If there is a collision with the broad-phase area, we know that we should perform the swept AABB check to get a more precise answer.

Box GetSweptBroadphaseBox(Box b)
{
    Box broadphasebox;
    broadphasebox.x = b.vx > 0 ? b.x : b.x + b.vx;
    broadphasebox.y = b.vy > 0 ? b.y : b.y + b.vy;
    broadphasebox.w = b.vx > 0 ? b.vx + b.w : b.w - b.vx;
    broadphasebox.h = b.vy > 0 ? b.vy + b.h : b.h - b.vy;

    return broadphasebox;
}

This first step is to calculate the broad-phase area. As bad as this looks, all it is doing is adding the velocity to the edge (depending on the direction of the velocity). Now all we have to do is a generic AABB test.

bool AABBCheck(Box b1, Box b2)
{
    return !(b1.x + b1.w < b2.x || b1.x > b2.x + b2.w || b1.y + b1.h < b2.y || b1.y > b2.y + b2.h);
}

This is a rather simplified function that returns true if a collision occurred.

Now we should be able to put all of the pieces together like this:

	// box is the moving box
	// block is the static box

	Box broadphasebox = GetSweptBroadphaseBox(box);
	if (AABBCheck(broadphasebox, block))
	{
		float normalx, normaly;
		float collisiontime = SweptAABB(box, block, out normalx, out normaly);
		box.x += box.vx * collisiontime;
		box.y += box.vy * collisiontime;

		if (collisiontime < 1.0f)
		{
			// perform response here
		}
	}

Limitations


The implementation described here has some limitations that you may have figured out already. These include:
  • Doesn’t take resizing into consideration (i.e. if a box resizes throughout the frame).
  • Only allows linear movement. If your moving box is moving in a circular fashion, it will not check where it was extended out on the curve.
  • Only allows one box to be moving (i.e. if two boxes move towards each other and collide). This is something I intentionally left out as it starts to involve many of the physics concepts like mass and force.
  • It is still only square shapes! You can’t even rotate them! This is obvious because the name of the algorithm sort of says that already. But if you have conquered swept AABB, then you might be ready to move onto the next level (like SAT or GJK).
  • It is made for 2D only. Luckily, it is quite easy to convert this code to 3D. So long as you understand the concept well, you shouldn’t have much trouble with it. I kept it as 2D to keep things as simple as possible.

Code


All of the C/C++ code specified in this article is available for download here. I have also implemented it in C#. This example code will not run a demonstration; it shows only the functions involved.

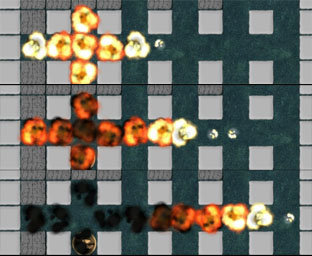
And, just for the hell of it, here’s a picture of everything in action:


Attached Image: 10.png


Building a First-Person Shooter Part 1.1: Visual Studio Setup

$
0
0
This is a continuation of a multi-part tutorial on Building a First-Person Shooter - Part 1.0: Creating a Room.

Setting up the VS 2010 project


Now that we've finished building our level it is now time to begin the coding side of the project. For this lesson, we will be using Visual Studio 2010 on Windows, but you can follow the equivalent steps for Xcode on Mac. Right-click on the project name in the project list and select the Open Folder menu item from the context menu that pops up. This will open the project folder in Windows Explorer (or Finder on Mac). Navigate to the Projects/Windows folder and open the file MyGame.sln. At this point in time we are going to create a few blank C++ and Header files that we will be fleshing out throughout the tutorial.

Attached Image: Cpp1.png

Attached Image: cpp2.png

Creating C++ Files


In the Visual Studio’s Solution Explorer (normally located on the left side of the screen) right click on the Source folder and select Add->New Item, A new item window will pop up and we are going to select “C++ File (.cpp)” and name the file “Player” we also want to change the location of this file so on the right side of “Location” click the browse button and navigate to “MyGame/Source” and click “Select Folder” finally click Add and our new Player.cpp file will appear in the Solution Explorer. We will also want a “Node.cpp” file so repeat the process again but this time name the file “Node”.

Attached Image: cpp3.png

Attached Image: cpp4.png

Creating Header Files


Adding header files into Visual Studios 2010 is essentially the same process as adding in a cpp file. This time we will click on the “Header Files” folder in the solution explorer, right click and select Add->New Item. The window from before will pop up, but now we select “Header File (.h)” instead. Once again we will want these files saved in the “MyGame/Source” folder so remember to save to the correct folder. We are going to make three headers for this tutorial so repeat the steps of adding a new file for Player.h, Node.h, and MyGame.h.

Attached Image: cpp5.png

Attached Image: cpp6.png

Now we're ready to start coding.

MyGame.h


Inside MyGame.h we are going to set a series of #define statements that will allow other files to just make a single #define call. You will notice a call to #pragma once, this is a preprocessor directive that says “only include the following files if they’re not already included”. After this call we insert #define calls to leadwerks.h, node.h, and player.h:

#pragma once
#include "Leadwerks.h"
#include "Node.h"
#include "Player.h"

App Class


By default the App class contains two functions for structuring a game. App::Start() will be called when the game begins, and App::Loop() will be called continuously until the game ends. Inside App.h we are going to remove the default camera and add in a Player, the resulting file should look as such:

#pragma once
#include "Leadwerks.h"
#include "MyGame.h"

using namespace Leadwerks;

class App
{
public:
    Window* window;
    Context* context;
    World* world;
    Player* player;

    App();
    virtual ~App();

    virtual bool Start();
    virtual bool Loop();
};

Since we removed the default camera from App.h we will also need to remove the initialization call within the App constructor inside App.cpp:

App::App() : window(NULL), context(NULL), world(NULL){}

Next we are going to create a new instance of a player in App::Start() as well as call the player’s Update function in App::Loop():

//Create the player
player = new Player;
//Update the player
player->Update();

Also inside the App::Start() function, we are going to load an ambient background sound, then have that sound play on a continuous loop. (We'll replace this with something more advanced later on, but this is fine for now):

Sound* sound = Sound::Load("Sound/Ambient/cryogenic_room_tone_10.wav");
Source* source = Source::Create();
source->SetSound(sound);
source->SetLoopMode(true);
source->Play();

By the end of these changes your finished App class should look like the following:

#include "App.h"
#include "MyGame.h"

using namespace Leadwerks;

App::App() : window(NULL), context(NULL), world(NULL) {}

App::~App()
{
    //delete world; delete window;
}

bool App::Start()
{
    //Create a window
    window = Window::Create("MyGame");

    //Create a context
    context = Context::Create(window);

    //Create a world
    world = World::Create();

    //Create the player
    player = new Player;

    std::string mapname = System::GetProperty("map","Maps/start.map");
    if (!Map::Load(mapname)) Debug::Error("Failed to load map &#092;""+mapname+"&#092;".");

    //Move the mouse to the center of the screen
    window->HideMouse();
    window->SetMousePosition(context->GetWidth()/2,context->GetHeight()/2);

    Sound* sound = Sound::Load("Sound/Ambient/cryogenic_room_tone_10.wav");
    Source* source = Source::Create();
    source->SetSound(sound);
    source->SetLoopMode(true);
    source->Play();
    world->SetAmbientLight(0,0,0,1);

    return true;
}

bool App::Loop()
{
    //Close the window to end the program
    if (window->Closed() || window->KeyDown(Key::Escape)) return false;

    //Update the game timing
    Time::Step();

    //Update the world
    world->Update();

    //Update the player
    player->Update();

    //Render the world
    world->Render();

    //Sync the context
    context->Sync(true);

    return true;
}

Node Class


Next we are going to create a base class which we will call Node. All classes in our game will be derived from this base class. This is called inheritance, because each class inherits members and functions from the class it's derived from. We can override inherited class functions with new ones, allowing us to create and extend behavior without rewriting all our code each time.

The Node class itself will be derived from the Leadwerks Object class, which is the base class for all objects in Leadwerks. This will give us a few useful features right off the bat. Our Node class can use reference counting, and it can also be easily passed to and from Lua. The node header file will get just one member, an Entity object:

#pragma once
#include "MyGame.h"

using namespace Leadwerks;

class Node : public Object
{
public:
    Entity* entity;

    Node();
    virtual ~Node();
};

In the Node.cpp file, we'll add the code for the Node constructor and destructor:

#include "MyGame.h"

Node::Node() : entity(NULL)
{
}

Node::~Node()
{
    if (entity)
    {
        if (entity->GetUserData()==this) entity->SetUserData(NULL);
        entity->Release();
        entity = NULL;
    }
}

Our code foundation has now been laid and it is finally time to move onto developing the player class, which will be the subject of our next lesson.

Building a First-Person Shooter Part 1.0: Creating a Room

$
0
0
This is the first lesson in a set of tutorials that demonstrate how to build a complete first-person shooter game, from start to finish.

Download the files used in this lesson: FPSGame.zip

Getting Started


We're going to write this game in the programming language C++. C++ compiles to native code, which gives us the fastest possible performance on mobile devices. The object-oriented nature of C++ makes it great for games.

We begin by creating a new C++ project. To open the project manager, select the File > Project Manager menu item. When it appears, press the Import button and select the zip file posted at the top of this lesson. (In older versions of Leadwerks, you will need to create a new project called "FPSGame" and then manually extract the zip file into this project's folder.)

Note:  
If you do not have a copy of the Leadwerks engine, a free 30-day trial can be downloaded to use with this tutorial


ccs-1364-0-11791300-1367301963.png

Using Brushes to Sketch Out a Room


Since this tutorial is focused on the player class we are only going to sketch out a simple rectangular room for our player to run around in.

Select the box primitive brush from either the Objects tab or the shortcut box brush icon located on the left toolbar.

In the X/Z viewport sketch out a box that has a width and length of 16 and height of about 0.25. This will be the floor of our level. Create four more boxes to form the walls, and finally top it off with a ceiling.

ccs-5181-0-94166300-1366929131_thumb.png

Room Materials


At this point our room should look like a very bland box, luckily it’s time to spice things up and bring our room to life with materials. Left click on the asset browser and expand then select the Materials->Spaceship folder. Inside should be a group of textures and materials. Next drag and drop the “scificeilingb” material to the ceiling box in the 3D viewport, the changes should immediately appear. Scroll down in the asset browser to the “scififloorb” material and drag and drop it onto the floor box. Finally select the “scifiwall_basea2” material and drag it onto all four walls.

ccs-5181-0-62180100-1366929250_thumb.png

ccs-5181-0-45510600-1366929258_thumb.png

ccs-5181-0-33356600-1366929267_thumb.png

UV Manipulations


When you take some time to look around the room, the first thing that jumps out at you is that the material pattern is repeating itself very often thus drawing too much attention to itself. To remedy this we are going to scale the materials texture. Start off by opening the objects tab on the right toolbar. Next we are going to change to selection mode to “Select Surface” Edit->Select Surface or alternatively click the “Select Surface” shortcut icon located second from the top on the left toolbar. In the 3D viewport left click on the floor of the room, then under the Texture Mapping section of the objects tab change both scale values to 4.0. After repeating the texture scaling on all four walls and the ceiling it will be time to move onto lights.

ccs-5181-0-41660300-1366929118_thumb.png

Lights


Now that we have our room’s materials set it is time to add some lights to the room. For this tutorial we are going to add in four point lights, these lights emit light in a radius similar to that of a traditional light bulb. On the left toolbar there is an icon showing a light bulb, this is the point light shortcut, left click on the icon. With the light bulb icon selected, left click anywhere in a 2D view port and press the Enter key and a point light will be added into the map. Create four of these to illuminate your room.

ccs-5181-0-11531900-1366929322_thumb.png

Now it’s time to adjust the light ranges. Left click on the map tab and select the four point lights in the Scene Browser. Next left click on the “Light” tab and set the range value to 9.0. This will increase the radius of the light.

ccs-5181-0-70419600-1366929337_thumb.png

ccs-5181-0-75452100-1366929349_thumb.png

Our final step is to create the map’s lightmap, so that our lights take effect on static objects. In the top toolbar navigate to Tools->Calculate Lighting (or press ctrl+L), a Calculate Lighting window should pop up. Click Render and after the lighting is calculated close both windows and we are done adding lights.

ccs-5181-0-14695200-1366929365_thumb.png

ccs-5181-0-59571400-1366929376_thumb.png

ccs-5181-0-47037100-1366929389_thumb.png

The level is now complete, now it’s time to create a player to run around in our room. Before moving on don't forget to save the map. Select the File > Save menu item and save the map as "start.map".

ccs-1364-0-22322900-1366933402_thumb.jpg

The next lesson will cover setting up Visual Studio so we can code some functionality into the level.

Practical Cross Platform SIMD Math: Part 2

$
0
0
Having created a starting point to write a math library using basic SIMD abstractions, it is time to put in some real testing. While unit testing gets you halfway to a solid library, a primary part of the reason for using SIMD is to get extra performance. Unfortunately, with so many variations of SIMD instructions, it is easy to slow things down on accident or break things in ways which leave them testing positive in the unit tests but not really correct in practice. We need something which will use the current Vector3fv class in a manner where the math is similar to games but uses enough variation where performance and odd cases are easily tested. Additionally we need something simple that doesn’t take a lot of work to implement which brings us to a simple answer: a ray tracer.

What exactly does a ray tracer have to do with a game? All the required math is generally shared between game and ray tracer, additionally a ray tracer abuses memory in ways similar to a game and finally a ray tracer condenses several minutes worth of game play related math into something which only runs for a couple seconds. Presented here is a ray tracing system implemented in a manner eventually usable by the unit tests through fixtures. This article will start by implementing the item as an application in order to get some basics taken care of. Additionally the application may continue to be useful while discussing features of C++11 and less common ways to use them. Given this is a testbed, it is worth noting that the ray tracer is not something intended to be a real rendering starting point, it is dirty, hacked together and probably full of errors and bugs.

As with prior work, the CMake articles (here) cover the build environment and the prior overview of how the library is setup is at here. Finally, the source repository can be found here.

Preparing For The Future


Prior to moving forward, it is important to note that a couple changes have been made to the SIMD instruction abstraction layer preparing for future extensions. The first item is renaming the types used and providing some extra utilities which will be discussed later. Instead of the name Vec4f_t for instance, the types have been renamed to follow the intrinsic types supplied by Clang and GCC a little better. The primary reason for this is the greatly expanded set of types which will eventually need to be covered and while the naming convention would work, it was better for GCC and Clang to follow a slightly modified form which follows the compiler conventions closer. The names are changed to be: U8x16_t, I8x16_t, U16x8_t, etc up to F32x4_t, F64x2_t and beyond. Again, while not necessary it made the code a bit more consistent and easier to map to/from Neon types and other intrinsics.

There are some additions to the build in order to support MMX also. But, it is important to realize that prior to SSE2, MMX shared registers with the FPU which is undesirable, so MMX is only enabled in the presence of SSE2. Additionally, the MMX __m64 data type is not present when compiling 64bit targets so MMX must be disabled in that case also. It should also be noted that the SSE3 specific versions of Dot3 and other intrinsics are missing, in the first article I made a mistake and used two timing sheets from different aged CPU’s and didn’t catch the inconsistency. The SSE 3 implementation turned out to be slower than the SSE 1 implementation. The _mm_hadd_ps instruction is unfortunately too slow to beat out the SSE 1 combination of instructions when the timings are all consistently measured on a single CPU target.

These are just a couple of the changes since the first article and some will be covered in more detail later in this article. For other changes, you will likely just want to browse the source and take a look. For instance, a starting point for a matrix exists but it is just that, a starting point and not particularly well-implemented as of yet. It is suggested not to use the additional classes as of yet, as they are experimental and being validated which may cause notable changes as I move forward with the process.

Library Validation


As important, or arguably more important, than the performance gains of the vectorization is making sure the library is usable without undue hassle and that common bug patterns are avoided. The only way to really validate code is to use it. This is one of the reasons a ray tracer is a decent testbed, with a small project there is less resistance to change if problems with the code are noticed. Additionally, like the unit tests, it is useful to switch from different versions of the vectorized code quickly to make sure the results are consistent. While the unit tests should catch outright errors, trivial differences in execution are easier to catch with the ray tracer since it outputs an image you can inspect for correctness. Eventually it will be useful to automate the ray tracer tests and note output differences within the unit test runs, but for the time being we’ll just validate times via log and images via version 1.0 eyeball.

In using the supplied code, the intention is to find and correct any obvious errors which will exist in any amount of code. While I don’t intend to walk through each error and the corrections, at least 10 very obvious errors were fixed in the first couple hours of implementing the ray tracer. It doesn’t take much to make a mistake and often unit tests just don’t catch the details. An example of a bug which showed up almost immediately was the division by scalar implementation - it was initializing the hidden element of the SIMD vector to 0.0f and generating a NaN during division. While we don’t care about the hidden element, some of the functions expect it to always be 0.0f and as such a NaN corrupted later calculations. The fix was to simply initialize the hidden element to 1.0f in that particular function and everything started working as expected. This is just one example of a trivial-to-make mistake which takes less time to fix than it does to diagnose, but which can exist in even relatively small amounts of code.

NaN And Infinity


Testing for NaN and infinity values is usually performed by calling to standard library functions such as isnan or isfinite. Unfortunately there are two problems: one is that Microsoft decided functions such as those will be renamed to _isnan or _isfinite which of course means a little preprocessor work to get around the name inconsistency. The second problem is with the SIMD fundamental types you have to extract each element individually in order to pass them to such functions. Thankfully though, by leveraging the rules of IEEE 754 floating point, we can avoid both issues and perform validations relatively quickly.

What is a NaN or infinity value in terms of floats? The simple definition is that the floating point binary representation will be set in such a way as to flag an error. For our purposes, we don’t care about what causes the error results, we just want to notice them quickly. While some SIMD instruction sets do not fully conform to IEEE 754, usually the handling of NaN and infinity values do apply the common rules. To summarize the rules: any operation involving a NaN returns a NaN and any operation involving an Infinity (when not involving a NaN) will result in Infinity, though positive and negative variations are possible. Additionally, a comparison rule is defined such that NaN can never be equal to anything, even another NaN. This gives us a very effective method of testing for NaN and infinity using SIMD instructions. Multiply the SIMD register by 0 and if the result does not compare equal to 0, then either the value is a NaN or it is positive or negative infinity. Again, we don’t care which, we just care that the values were valid or not.

Using Intel SSE, this is represented by the following code:

static bool IsValid( F32x4_t v )
{
  F32x4_t test = _mm_mul_ps( v, _mm_setzero_ps() );
  test         = _mm_cmpeq_ps( test, _mm_setzero_ps() );
  return( 0x0f == _mm_movemask_ps( test ) );
}

With this abstraction in hand, we are able to insert additional testing of the Vector3fv classes. Even though this is a fast test, the extra validation placed in too many locations can quickly drag debug build performance to its knees. We want to only enable the advanced testing as required and as such it will be a compile time flag we add to CMake. Additionally, sometimes debugging a problem may only be possible in release builds, so we want the flag to be independent of debug build flags. Presenting the new option is quite simple with the CMake setup, we will be exposing SIMD_ADVANCED_DEBUG to the configuration file. This leaves one additional problem to be covered. The standard assert macro compiles out of release builds so our flag will still have no effect in release builds. We need a customized function to break on the tests even in release builds. Since this is a handy item to have for other reasons, it will be placed in the Core library header as a macro helper. CORE_BREAK will cause a break point in the program, even in release builds. For Windows, we simply call __debugbreak() and *Nix style Os’s we use raise( SIGTRAP ).

When everything is set up, the excessive level of debugging is handy in catching problems but comes at a notable cost. In heavy math, it is nearly a 50% slowdown to the library. We may need to cut back on the level of debugging or possibly use two flags for quick and/or detailed variations. For the time being though, the benefits outweigh the costs. Of course, the base functionality for IsValid always exists and as such it is possible to put in spot checks as required to catch common problems and only rely on the heavy-handed solution when absolutely needed.

Performance Measurement


Why is making sure that the math library is decently optimized so important? Donald Knuth stated something which is often paraphrased as: “premature optimization is the root of all evil.” The entire saying though is more appropriate to a math library: “We should forget about small efficiencies, say about 97% of the time: premature optimization is the root of all evil.“ A math library is so fundamental to all your game code that there is a very strong argument that it is in the 3% of code which is not considered evil to be optimized as soon as possible. Of course this has to be taken with a grain of salt - since you can’t go changing all the interfaces and usage patterns during the optimization pass, this is most definitely a function-to-function optimization which is generally frowned upon. But, unlike 90+% of other functions, optimizing something like a dot product is easily going to effect potentially hundreds, or more likely, thousands of calls per frame. The reason to optimize it early is that a dot product is a small function often inlined and will not show up as a hot spot in a profiler, the only reliable manner to know the optimization helps is to enable it and disable it, measuring both cases.

Classes And SIMD


Part of the performance gains from SIMD math ends up being lost since, as mentioned briefly in the first article, classes which wrap SIMD types often do not perform as best they could. While compilers continue to get better at optimizing in this area, it is still a fairly weak point for most. The difficulty is not so much caused within single functions since the compilers will inline and optimize away (almost) all of the wrapper and simply use the intrinsics on the fundamental type. Instead the difficulty is in calling between functions which are not inlined. In such cases the compiler is forced to flush the SIMD register back to memory and then use normal class style parameter passing when calling the function. Of course, once in the called function, the data is loaded back into a SIMD register. This is unneeded overhead which can be avoided if you pass by the fundamental type in most cases.

Before you rush out and try to fix things, there are several items to consider. The first is: do you really care? If a function is called rarely, this overhead is trivial and can be ignored while you continue to get the primary gains from the vectorized types. On the other hand, if a function is called continually, such as the case of intersection calls in the ray tracer, the overhead is not trivial and is a notable loss of performance. Even in the case of highly-called functions, the vectorized code still out-performs the native C++ by a notable amount, just not as much as it could. Is the work of fixing this problem worth it? That is going to have to be left to the reader for their specific cases to determine, we’ll simply be covering the solutions provided by the wrapper and abstraction architecture.

Isolation Of SIMD Performance


Clang and GCC both disable usage of intrinsics for higher-level instruction sets, unless you enable the compiler to also use the intrinsics. This is unfortunate in a number of ways but mostly when attempting to get a base line cost/benefit number for isolated work with SIMD instructions. Enabling compiler support of higher instruction sets makes the entire program faster of course but what we really want is to get an idea of just the bits which are vectorized from our work. Using MSVC it is possible to tell the compiler not to use SIMD instruction sets in generated code, yet still use the vectorized math and hand coded intrinsics we have written. In this way it is possible to get the isolated changes properly timed. Of course, this is not a very accurate method of measuring performance since interactions between the compiler optimizations and the library are just as important as the raw vectorized changes, but it does give a baseline set of numbers showing how the wrappers are performing in general. For these reasons, unless otherwise noted, all performance information will be measured with MSVC on an Intel I7 with the compiler set to generate non-SSE code.

The Ray Tracer


While the ray tracer is intended to be simple, it is also written as a complete application with object oriented design and driving principles. Also, the ray tracer introduces a small open source utility class which has been dropped in to parse JSON files. (See http://mjpa.in/json) I don’t intend to detail parsing of JSON but I will quickly review why it was chosen. JSON as a format is considerably more simplified than XML and supports a differentiation of concepts which is quite useful to programming. The differentiation is that everything is one of four things: string, number, array or object. With the four concepts, parsing is simplified in many cases and error checks can start off by simply checking the type before trying to break down any content. For instance, a 3D vector can be written as the following in JSON: MyVector : [0, 0, 0]. With the library in use, the first error check is simply: isArray() && AsArray().size()==3. XML on the other hand does not have any concepts built in, everything is a string and you have to parse the content yourself. This is not to say XML doesn’t have a place, it is just a more difficult format to parse and for this testbed JSON was a better fit. The only real downside to the JSON format is lack of commenting abilities, it would be nice to have comments in JSON but people argue adamantly to not support such an extension.

The scene files used by the test application are quite simple, there are only six key sections listing out specific items. If you open the Sphere.json file in the Assets directory, you can see a very simple example. Hopefully the format is easy enough to understand, as I won’t be going into details. As a little safety item, it does include a version section which is currently 1.0. But, as mentioned, the ray tracer is a quickly put together testbed and not properly coded in a number of areas. The lighting model is incorrect, the super-sampling is just a quick approximation and some of the settings are probably used incorrectly in general. While the ray tracer may be made better eventually, it currently serves the goal of something which tests the math vectorization in non-trivial ways.

First Performance Information


There are 4 different timings that we are interested in when testing the ray tracer. The first timing is the pure C++ implementation with all vectorization disabled. The second time is the reference SIMD implementation which, due to working on the hidden element, will be a bit slower than the pure C++ version. Finally, we test the base SSE modification and then the SSE 4 upgrades. As mentioned, all SSE optimizations will be turned off in the compiler and the relative performance will be completely related to the vectorization of the math in use. We will be using a more complicated scene for testing, found in the BasicScene.json file. The scene contains a couple planes and a number of spheres with varying materials.

With a couple minor additions to the SSE code since the first article, the first run results in the following numbers (command line: RayTracer BasicScene.json):

Total time Relative Performance Description
41.6 seconds 1.00 C++
47.4 seconds 0.88 Reference
36.3 seconds 1.15 SSE 1
33.0 seconds 1.26 SSE 4

For a fairly simple starting point, 15% and 26% performance gains are quite respectable. The reference implementation is 12% slower than the normal C++, we need to fix that eventually but won’t be doing so in this series of articles, it will just be fixed in the repository at some point in the future. These numbers are not the huge gains you may be expecting, but remember the only change in this code is the single Vector3fv class, all other code is left with only basic optimizations.

Passing SIMD Fundamental Types By Register


Passing the wrapper class to functions instead of passing by the fundamental type breaks part of the compiler optimization abilities. It is fairly easy to gain back a portion of the optimizations by doing a little additional work. Since the class wrapper contains a conversion operator and constructor for the fundamental type, there is no reason function calls can’t be optimized by passing the fundamental type, but how to do that? In the SIMD instruction abstraction layer a utility structure has been added, for Intel it is in the Mmx.hpp file. The purpose of the structure is to provide the most appropriate parameter passing convention for any of the abstractions. In the reference implementation, the preferred passing style is a const type reference while in the MMX+ version we pass by unqualified basic type. The purpose of the type indirection is to maintain compatibility between the various implementations and has little effect on overall code usage or implementation details. At anytime you can directly reference the type via: Simd::Param< F32x4_t >::Type_t, though as is done in the Vector3f classes, we pull the type definition into the wrapper class for ease of use and simply name it ParamType_t.

There are a number of downsides to passing by the fundamental type, all related to ease of use. When you want to use the fundamental type you either need to use the SIMD instruction abstraction layer directly or wrap it back up in the Vector3fv wrapper class. In practice, it is a bit more typing and looks odd, but re-wrapping the passed-in register has no fundamental effect on code generation given the compilers. The wrapper is stripped right back out during optimization and you still have the benefits of the class wrapper without additional costs.

Intersection Optimization


The primary ray tracer loop, Scene::Render, cycles through all pixels in the output image and builds a ray for each pixel. In the case of super sampling, it also builds intermediate rays which are averaged together. Each of the rays is sent into the scene via the Scene::Trace function which is a recursive function. From within Scene::Trace, the rays are checked against the contents of the scene via the ModelSet::Intersect and the ModelSet::Shadowed functions. In all of these functions, the ray to be computed is packaged in a simple wrapper and passed by const reference. Of course given two vectors in the Ray class, the optimization loss is fairly significant. Since the per model intersection routines are the most called within the testbed, we will proceed to optimize them in a simple manner.

At this point, it is important to mention a rule of optimization. Fix the algorithms before proceeding to optimizing single functions. In the case of the ray tracer, its brute force nature is a problem. We do not want to fix this though, the purpose is not to write a fast ray tracer but to have a good consistent method of abusing the math types. So, for the purposes here we are breaking the rule for good cause. Always make sure you remember not to focus on little details as is being done here, or stated another way: “Do as I say, not as I do.” In this particular case.

In order to get a good idea of the performance difference, we’ll optimize starting with the sphere and plane interception routines. The function declaration is currently: virtual bool Intersect( const Math::Ray& r, float& t ) const=0;. We will change this to pass the two components of the ray as registers as shown in: virtual bool Intersect( Vector3::ParamType_t origin, Vector3::ParamType_t dir, float& t ) const=0. We are not expecting a huge win with this change since we still have broken optimizations up the chain of function calls. But there should be a noticeable difference:

Total time Relative Performance Description
41.6 seconds 1.00 C++
47.4 seconds 0.88 Reference
35.8 seconds 1.16 SSE 1
31.9 seconds 1.30 SSE 4

For SSE 1, this is not a great win but 4% for SSE 4 is notable. Now, why would SSE 4 get such a benefit while SSE 1 shows only about 1 percent? If you look at the intersection code, the first thing which happens in both is a dot product. SSE4’s dot product is so much faster than the SSE 1 implementation that the latencies involved in SSE 1 were hiding most of the performance losses. SSE 4 though, has to load the registers just the same, but there are fewer instructions in which the latencies get hidden. Passing by register under SSE 4 gets a notable speed benefit in this case specifically because we removed wait states in the SIMD unit. Of course, changing all the code up to the main loop to pass by register will supply further and even potentially more notable performance gains.

Conclusion


The SIMD wrapper classes can provide a significant performance gain without requiring any changes to a code base. With some extra work, using the pass by register modifications can return a significant portion of the lost performance caused by wrapping fundamental types. Once pass by register is pushed throughout the code base, even hand coding SIMD intrinsics will not usually provide a notable amount of extra performance at this point. Of course, as with all things optimization, you need to keep in mind where you apply optimizations. Low-level optimizations of the math library and types are unlikely to provide your greatest gains with even a fair SIMD implementation. Other math types will be added and used in further articles but this concludes the overview of the practical usage of SIMD.

It is highly suggested that you learn more about SIMD in general because eventually using the intrinsics directly can be used to optimize many portions of your game code well beyond the specific math involved.

Game Development with Win32 and DirectX 11 - Part 00.5: Concept

$
0
0

Introduction


So you might be wondering why this tutorial is numbered Part 00.5 rather than Part 2. Since I released the first tutorial, I've been asked in the comments and through PM what type of game I am making and what concepts I plan on covering in this tutorial series. So without further adeu, I present my tutorial series overview.

Note:  Due to my busy schedule, I will most likely not be able to add a new tutorial part on a weekly basis as I originally planned. I will try and publish new tutorials as soon as I can, but this is no guarantee that I will be able to keep it on a weekly schedule.


Game Concept


This was one of the hardest things for me to decide on. I already knew I didn't want to create another FPS-type game (there are too many tutorials on that already), but I also wanted to choose a style and genre that would allow for almost infinite expansion. In the end, I decided to write this tutorial for an open-world action/adventure game. I'm thinking along the lines of Grand Theft Auto, Red Dead, and Midnight Club (all produced by Rockstar Games). Now, I'm not going to try and copy them, but rather develop a game with a similar gameplay style.

Tutorial Topics


Once we have a working game framework going, we'll start to expand onto more advanced topics. Some of these topics (in no particular order) include:
  • Skeletal and vertex animations.
  • Full and proper physics engine (with physically adjusted animation).
  • Advanced rendering technques (e.g. tile-based deferred rendering, HDR, global illumination).
  • Client-server and client-client multiplayer support.
  • Scripting language support (either Python or Lua).
  • Procedural game generation.
  • Xbox 360 Controller support with XInput.
It should be noted that these aren't the only concepts that will be covered, but rather the more interesting ones. None of these will be covered though until we have a fully working framework (proper graphics, sound, and keyboard & mouse input).

Pathfinding concepts, the basics

$
0
0
As an old saying goes: if you can’t explain it, then you don’t master it. This will serve as a starting point to others that might be on the same path I was a few months ago: trying to understand the basic concept of efficient pathfinding.

The problem


Pathfinding is a domain in computing science that is widely known to be complex since most of the paper/explanation comes from expert/mathematician/AI veterans. Applied to games, it gets more complex as you get into optimizations more often than basic explanations. True, it is a complicated subject: it needs to be efficient and also be accurate.

The compromises


When you try to achieve both efficiency and accuracy, you will certainly need some very heavily-optimized code. So for games, we’ll need to state some compromises. Do we actually need the shortest path or having a path at all will suffice? Can our level/terrain can be simplified into a basic layout? Those two questions are the fundamentals of the compromises: sufficient and simplistic. For games, an AI moving toward an objective will be sufficient enough to be believable. And to obtain good performances and efficient work flow, we’ll need to break down our level into a more simplistic representation.

The theory


Pathfinding is a complex process that we can split down into three components: the spacial representation, the goal estimation and the agent. The spacial representation, also known as the graph, is a means to describe a network of inter-connected walkable zones (roads, floors, …). The goal estimation, known as an heuristic, is a general representation to where might be the goal. This is a mere estimation that is needed to speed things up. Finally, the agent is the one responsible for actually searching through the spacial representation based on the goal estimation.

Putting this together you get an agent searching for a goal on a spatial representation with some hints to where it might be. Simple enough? But why do we need these three components? Why can’t we just use a spatial representation and iterate through all the zones till we find our goal? Yes you could, but it depends on what you are trying to achieve. What if you have different types of enemies? Say we have a soldier and a tank heading toward the player. A tank can't go in tight spaces and can not make sharp turns. How would you represent both in a one component? With the three components above, both units are walking on the same terrain, looking for the same goal, the player, but have their own limitations: you got a spatial representation, a goal and two agents. That is why pathfinding is always explained as three distinct components.

The graph


There are several ways to represent a graph of walkable zones and I’ll be describing the three most used throughout my research.

The first one, the most basic and easiest to understand is the grid. This is the most-explained type of graph when it come to pathfinding, go ahead and google "A star search algo" and you’ll most likely find an evenly spaced grid that covers a square room/space. Let's take a look on a simple “H” shape.


Attached Image: pathfind-graph-grid.png


As you can see, a uniform grid has been applied on the shape creating a network of nodes (pink and black dots). Yet effective and simple, a lot of memory is wasted on keeping data for a network that is not within our shape. To overcome this detail we could simply remove black dot from the graph and voilà. Here’s another catch: from a to b would require a search through all the mid to south noded, ±96nodes, to find a path of ±19nodes. The search algorithm is wasting precious time and power to go from 96nodes to 19. You could also add diagonal connectiond between nodes to reduce the path a bit. Another catch: most of the implementations I saw relies on raycasting from the sky (to detect nodes that are outside of geometry) thus making it useless (or complex workaround) when dealing with environments that have a ceiling. The point is, this graph is inefficient because too much data is representing the same zone (we’ll get into that in a moment).

The waypoints graph is the most used (based on pure observation in games). It does give you an alternative to the grid since more than 4 connections (8 with diagonal) between nodes can be made. Nodes are placed around the level with care to cover most of the walk-able areas without creating too much noise for the search algorithm.

Attached Image: pathfind-graph-waypoint.png

This graph can be placed along your geometry (doesn’t care if it has a ceiling) and also reduce the nodes count: ±31 mid-south nodes and a path from a to b of ±11 nodes. That is a lot better than the grid-based graph but still has a major issue (like the grid graph). The resulting network from these two point-line-connections is stripping away part of your actual walk-able area. See the image below for a better understanding.

Attached Image: pathfind-graph-waypoint-walkable.png

The network contains data only about the connections between nodes, thus stripping away the actual floor of our geometry. Multiple problems emerge from this fact: paths will have angular turns, an agent could never land on the a or b since they are not on the network and the paths can not be reduced with some direct-line-of-sight. Because these types of network only consider the walk-able area to be dots (with a radius) and their connections, the outside of the network can only be unwalk-able area or at least not safe (like a ditch, or narrow passage). So cutting a corner or trying to go in straight lines between nodes may be risky. I say may be because it depends on your level and your network. You could place your nodes to take account of the fact that agents will cut corners and maybe your level doesn’t have ditches/holes/obstacles.

For those that are still with me, the solution to the above problems lie within our actual geometry, meshes, commonly referred as navigation mesh or simply navmesh. The mesh of your floor geometry is pretty much all you’ll ever need to build your network: connected vertices form triangles, put in our terms, interconnected nodes.

Attached Image: pathfind-graph-mesh.png

As you can see, by giving each node an actual surface instead of point, the network reflects the actual floor. We also reduce the network from mid-south ±31nodes to 10 and a path of ±11 nodes to 8. What now? Well we can reduce a bit more our number of nodes by merging triangles into convex polygons. Why convex? A point and triangle are some kind of convex polygon and we can all affirm that two points lying within a convex shape can be linked with a straight line? Yes. In a convex polygon, for every point that lies on the edges to an other point on an other edge can be linked with a line that is contained within the polygon. In other words, an agent coming from the left side of a rectangle can cross over to the right side without worrying about collisions with walls.

Attached Image: pathfind-graph-mesh-convex.png

Once more we reduced our network significantly, 4 nodes total with a 3 nodes to our goal. As you can see, based on some simple geometry assumption, we were able to build a very efficient network for our “H” shape. I hope now you do understand that grids and graphs are very useless compared to a navmesh: we saved 3200% (131nodes to 4nodes) of processing power for our search algorithm. As intelligent beings, we do this process every time we plot a path in a known surface: we simplify the environment into basic shapes to find an path that is satisfying (we aren’t computers that are looking for the most-optimized-path).

Navmesh grid is the most efficient and accurate method to describe spatial areas and that is what we are looking for.

The heuristic


The heuristic is an information that is provided to each node of your graph to direct the search algorithm toward the target(s). Acting like a heat map, your search algorithm will look into this map to prioritize nodes.

Attached Image: pathfind-heuristic-heatmap.png

Multiple algorithms can be used to generate a heat map. In fact, it all depends on your game design, level design, platform, etc. For example, for levels that don’t have overlapping floors, the euclidean distance (distance between two points) will do the job (like in the above diagram). The heuristic is a game changer in pathfinding, without it, performance would drop since the search would need to look up every node till it finds the target. On the other hand, with a heuristic that isn’t adapted to your game, it would result in false estimation and your search algorithm could waste some valuable time in the opposite direction of your target.

If your graph is relatively small (node count) and your target platform possesses enough memory, the best heuristic would be as follows: each nodes contains a list of all other nodes in the graph with their corresponding depth. So node #1 would know that it’s 4 nodes away from #56, and thus providing the best estimation for the search algorithm – moving from lowest depth connections of each node would inevitably result in the shortest path.

The agent


This is where the search algorithm is performed. With a network and heuristic, a basic A* (pronounced “a star”) algorithm can find the shortest path between two nodes. A* algorithm is really well documented and is pretty simple to implement (under 50 lines of code), so I don’t have anything more to say on that topic.

The result


At this point, the agent found a path of nodes toward the target. As stated in my previous posts of April, Pathfinding 101 and Pathfinding 102-ish, we’ll need to find a way to optimize the path into a list of waypoints. This is where I struggled the most, I tried to find an algorithm that would optimize the path based on my understanding of the Funnel algorithm. And then I found a simple implementation in C++ (first result on google). It does work perfectly and it only requires a list of portals to walk through, so it will work with any graph you decide to use.

Attached Image: pathfind-result.png

Demo


A tech demo that combines everything discussed in this article.

Implementations in Unity3D


Reprinted with permission from Michael Grenier's blog

Multiplayer Pong with Go, WebSockets and WebGl

$
0
0
This article will guide you through the implementation of a pong server in Go and a pong client in JavaScript using Three.js as the render engine. I am new to web development and implementing pong is my first project. So there are probably things that could be done better, especially on the client side, but I wanted to share this anyway.

I assume that you are familiar with Go and the Go environment. If you are not, I recommend doing the Go tour on http://golang.org.

Setting up the Webserver and the Client


We first implement the basic webserver functionallity. For the pong server add a new directory to your go workspace, e.g., "$GOPATH/src/pong". Create a new .go file in this directory and add the following code:

package main

import (
	"code.google.com/p/go.net/websocket"
	"log"
	"net/http"
	"time"
)

func wsHandler(ws *websocket.Conn) {
	log.Println("incoming connection")
	//handle connection
}

func main() {
	http.Handle("/ws/", websocket.Handler(wsHandler))
	http.Handle("/www/", http.StripPrefix("/www/",
		http.FileServer(http.Dir("./www"))))
	go func() {
		log.Fatal(http.ListenAndServe(":8080", nil))
	}()

	//running at 30 FPS
	frameNS := time.Duration(int(1e9) / 30)
	clk := time.NewTicker(frameNS)

	//main loop
	for {
		select {
		case <-clk.C:
			//do stuff
		}
	}
}

We use the "net/http" package to serve static files that are in the "./www" directory relative to the binary. This is where we will later add the pong client .html file. We use the websocket package at "code.google.com/p/go.net/websocket" to handle incoming websocket connections. These behave very similar to standard TCP connections.

To see the webserver in action we make a new directory in the pong directory with the name "www" and add a new file to the directory called "pong.html". We add the following code to this file:

<html>
<head>
<title>Pong</title>
<style>
    body {
        width: 640px;
        margin: 0 auto;
        font-family: Tahoma, Verdana, Arial, sans-serif;
    }
</style>
<script src="http://ajax.googleapis.com/ajax/libs/jquery/1.4.2/jquery.min.js"></script>
<script src="https://raw.github.com/kig/DataStream.js/master/DataStream.js"></script>
<script src="http://threejs.org/build/three.min.js"></script>
<script type="text/javascript">
var ws

$(document).ready(function() {
	if ("WebSocket" in window) {
		// Let us open a web socket
		ws = new WebSocket("ws://"+document.location.host+"/ws/pong");
		ws.binaryType = "arraybuffer";
		ws.onopen = function() {
			console.log("connection open")
		}
		ws.onmessage = function(evt) {
		}
		ws.onclose = function() { 
			console.log("Connection is closed..."); 
		};

	}else{
		alert("no websockets on your browser")
	}
})
</script>
</head>
<body>
</body>
</html>

This code simply opens a websocket connection to the server. The libraries which will be used later in this tutorial are already included. Namely, we will use jQuery for some helper functions, Three.js to render stuff and a small helper library named DataStream.js which helps parsing data received from the server. We could also download those .js files and put them into the "www" directory and serve them directly from our Go webserver.

Now if we go back to the pong diretory and start the pong server (type "go run *.go" in the terminal) you should be able to connect to the webserver in your browser. Go to the url "http://localhost:8080/www/pong.html" and you should see a message in your terminal saying "incoming connection".

If you want to include one or several websocket-based games in a larger website I recommend using nginx as a reverse proxy. In the newest version you can also forward websocket connections. In a unix-type operating system this feature can be used to forward the websocket connection to a unix domain socket on which the game server is listening. This allows you to plug in new games (or other applications) without reconfiguring or restarting the webserver.

Handling Connections on the Server


We add three new types to store information for each client connection:

type PlayerId uint32

type UserCommand struct {
	Actions uint32
}

type ClientConn struct {
	ws         *websocket.Conn
	inBuf      [1500]byte
	currentCmd UserCommand
	cmdBuf     chan UserCommand
}

The type PlayerId is used for unique identifiers for the players. The struct UserCommand describes the information that is sent from the clients. For now it contains an integer that we use as a bitmask, which basically encodes the keyboard state of the client. We will see how to use that later on. Now we come to the actual ClientConn struct. Each client has a websocket connection which is used to receive and send data. The buffer is used to read data from the websocket connection. The currentCmd field contains the most recent received user command.

The last field is a buffer for user commands. We need this buffer since we receive the user command packages from the client asynchronously. So the received commands are written into the buffer and at the beginning of each frame in the main loop we read all commands from each player and place the most recent one in the currentCmd field. This way the user command cannot suddenly change mid-frame because we received a new package from the client.

So lets see how to implement the wsHandler function. We first need to add a new global variable

var newConn = make(chan *ClientConn)

that we need to handle incoming connections sychronously in the main loop. Next we have to import two additional packages, namely "bytes" and "encoding/binary". Now we are set up to handle incoming connections and read incoming packages:

func wsHandler(ws *websocket.Conn) {
	cl := &ClientConn{}
	cl.ws = ws
	cl.cmdBuf = make(chan UserCommand, 5)

	cmd := UserCommand{}

	log.Println("incoming connection")

	newConn <- cl
	for {
		pkt := cl.inBuf[0:]
		n, err := ws.Read(pkt)
		pkt = pkt[0:n]
		if err != nil {
			log.Println(err)
			break
		}
		buf := bytes.NewBuffer(pkt)
		err = binary.Read(buf, binary.LittleEndian, &cmd)
		if err != nil {
			log.Println(err)
			break
		}
		cl.cmdBuf <- cmd
	}
}

The wsHandler function gets called by the http server for each websocket connection request. So everytime the function gets called we create a new client connection and set the websocket connection. Then we create the buffer used for receiving user commands and send the new connection over the newConn channel to notify the main loop of the new connection.

Once this is done we start processing incoming messages. We read from the websocket connection into a slice of bytes which we then use to initialize a new byte buffer. Now we can use the Read function from "encoding/binary" to deserialize the buffer into a UserCommand struct. If no errors ocurred we put the received command into the command buffer of the client. Otherwise we break out of the loop and leave the wsHandler function which closes the connection.

Now we need to read out incoming connections and user commands in the main loop. To this end, we add a global variable to store client information

var clients = make(map[PlayerId]*ClientConn)

We need a way to create the unique player ids. For now we keep it simple and use the following function:

var maxId = PlayerId(0)

func newId() PlayerId {
	maxId++
	return maxId
}

Note that the lowest id that is used is 1. An Id of 0 could represent an unassigned Id or something similar.

We add a new case to the select in the main loop to read the incoming client connections:

...
		select {
		case <-clk.C:
			//do stuff
		case cl := <-newConn:
			id := newId()
			clients[id] = cl
            //login(id)
		}
...

It is important to add the clients to the container synchronously like we did here. If you add a client directly in the wsHandler function it could happen that you change the container while you are iterating over it in the main loop, e.g., to send updates. This can lead to undesired behavior. The login function handles the game related stuff of the login and will be implemented later.

We also want to read from the input buffer synchronously at the beginning of each frame. We add a new function which does exactly this:

func updateInputs() {
	for _, cl := range clients {
		for {
			select {
			case cmd := <-cl.cmdBuf:
				cl.currentCmd = cmd
			default:
				goto done
			}
		}
	done:
	}
}

and call it in the main loop:

		case <-clk.C:
			updateInputs()
			//do stuff

For convenience later on we add another type

type Action uint32

and a function to check user commands for active actions

func active(id PlayerId, action Action) bool {
	if (clients[id].currentCmd.Actions & (1 << action)) > 0 {
		return true
	}
	return false
}

which checks if the bit corresponding to an action is set or not.

Sending Updates


We send updates of the current game state at the end of each frame. We also check for disconnects in the same function.

var removeList = make([]PlayerId, 3)

func sendUpdates() {
	buf := &bytes.Buffer{}
	//serialize(buf,false)
	removeList = removeList[0:0]
	for id, cl := range clients {
		err := websocket.Message.Send(cl.ws, buf.Bytes())
		if err != nil {
			removeList = append(removeList, id)
			log.Println(err)
		}
	}
	for _, id := range removeList {
		//disconnect(id)
		delete(clients, id)
	}
}

We use the Message.Send function of the websocket package to send binary data over the websocket connection. There are two functions commented out right now which we will add later. One serializes the current game state into a buffer and the other handles the gameplay related stuff of a disconnect.

As stated earlier we call sendUpdates at the end of each frame:

...
		case <-clk.C:
			updateInputs()
			//do stuff
			sendUpdates()
...

Basic Gameplay Structures


Now that we have the basic server structure in place we can work on the actual gameplay. First we make a new file vec.go in which we will add the definition of a 3-dimensional vector type with some functionality:

package main

type Vec [3]float64

func (res *Vec) Add(a, b *Vec) *Vec {
	(*res)[0] = (*a)[0] + (*b)[0]
	(*res)[1] = (*a)[1] + (*b)[1]
	(*res)[2] = (*a)[2] + (*b)[2]
	return res
}

func (res *Vec) Sub(a, b *Vec) *Vec {
	(*res)[0] = (*a)[0] - (*b)[0]
	(*res)[1] = (*a)[1] - (*b)[1]
	(*res)[2] = (*a)[2] - (*b)[2]
	return res
}

func (a *Vec) Equals(b *Vec) bool {
	for i := range *a {
		if (*a)[i] != (*b)[i] {
			return false
		}
	}
	return true
}

We use three dimensions, since we will render the entities in 3D and for future extendability. For the movement and collision detection we will only use the first two dimensions.

The following gameplay related code could be put into a new .go file. In pong we have three game objects or entities. The ball and two paddles. Let us define data types to store relevant information for those entities:

type Model uint32

const (
	Paddle Model = 1
	Ball   Model = 2
)

type Entity struct {
	pos, vel, size Vec
	model          Model
}

var ents = make([]Entity, 3)

The Model type is an id which represents a model. In our case that would be the model for the paddle and for the ball. The Entity struct containst the basic information for an entity. We have vectors for the position, the velocity and the size. The size field represents the size of the bounding box. That is, for the ball each entry should be twice the radius.

Now we initialize the entities. The first two are the two paddles and the third is the ball.

func init() {
	ents[0].model = Paddle
	ents[0].pos = Vec{-75, 0, 0}
	ents[0].size = Vec{5, 20, 10}

	ents[1].model = Paddle
	ents[1].pos = Vec{75, 0, 0}
	ents[1].size = Vec{5, 20, 10}

	ents[2].model = Ball
	ents[2].size = Vec{20, 20, 20}
}

Note that the init function will be called automatically once the server starts. The way we will set up our camera on the client, the first coordinate of a vector will point to the right of the screen, the second one will point up and the third will be directed out of the screen.

We also add the two actions we need for pong, i.e., Up and Down:

const (
	Up   Action = 0
	Down Action = 1
)

and an empty update function

func updateSimulation() {
}

which we call in the main loop

...
		case <-clk.C:
			updateInputs()
			updateSimulation()
			sendUpdates()
...

Serialization and Client functionality


We add the serialization and the rendering on the client now because it is nice to see stuff even when the entities are not moving yet.

Serialization


When serializing game state my approach is to serialize one type of information after the other. That is, we first serialize all positions, then the velocities, etc.

In a more complex game with many entities I would first send the amount of entities which are serialized and then a list of the corresponding entity ids. The serialization would then also be dependent on the player id, since we might want to send different information to different players. Here we know that there are only three entities and we always send the full game state to each client.

For the serialization we need the "io" and the "encoding/binary" packages. The actual code is quite simple

func serialize(buf io.Writer) {
	for _, ent := range ents {
		binary.Write(buf, binary.LittleEndian, ent.model)
	}
	for _, ent := range ents {
		binary.Write(buf, binary.LittleEndian, ent.pos)
	}
	for _, ent := range ents {
		binary.Write(buf, binary.LittleEndian, ent.vel)
	}
	for _, ent := range ents {
		binary.Write(buf, binary.LittleEndian, ent.size)
	}
}

Note that it actually does not make sense to send the size and the model more than once, since the websocket connection is reliable and the values do not change. In general it would be better to only send data that changed in the current frame. To this end we keep a copy of the last game state and only send fields for which differences are detected. Of course we have to tell the client which data is actually sent. This can be done by including a single byte for each data type which acts as a bitmask.

We add the new variable for the old game state:

var entsOld = make([]Entity, 3)

which is updated with

func copyState() {
	for i, ent := range ents {
		entsOld[i] = ent
	}
}

in the sendUpdates() function directly after we sent the updates

func sendUpdates() {
	buf := &bytes.Buffer{}
	//serialize(buf, false)
	removeList = removeList[0:0]
	for id, cl := range clients {
		err := websocket.Message.Send(cl.ws, buf.Bytes())
		if err != nil {
			removeList = append(removeList, id)
			log.Println(err)
		}
	}
	copyState()
	for _, id := range removeList {
		delete(clients, id)
		//disconnect(id)
	}
}

We copy the state here, because the difference is needed for the serialization, and the disconnect() function can already alter the game state.

Then we update the serialization function (We also need to import the package "bytes")

func serialize(buf io.Writer, serAll bool) {
	bitMask := make([]byte, 1)
	bufTemp := &bytes.Buffer{}
	for i, ent := range ents {
		if serAll || ent.model != entsOld[i].model {
			bitMask[0] |= 1 << uint(i)
			binary.Write(bufTemp, binary.LittleEndian, ent.model)
		}
	}
	buf.Write(bitMask)
	buf.Write(bufTemp.Bytes())

	bitMask[0] = 0
	bufTemp.Reset()
	for i, ent := range ents {
		if serAll || !ent.pos.Equals(&entsOld[i].pos) {
			bitMask[0] |= 1 << uint(i)
			binary.Write(bufTemp, binary.LittleEndian, ent.pos)
		}
	}
	buf.Write(bitMask)
	buf.Write(bufTemp.Bytes())

	bitMask[0] = 0
	bufTemp.Reset()
	for i, ent := range ents {
		if serAll || !ent.vel.Equals(&entsOld[i].vel) {
			bitMask[0] |= 1 << uint(i)
			binary.Write(bufTemp, binary.LittleEndian, ent.vel)
		}
	}
	buf.Write(bitMask)
	buf.Write(bufTemp.Bytes())

	bitMask[0] = 0
	bufTemp.Reset()
	for i, ent := range ents {
		if serAll || !ent.size.Equals(&entsOld[i].size) {
			bitMask[0] |= 1 << uint(i)
			binary.Write(bufTemp, binary.LittleEndian, ent.size)
		}
	}
	buf.Write(bitMask)
	buf.Write(bufTemp.Bytes())
}

We have to write the data into a temporary buffer since we have to write the bitmask before the actual data and we only know the bitmask once we've iterated over all entities. The serialization could probably be implemented more efficiently in terms of memory allocation, but I leave that as an exercise to the reader.

Note that we added an additional input argument serAll. If serAll is set to true we serialize the complete gamestate. This flag is used to send the whole game state once to each newly connected player. Thus we have to add to the main loop on the server

...
		case cl := <-newConn:
			id := newId()
			clients[id] = cl
			buf := &bytes.Buffer{}
			serialize(buf, true)
			websocket.Message.Send(cl.ws, buf.Bytes())
...

and uncomment the call in sendUpdates()

func sendUpdates() {
	buf := &bytes.Buffer{}
	serialize(buf, false)
        ...
}

Pong Client


First we add the input-related functionality to the client. At the beginning of our script in pong.html add a variable for the client actions and for the frame duration:

...
<script type="text/javascript">
var ws
var actions = 0
var interval = 1000/30

$(document).ready(function() {
...

Inside the anonymous function passed to $(document).ready() we add handler for key events:

...
$(document).ready(function() {
	if ("WebSocket" in window) {
        ...
	}else{
		alert("no websockets on your browser")
	}
	document.onkeydown = function(event) {
		var key_press = String.fromCharCode(event.keyCode);
		var key_code = event.keyCode;
		if (key_code == 87) {
			actions |= 1<<0
		}
		if (key_code == 83) {
			actions |= 1<<1
		}
	}
	document.onkeyup = function(event){
		var key_press = String.fromCharCode(event.keyCode);
		var key_code = event.keyCode;
		if (key_code == 87) {
			actions &= ~(1<<0)
		}
		if (key_code == 83) {
			actions &= ~(1<<1)
		}
	}
})
...

The key codes 83 and 87 correspond to the 'w' and 's' key on the keyboard. If the 'w' key is pressed we set the first bit in the actions bit mask to 1, i.e., the button 'w' corresponds to the Up action. If the key is released we set the corresponding bit to 0. Of course you could use other keys. You can check the key codes here: http://unixpapa.com/js/testkey.html

Now we know the current state of the actions, but we still have to send them to the server. To this end we have to implement a main loop in the client. As I said, I am new to JavaScript, but I read that the recommended way to do this is the following (add this function to the end of the script):

function clientFrame() {
	setTimeout(function() {
		window.requestAnimationFrame(clientFrame);
        
		sendCmd();
	}, interval);
}

The function requestAnimationFrame gives some control of the update interval to the browser. That is, the number of frames per second is reduced if the browser tab is not open etc. We encapsulate this function into setTimeout(..., interval) to set a maximum number of frames per second. For simplicity we run the client with the same frames per second as the server. This could be done differently, e.g., we could run the client faster than the server and interpolate between the received game states. There is a lot of other stuff which can be done on the client-side to improve the player experience which we do not cover in this tutorial (google for client-side prediction/interpolation, lag compensation etc.).

We still have to implement the sendCmd() function. We use the DataStream class to serialize the actions. This works similar to the "encoding/binary" package. The write functions of DataStream use LittleEndian by default.

function sendCmd() {
	var cmd = new DataStream()
	cmd.writeUint32(actions)
	ws.send(cmd.buffer);
}

If we now call clientFrame() once inside the ws.onopen callback

...
		ws.onopen = function() {
			console.log("connection open")
			clientFrame()
		}
...

the client will start sending user commands to the server.

What is still missing is the logic for receiving the game states and the rendering of the game entities. The render engine is initialized as follows

var camera, scene, renderer;
var mat1,mat2
var cube,sphere

function init3d() {
	camera = new THREE.PerspectiveCamera( 45, 400/300, 1, 10000 );
	camera.position.z = 200;

	scene = new THREE.Scene();

	var ambientLight = new THREE.AmbientLight(0x252525);
	scene.add(ambientLight);
	var directionalLight = new THREE.DirectionalLight( 0xffffff, 0.9 );
	directionalLight.position.set( 150, 50, 200 ); 
	scene.add( directionalLight );

	cube = new THREE.CubeGeometry(1,1,1)
	sphere = new THREE.SphereGeometry(0.5,32,16)
	mat1 = new THREE.MeshLambertMaterial( { color: 0xff0000, shading: THREE.SmoothShading } );
	mat2 = new THREE.MeshLambertMaterial( { color: 0x00ff00, shading: THREE.SmoothShading } );

	renderer = new THREE.WebGLRenderer();
	renderer.setSize( 640, 480)

	document.body.appendChild( renderer.domElement);
}

We create a new camera and a new scene, add some lights and define two geometries. One is a sphere which we will use for the ball and the other is a cube which will be used for the paddles. We also define two materials with different colors which we will use for the ball and the paddles respectively. The radius of the sphere is set to 0.5, which results in a unit bounding box.

We also add a function to our script which we use to add new objects to the scene:

function newMesh(model) {
	var mesh
	if (model==2){
		mesh = new THREE.Mesh(sphere, mat2)
	}else if (model==1){
		mesh = new THREE.Mesh(cube, mat1)
	}
	scene.add(mesh)
	return mesh
}

where we know that a model id of 1 is a paddel and a model id of 2 is the ball.

We still have to add a call to the init function

$(document).ready(function() {
	if ("WebSocket" in window) {
		init3d()
	...
	}
}

For the deserialization we need a new variable which stores the entity data:

var ents = [new Object(),new Object(),new Object()]

The deserialization is done in the onmessage callback of the websocket.

...
		ws.onmessage = function(evt) {
			var buf = new DataStream(evt.data)

			var nEnts = 3
            
			var bitMask = buf.readUint8()
			for (var i = 0; i<nEnts; i++) {
				if ((bitMask & (1<<i))>0) {
                    			var model = buf.readUint32()
					ents[i] = newMesh(model)
				}
			}

			var bitMask = buf.readUint8()
			for (var i = 0; i<nEnts; i++) {
				if ((bitMask & (1<<i))>0) {
                    			var pos = buf.readFloat64Array(3)
					ents[i].position.x = pos[0]
					ents[i].position.y = pos[1]
					ents[i].position.z = pos[2]
				}

			}
			var bitMask = buf.readUint8()
			for (var i = 0; i<nEnts; i++) {
				if ((bitMask & (1<<i))>0) {
					var vel = buf.readFloat64Array(3)
					//On the client, we do not actually do 
					//anything with the velocity for now ...
				}

			}
			var bitMask = buf.readUint8()
			for (var i = 0; i<nEnts; i++) {
				if ((bitMask & (1<<i))>0) {
					var size = buf.readFloat64Array(3)
					ents[i].scale.x = size[0]
					ents[i].scale.y = size[1]
					ents[i].scale.z = size[2]
				}

			}
		}
...

No magic here. If the bit for a entity is set we read the corresponding data. If we get an update for the model, which should happen only once for each entity, we add a new mesh to the scene.

For now the only thing left to do on the client is to render the scene. To this end we update the clientFrame() function

function clientFrame() {
	setTimeout(function() {
		window.requestAnimationFrame(clientFrame);
        
		renderer.render(scene, camera);
            
		sendCmd();
	}, interval);
}

We set the position of the mesh to the current entity position and then render the scene. If you run the server (go run *.go) you should be able to connect to http://localhost:8080/www/pong.html and see the entities rendered in 3D.

Movement


It is time to bring some movement into the game. Before we can do that we have to deal with logins and disconnects. We add a new global variable to the gameplay file which stores the player ids of the active players, i.e., the players controlling the paddles,

var players = make([]PlayerId, 2)

Now we can add the login function

func login(id PlayerId) {
	if players[0] == 0 {
		players[0] = id
		if players[1] != 0 {
			startGame()
		}
		return
	}
	if players[1] == 0 {
		players[1] = id
		startGame()
	}
}

As soon as two players logged in we start the game by setting the velocity of the ball to a non-zero vector

func startGame() {
	ents[2].vel = Vec{5, 0, 0}
}

We also have to call the login function in the main loop

...
		case cl := <-newConn:
			id := newId()
			clients[id] = cl
			login(id)

			buf := &bytes.Buffer{}
...

We also have to handle disconnects

func disconnect(id PlayerId) {
	if players[0] == id {
		players[0] = 0
		stopGame()
	} else if players[1] == id {
		players[1] = 0
		stopGame()
	}
}

where stopGame() resets the entity positions and velocities

func stopGame() {
	ents[0].pos = Vec{-75, 0, 0}
	ents[1].pos = Vec{75, 0, 0}
	ents[2].pos = Vec{0, 0, 0}
	ents[2].vel = Vec{0, 0, 0}
}

The disconnect function is called in sendUpdates

...
	for _, id := range removeList {
		disconnect(id)
		delete(clients, id)
	}
...

Now we finally add movement for the entities

func move() {
	for i := range ents {
		ents[i].pos.Add(&ents[i].pos, &ents[i].vel)
	}
}

which has to be called in the update function

func updateSimulation() {
	move()
}

If we connect to the server from two tabs in our browser the ball starts moving to the right. Once we close one of the tabs the ball returns to the starting position.

Next we process player input.

func processInput() {
	if players[0] == 0 || players[1] == 0 {
		return
	}

	newVel := 0.0
	if active(players[0], Up) {
		newVel += 5
	}
	if active(players[0], Down) {
		newVel -= 5
	}
	ents[0].vel[1] = newVel

	newVel = 0.0
	if active(players[1], Up) {
		newVel += 5
	}
	if active(players[1], Down) {
		newVel -= 5
	}
	ents[1].vel[1] = newVel
}

If two players are connected, we check for the Up and Down actions and change the vertical velocity accordingly. This has to be called in the update function before we move the entities

func updateSimulation() {
	processInput()
	move()
}

We can now move the paddles if we connect to the server http://localhost:8080/www/pong.html from two tabs.

We are still missing collision detection and response. First we introduce an upper and lower border

const FieldHeight = 120

func collisionCheck() {
	for i := range ents {
		if ents[i].pos[1] > FieldHeight/2-ents[i].size[1]/2 {
			ents[i].pos[1] = FieldHeight/2 - ents[i].size[1]/2
			if ents[i].vel[1] > 0 {
				ents[i].vel[1] = -ents[i].vel[1]
			}
		}
		if ents[i].pos[1] < -FieldHeight/2+ents[i].size[1]/2 {
			ents[i].pos[1] = -FieldHeight/2 + ents[i].size[1]/2
			if ents[i].vel[1] < 0 {
				ents[i].vel[1] = -ents[i].vel[1]
			}
		}
	}
}

The field is centered at the origin and we check if the bounding box of each entity is leaving the field. If we detect a collision, we reset the position and flip the vertical velocity. This might actually not be the optimal way to handle the collision for the paddles since we do not really want them to bounce from the borders, but we will keep it for now.

We call the collision check after processing the inputs and before moving the entities

func updateSimulation() {
	processInput()
	collisionCheck()
	move()
}

If we change the starting velocity of the ball, e.g.

func startGame() {
	ents[2].vel = Vec{2, 3, 0}
}

we can see it bouncing off the borders. The same effect can be seen when moving the paddles.

If we now add a collision response for the entities we are almost done. In our case the collision detection is rather simple. We have to detect the collision between a sphere and an axis aligned bounding box. This and more advanced problems are explained int this article: http://www.wildbunny.co.uk/blog/2011/04/20/collision-detection-for-dummies/.

Before implementing the collision response we have to add some functionality to our vec.go file:

func (res *Vec) Clamp(s *Vec) {
	for i := range *res {
		if (*res)[i] > (*s)[i]/2 {
			(*res)[i] = (*s)[i] / 2
		}
		if (*res)[i] < -(*s)[i]/2 {
			(*res)[i] = -(*s)[i] / 2
		}
	}
}

func Dot(a, b *Vec) float64 {
	return (*a)[0]*(*b)[0] + (*a)[1]*(*b)[1] + (*a)[2]*(*b)[2]
}

func (v *Vec) Nrm2Sq() float64 {
	return Dot(v, v)
}

func (res *Vec) Scale(alpha float64, v *Vec) *Vec {
	(*res)[0] = alpha * (*v)[0]
	(*res)[1] = alpha * (*v)[1]
	(*res)[2] = alpha * (*v)[2]
	return res
}

The Clamp function clamps a vector such that it lies within a box of size s centered at the origin. The other operators should be self explanatory.

With the new functionality we can implement the collision response by adding the following to the checkCollision function (we also need to import the "math" package)

func collisionCheck() {
    
...

	rSq := ents[2].size[0] / 2
	rSq *= rSq
	for i := 0; i < 2; i++ {
		//v points from the center of the paddel to the point on the
		//border of the paddel which is closest to the sphere
		v := Vec{}
		v.Sub(&ents[2].pos, &ents[i].pos)
		v.Clamp(&ents[i].size)

		//d is the vector from the point on the paddle closest to 
        //the ball to the center of the ball
		d := Vec{}
		d.Sub(&ents[2].pos, &ents[i].pos)
		d.Sub(&d, &v)

		distSq := d.Nrm2Sq()
		if distSq < rSq {
			//move the sphere in direction of d to remove the
			//penetration
			dPos := Vec{}
			dPos.Scale(math.Sqrt(rSq/distSq)-1, &d)
			ents[2].pos.Add(&ents[2].pos, &dPos)

            //reflect the velocity along d when necessary
			dotPr := Dot(&ents[2].vel, &d)
			if dotPr < 0 {
				d.Scale(-2*dotPr/distSq, &d)
				ents[2].vel.Add(&ents[2].vel, &d)
			}
		}
	}

}

I added some comments to hopefully make things clear. The first part is finding the closest distance from the paddle to the sphere which is done as described in the linked article. For the collision response we have to change the velocity of the ball. We use the vector connecting the closest points as contact normal and reflect the ball at the corresponding contact plane.

A last check we need to add is if the ball got past the paddle on the left or right side. The check itself is straightforward, but we first need to add a field to our entity struct containing the score

type Entity struct {
	pos, vel, size Vec
	model          Model
	score          uint32
}

This is probably not the cleanest way to keep track of the scores, because not every entity needs to have a score field, but it keeps things simple. I will share some more thoughts on the storage of the game state later.

We reset the scores in the startGame function

func startGame() {
	ents[0].score = 0
	ents[1].score = 0
	ents[2].vel = Vec{2, 3, 0}
}

Now we need to add the following to the collision check:

func collisionCheck() {
    
    ...
        
	if ents[2].pos[0] < -100 {
		ents[2].pos = Vec{0, 0, 0}
		ents[2].vel = Vec{2, 3, 0}
		ents[1].score++
	} else if ents[2].pos[0] > 100 {
		ents[2].pos = Vec{0, 0, 0}
		ents[2].vel = Vec{-2, 3, 0}
		ents[0].score++
	}
}

We also have to send the score to the client, so it can be displayed in the browser. To this end we add the following to the serialization function

func serialize(buf io.Writer, serAll bool) {
    
    ...
        
	bitMask[0] = 0
	bufTemp.Reset()
	for i, ent := range ents {
		if serAll || ent.score != entsOld[i].score {
			bitMask[0] |= 1 << uint(i)
			binary.Write(bufTemp, binary.LittleEndian, ent.score)
		}
	}
	buf.Write(bitMask)
	buf.Write(bufTemp.Bytes())
}

and the following to the deserialization on the client

...
    
		ws.onmessage = function(evt) {
    
    			...
                    
			var bitMask = buf.readUint8()
			for (var i = 0; i<nEnts; i++) {
				if ((bitMask & (1<<i))>0) {
					ents[i].score = buf.readUint32()
				}

			}
		}
...

To display the scores on the client we simply add two div elemnts to the html body

<body>
	<div id = "p1score" style="float:left">score1</div>
	<div id = "p2score" style="float:right;margin-right:10px">score2</div>
</body>

and change the deserialization of the scores to update the html elements

...
			var bitMask = buf.readUint8()
			for (var i = 0; i<nEnts; i++) {
				if ((bitMask & (1<<i))>0) {
					ents[i].score = buf.readUint32()
					console.log(i,ents[i].score)

					if (i==0) {
						$("#p1score").html(ents[i].score)
					} else if (i==1) {
						$("#p2score").html(ents[i].score)
					}
				}

			}
...

We completed the first prototype of the multiplayer pong project (Here is the link again: http://localhost:8080/www/pong.html )

Further Considerations


The server-side serialization is a bit awkward, with lots of code duplication. We could use a different structure for storing the game state which is more compatible with the serialization. Note that this is only a suggestion and all ways of storing the game state have pros and cons.

To this end we remove the following global variables and structures related to the game state

type Entity struct {
	pos, vel, size Vec
	model          Model
	score          uint32
}

var ents = make([]Entity, 3)
var entsOld = make([]Entity, 3)
var players = make([]PlayerId, 2)

and replace them with

type GameState struct {
	pos, vel, size []Vec
	model          []Model
	score          []uint32
	players        []PlayerId
}

func NewGameState() *GameState {
	st := &GameState{}
	st.pos = make([]Vec, 3)
	st.vel = make([]Vec, 3)
	st.size = make([]Vec, 3)
	st.model = make([]Model, 3)

	st.score = make([]uint32, 2)
	st.players = make([]PlayerId, 2)

	return st
}

var state = NewGameState()
var stateOld = NewGameState()

We can see that we switched from a slice of structures to a structure of slices. We also included the list of active players in the game state since it could also be useful to send it to the client.

We have to modify all references to the old global variables. This is a bit tedious, but most of it should be fairly straightforward. Keep in mind that the slices are reference types, so we have to perform a deep copy when copying the states

func copyState() {
	copy(stateOld.pos, state.pos)
	copy(stateOld.vel, state.vel)
	copy(stateOld.size, state.size)
	copy(stateOld.model, state.model)

	copy(stateOld.score, state.score)
	copy(stateOld.players, state.players)
}

We replace all other references to the ents variable except in the serialization function, which we will rewrite now. We add a helper function to serialize a slice of vectors

func serializeVecSlice(buf io.Writer, serAll bool, vs, vsOld []Vec) {
	bitMask := make([]byte, 1)
	bufTemp := &bytes.Buffer{}
	for i := range vs {
		if serAll || !vs[i].Equals(&vsOld[i]) {
			bitMask[0] |= 1 << uint(i)
			binary.Write(bufTemp, binary.LittleEndian, &vs[i])
		}
	}
	buf.Write(bitMask)
	buf.Write(bufTemp.Bytes())
}

and update the serialization function

func serialize(buf io.Writer, serAll bool) {
	bitMask := make([]byte, 1)
	bufTemp := &bytes.Buffer{}
	for i := range state.model {
		if serAll || state.model[i] != stateOld.model[i] {
			bitMask[0] |= 1 << uint(i)
			binary.Write(bufTemp, binary.LittleEndian,
				state.model[i])
		}
	}
	buf.Write(bitMask)
	buf.Write(bufTemp.Bytes())

	serializeVecSlice(buf, serAll, state.pos, stateOld.pos)
	serializeVecSlice(buf, serAll, state.vel, stateOld.vel)
	serializeVecSlice(buf, serAll, state.size, stateOld.size)

	bitMask[0] = 0
	bufTemp.Reset()
	for i := range state.score {
		if serAll || state.score[i] != stateOld.score[i] {
			bitMask[0] |= 1 << uint(i)
			binary.Write(bufTemp, binary.LittleEndian,
				state.score[i])
		}
	}
	buf.Write(bitMask)
	buf.Write(bufTemp.Bytes())

	bitMask[0] = 0
	bufTemp.Reset()
	for i := range state.players {
		if serAll || state.players[i] != stateOld.players[i] {
			bitMask[0] |= 1 << uint(i)
			binary.Write(bufTemp, binary.LittleEndian,
				state.players[i])
		}
	}
	buf.Write(bitMask)
	buf.Write(bufTemp.Bytes())
}

We also have to make a small change to the client since we are sending only two score variables now. We change the deserialization of the scores to

...
			var nPlayers = 2
			var bitMask = buf.readUint8()
			for (var i = 0; i<nPlayers; i++) {
				if ((bitMask & (1<<i))>0) {
					var score = buf.readUint32()
					if (i==0) {
						$("#p1score").html(score)
					} else if (i==1) {
						$("#p2score").html(score)
					}
				}

			}
...

If we also send each client its own player id and deserialize the list of active players, the client would actually know which paddle it controls. This could for example be used to write a client which plays on its own. This and making the client more pretty is left as an exercise for the reader.

Shortcut


The files for this tutorial can also be found on https://github.com/dane-unltd/pongtut. The files with the changes from the last section can be found on https://github.com/dane-unltd/pongtutimp

You can use the Go command, e.g., "go get github.com/dane-unltd/pongtut" to install the files in your Go workspace. Then go to the pongtut directory in the terminal and execute "go run *.go". You can now play pong in your browser under following link http://localhost:8080/www/pong.html.

How to Structure a Game

$
0
0
Basic game structure is a topic that many people have trouble with, yet it somehow gets overlooked. In this lesson, I will show you exactly how to set up and structure code for commercial games.

We're going to use Leadwerks 3 in this lesson because it makes C++ game development faster, but the ideas here are applicable to any programming environment.

Direct vs. Component Programming


Although the component-based script system Leadwerks supports is a convenient way to get simple demos running quickly with Leadwerks, it can be limiting when you try to make a full game. Fortunately Leadwerks supports direct programming, in both C++ and Lua. This gives a lot more power and control than component-based systems. To really take advantage of this power, we need to understand some basic principles on how to set up and structure our game.

Class Structure


We start with a base class for all objects in our game. We'll call this the Node class, and derive it from the Leadwerks::Object class. The Node class is not an entity, but it has an entity as a member. Think of a Node as your own game object that is associated with an entity.

For this lesson we'll create an imaginary class called Foo derived from the Node class. The Foo class could represent an enemy, an NPC, a bullet, a grenade, or anything else. We can use the same structure for all of these things. The Foo class has one function called Update. This is where all our game code that updates that single instance of this class would go. This code could control the trajectory of a bullet, the AI of an enemy, or anything else. The point is all the code that controls that object is compartmentalized into this function, and it gets called over and over again, for each instance of the class.

In order to keep track of each instance of the Foo class, let's use a standard C++ list. This is listed in the header file as a static member, so that each instance of the class can access this list:

static std::list<Foo*> list;

Each instance of the Foo class will also have a list iterator so we can remove it from the list when it's deleted:

std::list<Foo*>::iterator it;

In the Foo() constructor, the object will add itself to the list of all objects in this class:

Foo::Foo()
{
    list.push_front(this);
    it = list.begin();
}

And in the destructor, we will use the iterator to remove the object from the list:

Foo::~Foo()
{
    list.erase(it);
}

WARNING Removing the iterator from a list can cause a crash if this object is deleted while your code is iteratoring through a list. To avoid this problem, you can add the object to be deleted to a queue of objects to be deleted in your main application loop. However, this is beyond the scope of this lesson, which is only meant to convey a simple program structure.

Why do we need a list of all the instances of our Foo class? Well, this means we can now iterate through each one, at any point in our program. This is very powerful because it means we can create new instances of the Foo class at any time, and our game will adjust to keep them all running, without hard-coding a lot of specific behavior. Iterating through the list is done with the following code:

//First we declare an iterator so we can cycle through our loop
std::list<Foo*>::iterator it;

//Loop
for (it = Foo::List.begin(); it!=Foo::List.end(); it++)
{
    //The Foo object is gotten with (*it)
    (*it)->Update();

    //Alternatively, you could declare a Foo* variable and set it to this value
    //Foo* foo = *it;
    //foo->Update();
}

This code should go somewhere in your main game loop. You'll end up with a loop like that for each class your game uses, if it's a class that needs to be continuously updated. (Some types of objects can just sit there until something happens to make them react. For those situations, I recommend using a collision callback or other means to activate them.) So your main loop will look something like this now:

bool App::Loop()
{
    std::list<Foo*>::iterator it;

    for (it = Foo::List.begin(); it!=Foo::List.end(); it++)
    {
        (*it)->Update();
    }

    world->Update();
    world->Render();
    context->Sync();
}

We're going to do one more thing to make our code a little cleaner. Because we'll probably end up with a dozen or more classes by the time our game code is done, we can take that loop and put it into a static function:

void Foo::UpdateEach()
{
    std::list<Foo*>::iterator it;
    for (it = List.begin(); it!=List.end(); it++)
    {
        (*it)->Update();
    }
}

The Main Loop


Our main game loop becomes a little easier to manage now:

bool App::Loop()
{
    Foo::UpdateEach();
    world->Update();
    world->Render();
    context->Sync();
}

By the time our game is done, the main loop will look something like this:

bool App::Loop()
{
    Enemy::UpdateEach();
    Player::UpdateEach();
    Projectile::UpdateEach();

    world->Update();

    Explosion::UpdateEach();

    world->Render();
    context->Sync();
}

You might wonder why I didn't just create a list in the Node class, and have an Update function there. After all, any class derived from the Node class could override that function, and a single loop could be used to update all game objects. There's two reasons we don't do that.

First, not all of our game objects need an Update function to be called each frame. Iterating through hundreds or thousands of unnecessary objects would hurt our performance for no good reason. We can put an Update function in a base Enemy class, however, and have both goblins and trolls use the same Update loop, when Enemy::UpdateEach() is called.

Second, we want to control the order and time at which each class is updated. Some classes work best when they are updated at the beginning of the loop. Some work best when they are updated between the call to World::Update() and World::Render(). It's different for each class, depending on what you make them do, and we want to leave room for ourselves to experiment and not get locked into a design that can't be easily changed when needed. We could try working around this by setting a priority for each class, so objects are updated in a specified order, but I wouldn't do this. In my opinion, this is the point where your structure is done and you should think about structuring the classes for your game, and filling in their code.

So what does the Foo:Update() function do that's so important, anyways? Foo::Update() presently does nothing, but it does everything. This is where your game code goes. We can use this structure for AI, bullets, rockets, explosions, enemies, tanks, planes, ninjas, pirates, robots, or giant enemy crabs that shoot laser beams out of their eyes. In fact we can also use the same structure for those laser beam objects the crab is emitting!

Conclusion


The main point of this is to show how to graduate from writing simple single-file demos, and to start thinking in terms of classes. Your game code should be written in such a way that it doesn't matter how many objects there are of each class, when they get created, or when they get destroyed. Each class Update() function is written from the point of view of that single object, looking out at the world around it. This simple concept can be used to make just about any type of game, from first-person shooters to MMOs.

The image for this article was provided by oppenheimer.

MVC and CBES as it Relates to Game Programming

$
0
0
Required knowledge would be intermediate programming, different styles of programming paradigms, and OOP. The requirement for OOP is to understand fully the difference between inheritance and composition. If those terms are unfamilliar please look them up before continuing.

Component Based Entity System


Now, we must discuss what exactly a CBES is, in order to understand how the MVC paradigm works.

Component


Components are the most basic elements that our entities are comprised of. Components can be very granular or very fine depending on taste or desire. For example, a physics component could represent an object in the world as a rigid body, a rag doll, a ray, etc or each of those could be its own component.

By its very definition, components are "a constituent part [or] ingredient." This means that to make up an entity we must combine or compose different components together.

So to create a car we would combine a physics component (for movement and collision), a model component or maybe a sprite component (for rendering), a sound component or 2 (for horn, brake squeal, and engine noise), and a control component (for user input). Once all of these are combined we have created a car. This could have been done using traditional OOP inheritance (PhysicsObject -> 3DPhysicsObject -> Car <- SoundEffect), but now if a different type of car, such as a race car, with a different type of physics or a second model for the driver using the traditional inheritance way becomes more cumbersome as we either need to add another layer of inheritance or create a new class just for the 3DPhysicsObject with two models. However using components we just remove the old model component and add in our 2-model component, or if the components are designed right we can just add a second model component.

Components don't do anything though. They are just a way to store or model data for use by the system. That isn't to say components can't have functions or methods, but these shouldn't perform any logic with regard to data, and merely act as helpers and convenience for the programmer (such as AddPoint() for a 3d component or GetSongLength() for an audio component.)

Entities


Entities represent anything in the game's program. From actors, to sound effects, to UI widgets. Each entity has properties and components. Entities are read-only (in a vague sense) objects in the program that tie together the components and respective properties for that entity. Entities are just containers or glue and shouldn't have any functionality at all except for perhaps parent-child-sibling traversal.

Systems


Systems are the meat of the design. Systems operate on or control the data stored in components. Systems must provide a means for the programmer to manipulate the data in the components they control, and a component should only be allowed to be controlled by a single system. For example, only the Physics system can move a physics component and the Script System should tell the Physics system to apply the force instead of moving the physics component itself.

Model, View, Control


Next up, we will discuss how the MVC paradigm works great with regards to CBES.

Models


This section will be fairly self-explanitory as we just covered it in 2 previous sections (Components and Entities). Components model the data in a specific way that allows systems to control it and views to present it. Modeling is "a system of postulates, data, and inferences presented as a mathematical description of an entity or state of affairs; also : a computer simulation based on such a system." That is to model data is to store it in a specific way.

Entities aren't technically part of the data model as they are just an abstract concept that is used as a glue or container to hold the components and properties associated with the entity.

Controls


Controls are the systems that control or manipulate the data stored by the components. Systems can also be views, so care must be taken to ensure that a system is well-defined in its actions and not attempt to maniupulate data while trying to present a view of it.

Systems could include physics simulations, user input, network input, and script input. The pattern should be clear in that controls act upon input (direct in the case of input or indirect in the case of simulations.)

Views


Views are how the data in the components are rendered, presented, or transmitted to the user or clients (networked or otherwise). Views might be a rendering engine, database query, audio playback, or even a network transmission.

Views must take care when reading components so they don't read it as a control is operating on that set of components. Views typically only present data from a specific set of components, but when provided with how to understand the data from another component, a system could present it.

The Flow


Inside the game program execution flow should follow this simple pattern:

  1. Load and model the data
  2. Loop
    1. Gather inputs
    2. Call control systems
    3. Call view systems

This will ensure that the view is presented the most updated data. This will also ensure that views don't try to present components that are being manipulated by controls causing concurrency issues or other similar problems (depending on the programming language or system.)

Article Update Log


2 May 2013: Initial release

Object-Oriented Game Design

$
0
0
C++ can be intimidating to new programmers. The syntax does at first glance look like it was designed for robots to read, rather than humans. However, C++ has some powerful features that speed up the process of game design, especially as games get more complex. There's good reason C++ is the long-standing standard of the game industry, and we'll talk about a few of its advantages in this lesson.

Object-Oriented Design


C++ is an object-oriented language. This means that instead of using a lot of variables for different aspects of each object, the variables that describe that object are stored in the object itself. For example, a simple C++ class might look like this:

class Car
{
public:
    float speed;
    float steeringAngle;
    Model* tire[4];
    Model* steeringWheel
};

We can pass the Car object around and access its members, the class variables that describe different aspects of the object:

Car* car = new Car;
float f = car->speed

Object-oriented design compartmentalizes code so we can have lots of objects, each with its own set of parameters that describe that object.

Inheritance


In C++, we can create classes that are built on top of other classes. The new class is derived from a base class. Our derived class gets all the features the base class has, and then we can add more in addition to that. We can also override class functions with our own, so we can just change the bits of behavior we care about and leave the rest. This is extremely powerful because:

  1. We can create new classes that just add or modify a couple of functions, without writing a lot of new code.
  2. We can make modifications to the base class, and all our derived objects will be automatically updated. We don't have to change the same code for each different class.

In the previous lesson we created a base class all our game classes would be derived from. All the features of the base GameObject class are inherited by the derived classes. Now I'll show you some of the cool stuff you can do with inheritance.

Consider a bullet object, flying through the air. Where it lands, nobody knows, but it's a good bet that it's going to do some damage when it hits. Let's use the pick system in Leadwerks to continually move the bullet forward along its trajectory, and detect when it hits something:

void Bullet::Update()
{
    PickInfo pickinfo;
    Vec3 newPosition = position + velocity / 60.0;
    void* userData;

    //Perform pick and see if anything is hit
    if (world->Pick(position, newPosition, pickinfo))
    {
        //Get the picked entity's userData value
        userData = pickinfo.entity->GetUserData();

        //If the userData has been set, we know it's a GameObject
        if (userData!=NULL)
        {
            //Get the GameObject associated with this entity
            GameObject* gameobject = (GameObject*)userData;

            //==================================
            //What goes here???
            //==================================

            //Release the bullet, since we're done with it
            Release();
        }
    }
    else
    {
        position = newPosition;
    }
}

We can assume that for all our GameObjects, if a bullet hits it, something will probably happen. Let's add a couple of functions to the base GameObject class that can handle this situation. We'll start by adding two members to the GameObject class in its header file:

int health;
bool alive;

In the class constructor, we'll set the initial values of these members:

GameObject::GameObject() : entity(NULL), health(100), alive(true)
{
}

Now we'll add two functions to the GameObject class. This very abstract still, because we are only managing a health value and a live/dead state:

void GameObject::TakeDamage(const int amount)
{
    //This ensures the Kill() function is only killed once
    if (alive)
    {
        //Subtract the specified amount from the object's health
        health -= amount;
        if (health<=0)
        {        
            Kill();
        }
    }
}

//This function simply sets the "alive" state to false
void GameObject::Kill()
{
    alive = false;
}

The TakeDamage() and Kill() functions can now be used by every single class in our game, since they are all derived from the GameObject class. Since we can count on this function always being available, we can use it in our Bullet::Update() function:

//Get the GameObject associated with this entity
GameObject* gameobject = (GameObject*)userData;

//Add 10 damage to the hit object
gameobject->TakeDamage(10);

//Release the bullet, since we're done with it
Release();

At this point, all our classes in our game will take 10 damage every time a bullet hits them. After being hit by 10 bullets, the Kill() function will be called, and the object's alive state will be set to false.

Function Overriding


If we left it at this, we would have a pretty boring game, with nothing happening except a bunch of internal values being changed. This is where function overriding comes in. We can override any function in our base class with another one in the extended class. We'll demonstrate this with a simple class we'll call Enemy. This class has only two functions:

class Enemy : public GameObject
{
public:
    virtual void TakeDamage(const int amount);
    virtual void Kill();
};

Note that the function declarations use the virtual prefix. This tells the compiler that these functions should override the equivalent functions in the base class. (In practice, you should make all your class functions virtual unless you know for sure they will never be overridden.)

What would the Enemy::TakeDamage() function look like? We can use this to add some additional behavior. In the example below, we'll just play a sound from the position of the character model entity. At the end of the function, we'll call the base function, so we still get the handling of the health value:

void Enemy::TakeDamage(const int amount)
{
    //Play a sound
    entity->EmitSound(sound_pain);

    //Call the base function
    GameObject::TakeDamage(amount);
}

Once the enemy takes enough damage, the GameObject::TakeDamage() function will call the Kill() function. However, if the GameObject happens to be an Enemy, it will kill Enemy::Kill() instead of GameObject::Kill(). We can use this to play another sound. We'll also call the base function, which will manage the object's alive state for us:

void Enemy::Kill()
{
    //Play a sound
    entity->EmitSound(sound_death);

    //Call the base function
    GameObject::Kill();
}

So when a bullet hits an enemy and causes enough damage to kill it, the following functions will be called in the order below:
  • Enemy::TakeDamage
  • GameObject::TakeDamage
  • Enemy::Kill
  • GameObject::Kill
We can reuse these functions for every single class in our game. Some classes might act differently when the health reaches zero and the Kill() function is called. For example, a breakable object might fall apart when the Kill() function is called, and get replaced with a bunch of fragments. A shootable switch might open a door. The possibilities are endless. The Bullet class doesn't know or care what the derived classes do. It just calls the TakeDamage() function, and the behavior is left to the different classes to implement.

Conclusion


C++ is the long-standing game industry standard for good reason. In this lesson we learned some of the advantages of C++ for game development, and how object-oriented game design can be used to create a system of interactions. By leveraging these techniques, you can create wonderful worlds of rich interaction and emergent gameplay.

RPG Character Design: Technical Blueprints 101

$
0
0
In this article, I’m going to try to get over a 101 guide on how to do the technical design for an RPG’s character classes and how you can implement a basic programming model in order to make your development consistent, flexible and generic.

In order for this article to be of any use to you, you should have at least a base knowledge of Object Orientated Programming and concepts like working with Interfaces, Inheritance, Polymorphism etc.

Another thing to note – this article will not be a programming tutorial, rather a technical overview on how things should happen. I’m going to map over the functionalities, however I’m not going to overload this article with code. Most of the developers that are familiar with the above mentioned concepts should have absolutely no problem to implement this technical design in their game.

I also want to mention that this is basic character design. We will not go into the depth of the skill trees, skills usage and character builds. The topic is just far too wide for the scope of the article.

So, how is this going to go?

Well, to start off, for example and simplicity reasons – let’s say we are going to develop the hero character model of an RPG that has three classes: Warrior, Mage and Archer.

In order to develop these classes in a generic, easy to maintain and flexible to extend frame, we are going to develop an interface and class hierarchy that is going to take care of all of our troubles.

The Hero Class Technical Model


As general development, this is not too hard of a task. The problem here is that a lot of times, the end-product is not reusable, it’s not flexible and it’s not generic. Here is a typical problem, when someone is making a design of this nature – more inexperienced developers tend to develop three separate classes – a Warrior class, a Mage class and an Archer class. And that’s it. Just these three classes. Don’t get me wrong, this will work. However, it’s problem prone.

What’s not good about this concept? Here is a list of some of the biggest problems:
  • You have to re-write basic stuff that all of these classes have in common.
  • If you have to change a basic concept of the characters, you have to make the change in all of these classes.
  • If a consistent bug pops up, you are going to have to implement fixes in all of the classes.
  • Many other things that may trip you up.
So how do we avoid this issue?

It’s pretty simple. We are going to build up a character Interface that is going to map out the common traits of all of the characters. Then we are going to have a basic Character class that is going to implement the Interface with some basic programming logic that’s again common to all of the heroes, and last but not least, we are going to create the Warrior, Mage and Archer classes and they are all going to extend the character class that we earlier developed.

Developing the Technical Design


We will start off from the ground. Here is how our hierarchy is going to look.

Attached Image: UML RPG 101.png

Character Interface


First off, we will create the character interface. For this article, let’s simply name it ICharacter.
Now let’s start thinking. What do all of these characters have in common? Well, they can all attack, move, trigger actions and die. Of course, each of them will have its own interpretation of these traits later on.
So, the interface will have these methods:
  • onMove()
  • onAttack()
  • onActionTrigger()
  • onCharacterDeath()

Character Class


Now that we have the Interface up and ready, we should create a basic class that is going to implement it. For this article, we will call the class CharacterBase. So how will it work? When we implement the interface, we will craft out the most basic logic that is going to be initiated for all characters in this. Each method will contain just the very basic amount of logic.
  • onMove() – In this method we are going to handle the character's movement patterns. We will also trigger the movement animation.
  • onAttack() – since each of the character classes has a specific attack type, the only thing we will do here is handle the animation trigger and also make sure (in terms of game design, this step may vary) that we have the needed setup for the attack to commence. Calculate the damage to the target as well.
  • onActionTrigger() – this should basically just trigger an animation whenever we want to interact with something. However, the three character types may have a different way in interacting with objects.
  • onCharacterDeath() – this will trigger the death animation, save statistics or whatever is needed to be saved in order for the game to go further with its logic.

Warrior Class


We have the basics down. So let’s create the Warrior class. We will call it WarriorCharacter. It will extend CharacterBase and basically override all of its methods.

This is how the methods should be customized to fit the WarriorCharacter class:
  • onMove() – Here we will need to add a specific move pattern to the character. Since we have a warrior, he needs to move in a slow yet stable fashion. We will slow down his movement speed. After we've handled that, we will call the basic logic from CharacterBase by using super.onMove(). When the time comes to analyze the movement pattern, we will have already changed it, so now it initiates what we want. It will also trigger the warrior animation for movemet.
  • onAttack() – the method should firstly check the distance from the Warrior’s transform position in regards to its target. If we are in range – that is up close and personal, we will call the CharacterBase onAttack() method logic by using super.onAttack() or whatever technique your programming language supports in order to do so.
  • onActionTrigger() – Our warrior has to be able to interact with breakable objects and well ... break them. This we will do by setting up a trigger in this method that will allow a breaking action for that specific object. How you can actually do that is something that should be designed on the object base, not the character. So, initially we will call the basic logic from CharacterBase and then expand on that by allowing the warrior to break stuff.
  • onCharacterDeath() – To build upon the death animation logic, when a Warrior dies, we would want to implement a specific death effect, like dropping your weapon. After we call the original logic, we can add that as well.
Keep in mind, that in order to execute the basic logic from the CharacterBase class, you need to do something like

super.onAttack()

or the method you actually want to call.

Mage Class


Now to implement the mage logic. We will call this class MageCharacter. It will extend CharacterBase and things will work much like with the WarriorCharacter class. Here, the distance of your attack is going to be vastly different from that of the warrior and gradually, the damage is going to be different as well. We are also going to have a missile effect to the attack. Again, when you put extra logic in your methods, make sure you are calling the original ones from the CharacterBase as well. If you don’t do that, their basic functionality will not be executed and then nothing useful will come out of this. So this is how our basic methods are going to look for the mage character:

  • onMove() – Here the character pattern should be pretty normal. The movement speed as well. In physical terms, the mage is a normal guy so he should move around like the average people. However, we can use magic here. Let's way we use some sort of a skill (again, as said above, we will not go in-depth on the skill thing) that makes our mage fly. In this method we need to check if this skill is on. If it is, we change the movement pattern, the speed and even the animations for the mage.
  • onAttack() – As with the Warrior, after we've found our range, the mage should be able to fire. This range however should be bigger then the warrior's range. At that point we should trigger a missile effect. It can be implemented through additional logic in the mages class that is out of scope for this article.
  • onActionTrigger() – The magge has to be able to interact with objects through magic. That's to say that we should be able to use skills or our attack even on some objects, like spellbooks for example.
  • onCharacterDeath() – Here we should implement a time-span for our mage to be able to ressurect himself if he has such a skill at his disposal. Then we can trigger the standard logic.

Archer Class


And just like with the mage and warrior, we extend CharacterBase with a class called ArcherCharacter. By now you've pretty much got the idea of how this is going to go. For the archer we would need a very fast movement with movement patterns that allow a fast strife from side A to side B of the visible/playable field. We would also need to implement fast and rappid attacks for this class. Maybe even a multiple shots kind of thing, where we initiate two attacks for the time of one. We would also most certainly be able to implement logic that allows us to interact with objects, such as a bush, so we can hide in it. On death, we should be able to implement logic that allows our archer to strike one lasw blow to it's target, before he goes out for good.

Interesting Points


In this article I simply want to make a point on how you can do your most basic character class design. If you are to actually make this into a best practice kind of thing, you should make the hierarchy a lot bigger, including separate classes for melee characters, characters that use magic, range characters. From there do the inheritance for specific character classes.

Also, to be fair, in order for this to actually work good, you would need a bigger array of methods at your disposal. Methods to handle your character’s statistics, usage of skills etc. You would also need to add some variables to handle the health, stamina and a character-specific resource, like mana for example.

However, this is going to get the article too complicated. This article is aimed for developers that have just recently started using concepts like Inheritance, Polymorphism and so on and so forth. If you can get down to write just your basic technical design down, then you should pretty much be able to go to an upper level with no problems.

Conclusion


The technical side of the character class design is not something hard to understand or implement. Just keep in mind, that the concepts of Object Oriented Programming and the reusability factor that stands behind these concepts can save you a lot of time, bugs and make your code really better in all terms.

Article Update Log


4 May 2013: Initial release

7 May 2013: Additional article format

19 May 2013: Remaking the article. Addint additional information and a diagram.

Binding D To C

$
0
0
This is a topic that has become near and dear to my heart. Derelict is the first, and only, open source project I've ever maintained. It's not a complicated thing. There's very little actual original code outside of the Utility package (with the exception of some bookkeeping for the OpenGL binding). The majority of the project is a bunch of function and type declarations. Maintaining it has, overall, been relatively painless. And it has brought me a fair amount of experience in getting D and C to cooperate.

As the D community continues to grow, so does the amount of interest in bindings to C libraries. A project called Deimos was started over at github to collate a variety of bindings to C libraries. There are several bindings there now, and I'm sure it will continue to grow. People creating D bindings for the first time will, usually, have no trouble. It's a straightforward process. But there are certainly some pitfalls along the way. In this article, I want to highlight some of the basic issues to be aware of.

Static vs. Dynamic Bindings


Terminology


The first thing to consider is what sort of binding to use, static or dynamic. By static, I mean a binding that allows linking with C libraries or object files directly at compile time. By dynamic, I mean a binding that does not allow linking at compile time, but instead loads a shared library (DLL/so/dylib/framework) at runtime. Derelict is an example of the latter; most, if not all, of the bindings in the Deimos repository the former. Before going further, it's important to understand exactly what I mean when I use these terms.

When I talk of a static binding, I am not referring to static linking. While the two terms are loosely related, they are not the same at all. Static bindings can certainly be used to link with static libraries, but they can also be linked with dynamic libraries at compile time. In the C or C++ world, it is quite common when using shared libraries to link them at compile time. On Windows, this is done via an import library. Given an application "Foo" that makes use of the DLL "Bar", when "Foo" is compiled it will be linked with an import library named Bar.lib. This will cause the DLL to be loaded automatically by the operating system when the application is executed. The same thing can be accomplished on Posix systems by linking directly with the shared object file (extending the example, that would be libBar.so in this case). So with a static binding in D, a program can be linked at compile time with the static library Bar.lib (Windows) or libBar.a (Posix) for static linkage, or the import library Bar.lib (Windows) or libBar.so (Posix) for dynamic linkage.

A dynamic binding can not be linked to anything at compile time. No static libraries, no import libraries, no shared objects. It is designed explicitly for loading a shared library manually at run time. In the C and C++ world, this technique is often used to implement plugin systems, or to implement hot swapping of different application subsystems (for example, switching between OpenGL and Direct3D renderers) among other things. The approach used here is to declare exported shared library symbols as pointers, call into the OS API that loads shared libraries, then manually extract the exported symbols and assign them to the pointers. This is exactly what a dynamic binding does. It sacrifices the convenience of letting the OS load the shared library for more control over when and what is loaded.

To reiterate, a static binding can be used with either static libraries or shared libraries that are linked at compile time. A dynamic binding cannot be linked to the bound library at compile time, but must provide a mechanism to manually load the library at run time.

Tradeoffs


When choosing whether to implement a static or dynamic binding, there are certain tradeoffs to consider. D understands the C ABI, so it can link with C object files and libraries just fine, as long as the D compiler understands the object format itself. Therein lies the rub. On Posix systems, this isn't going to be an issue. DMD (and of course, GDC and, I assume, LDC) uses the GCC toolchain on Posix systems. So getting C and D to link and play nicely together isn't much of a hassle. On Windows, though, it's a different world entirely.

On Windows, we have two primary object file formats to contend with: COFF and OMF. Most Windows compilers are configured, or can be configured, to output object files in the COFF format. This shouldn't be an issue when using GDC or LDC, both of which use MinGW as a backend. With DMD, which format is used depends on whether 32-bit or 64-bit compilation is configured. When compiling for 32-bit, DMD uses an ancient linker called Optlink which only works with OMF objects. When compiling for 64-bit, DMD makes use of the Microsoft compiler tools which only understand the COFF format.

All of this means that when making a C binding, a decision must be made up front whether or not to deal with the object file format issue or to ignore it completely. If the latter, then a dynamic binding is the way to go. Generally, when manually loading DLLs, it doesn't matter what format they were compiled in, since the only interaction between the app and the DLL happens in memory. But if a static binding is used, the object file format determines whether or not the app will link. If the linker can't read the format, then no executable can be generated. That means either compiling the bound C library with a compiler that outputs a format the given D linker understands, using a conversion tool to convert the library into the proper format, or using a tool to extract a link library from a DLL. If the binding is to be made publicly available, will the C libraries be shipped with it in multiple formats? Or will it be left to the users to obtain the C libraries themselves? I've seen both approaches.

In my mind, the only drawback to dynamic bindings is that you can't choose to have a statically linked program. I've heard people complain about "startup overhead", but if there is any it's negligble and I've never seen it. The only drawback to static bindings is the object file mess. But with a little initial work up front, it can be minimized for users so that it, too, is negligible.

Manual vs Automated


Once a decision is made between static and dynamic, it's not yet time to roll up the sleeves and start implementing the binding. First it must be decided how to create the binding. Doing it manually is a lot of work. Trust me! That's what I do for all of the bindings in Derelict. Once a systematic method is developed, it goes much more quickly. But it is still drastically more time consuming than using an automated approach.

To that end, I know people have used SWIG and a tool called htod. VisualD now has an integrated C++-to-D converter which could probably do it as well. I've never used any of them, so I can't comment on the pros and cons one way or another. But I do know that any automated output is going to require some massaging. There are a number of corner cases that make an automated one-for-one translation extremely difficult to get right. So regardless of the approach taken, in order to prevent the binding from blowing up down the road, it is absolutely imperative to understand exactly how to translate D to C. And that's where the real fun begins.

Implementation


When implementing bindings, there is a page at dlang.org that can be used as a reference, Interfacing to C. This is required reading for anyone planning to work on a D binding to a C library. This article should be considered a companion to that page.

Linkage Attributes


When binding to C, it is critical to know which calling convention is used by the target C library. In my experience, the large majority of C libraries use the cdecl calling convention across each platform. Modern Windows system libraries use the stdcall calling convention (older libraries used the pascal convention). A handful of libraries use stdcall on Windows and cdecl everywhere else. See this page on x86 calling conventions for the differences.

D provides a storage class, extern, that does two things when used with a function. One, it tells the compiler that the given function is not stored in the current module. Two, it specifies a calling convention via a linkage attribute. The D documentation lists all of the supported linkage attributes, but for C bindings the three you will be working with most are C, Windows and System.

Although linkage attributes are used for both static and dynamic bindings, the form of the function declarations is different. For the examples in this section, I'll use function declarations as they would appear in static bindings. Dynamic bindings use function pointers. I'll discuss those later in the article.

The C attribute, extern( C ), is used on functions that have the cdecl calling convention. If no calling convention is specified in the C headers, it's safe to assume that the default convention is cdecl. There's a minor caveat in that some compilers allow the default calling convention to be changed via the command line. This isn't an issue in practice, but it's a possibility implementers should be aware of if they have no control over how the C library is compiled.

// In C
extern void someCFunction(void);

// In D
extern( C ) void someCFunction();

The Windows attribute, extern( Windows ), is used on functions that have the stdcall calling convention. In the C headers, this means the function is prefixed with something like __stdcall, or a variation thereof depending on the compiler. Often, this is hidden behind a define. For example, the Windows headers use WINAPI, APIENTRY, and PASCAL. Some third party libraries will use these same defines or create their own.

// In C
#define WINAPI __stdcall
extern WINAPI void someWin32Function(void);

// In D
extern( Windows ) void someWin32Function();

The System attribute, extern( System ), is useful when binding to libraries, like OpenGL, that use the stdcall convention on Windows, but cdecl on other systems. On Windows, the compiler sees it as extern( Windows ), but on other systems as extern( C ). The difference is always hidden behind a define on the C side.

// In C
#ifdef _WIN32
#include <windows.h>
#define MYAPI WINAPI
#else
#define MYAPI
#endif

extern MYAPI void someFunc(void);

// In D
extern( System ) void someFunc();

In practice, there are a variety of techniques used to decorate function declarations with a calling convention. It's important to examine the headers thoroughly and to make no assumptions about what a particular define actually translates to.

One more useful detail to note is that when implementing function declarations on the D side, it is not necessary to prefix each one with an extern attribute. An attribute block can be used instead.

// An attribute block
extern( C )
{
	void functionOne();
	double functionTwo();
}

// Or alternately
extern( C ):
	void functionOne();
	void functionTwo();

Typedefs, Aliases, and Native Types


D used to have typedefs. And they were strict in that they actually created a new type. Given an int typdefed to a Foo, a type Foo would actually be created rather than it being just another name for int. But D also has alias, which doesn't create a new type but just makes a new name for an existing type. typedef was eventually deprecated. Now we are left with alias.

alias is what should be used in D when a typedef is encountered in C, excluding struct declarations. Most C headers have a number of typedefs that create alternative names for native types. For example, something like this might be seen in a C header.

typedef int foo_t;
typedef float bar_t;

In a D binding, it's typically a very good idea to preserve the original typenames. The D interface should match the C interface as closely as possible. That way, existing C code from examples or other projects can be easily ported to D. So the first thing to consider is how to translate the native types int and float to D.

On the dlang page I mentioned above, there is a table that lists how all the C native types translate to D. There it shows that a C int is a D int, a C float is a D float, and so on. So to port the two declarations above, simply replace typedef with alias and all is well.

alias int foo_t;
alias float bar_t;

Notice in that table the equivalent to C's long and unsigned long. There is a possibility that the C long type could actually be 64-bits on some platforms and 32-bits on others, whereas D's int type is always 32-bits and D's long type is always 64-bits. As a measure of protection against this possible snafu, it's prudent to use a couple of handy aliases on the D side that are declared in core.stdc.config: c_long and c_ulong.

// In the C header
typedef long mylong_t;
typedef unsigned long myulong_t;

// In the D module
import core.stdc.config;

// Although the import above is private to the module, the aliases are public
// and visible outside of the module.
alias c_long mylong_t;
alias c_ulong myulong_t;

One more thing. When translating typedefs that use types from C's stdint.h, there are two options for the aliases. One approach is to use native D types. This is quite straightforward since the sizes are fixed. Another way is to include core.stdc.stdint, which mirrors the C header, and just replace typedef with alias. For example, here are some types from SDL2 translated into D.

// From SDL_stdinc.h
typedef int8_t Sint8;
typedef uint8_t Uint8;
typedef int16_t Sint16;
typedef uint16_t Uint16;
...

// In D, without core.stdc.stdint
alias byte Sint8;
alias ubyte Uint8;
alias short Sint16;
alias ushort Uint16;
...

// And with the import
import core.stdc.stdint;

alias int8_t Sint8;
alias uint8_t Uint8;
alias int16_t Sint16;
alias uint16_t Uint16;
...

Enums


Translating anonymous enums from C to D requires nothing more than a copy/paste.

// In C
enum
{
	ME_FOO,
	ME_BAR,
	ME_BAZ
};

// In D
enum
{
	ME_FOO,
	ME_BAR,
	ME_BAZ,
}

Note that enums in D do not require a final semicolon. Also, the last member may be followed by a comma.

For named enums, a bit more than a direct copy/paste is needed. Named enums in D require the name be prefixed when accessing members.

// In C
typedef enum
{
	ME_FOO,
	ME_BAR,
	ME_BAZ
} MyEnum;

// In D
enum MyEnum
{
	ME_FOO,
	ME_BAR,
	ME_BAZ
}

// In some function...
MyEnum me = MyEnum.ME_FOO;

There's nothing wrong with this in and of itself. In fact, there is a benefit in that it gives some type safety. For example, if a function takes a parameter of type MyEnum, not just any old int can be used in its place. The compiler will complain that int is not implicitly convertible to MyEnum. That may be acceptable for an internal project, but for a publicly available binding it is bound to cause confusion because it breaks compatibility with existing C code samples. One work around that maintains type safety is the following.

alias MyEnum.ME_FOO ME_FOO;
alias MyEnum.ME_BAR ME_BAR;
alias MyEnum.ME_BAZ ME_BAZ;

// Now this works
MyEnum me = ME_FOO;

It's obvious how tedious this could become for large enums. If type safety is not important, there's one more workaround.

alias int MyEnum;
enum
{
	ME_FOO,
	ME_BAR,
	ME_BAZ
}

This will behave exactly as the C version. It's the approach I opted for in Derelict.

#defines


Often in C, #define is used to declare constant values. OpenGL uses this approach to declare values that are intended to be interpreted as the type GLenum. Though these values could be translated to D using the immutable type modifier, there is a better way.

D's enum keyword is used to denote not just traditional enums, but also manifest constants. In D, a manifest constant is an enum that has only one member, in which case you can omit the braces in the declaration. Here's an example.

// This is a manifest constant of type float
enum float Foo = 1.003f;

// We can declare the same thing using auto inference
enum Foo = 1.003f; // float
enum Bar = 1.003; // double
enum Baz = "Baz!" // string

For single #defined values in C, these manifest constants work like a charm. But often, such values are logically grouped according to function. Given that a manifest constant is essentially the same as a one-member enum, it follows that we can group several #defined C values into a single, anonymous D enum.

// On the C side.
#define FOO_SOME_NUMBER 100
#define FOO_A_RELATED_NUMBER 200
#define FOO_ANOTHER_RELATED_NUMBER 201

// On the D side
enum FOO_SOME_NUMBER = 100
enum FOO_A_RELATED_NUMBER = 200
enum FOO_ANOTHER_NUMBER = 201

// Or, alternatively
enum
{
	FOO_SOME_NUMBER = 100,
	FOO_A_RELATED_NUMBER = 200,
	FOO_ANOTHER_NUMBER = 201,
}

Personally, I tend to use the latter approach if there are more than two or three related #defines and the former if it's only one or two values.

But let's get back to the manifest constants I used in the example up above. I had a float, a double and a string. What if there are multiple #defined strings? Fortunately, D's enums can be typed to any existing type. Even structs.

// In C
#define LIBNAME "Some Awesome C Library"
#define AUTHOR "John Foo"
#define COMPANY "FooBar Studios"

// In D, collect all the values into one enum declaration of type string
enum : string
{
	LIBNAME = "Some Awesome C Library",
	AUTHOR = "John Foo",
	COMPANY = "FooBar Studios",
}

Again, note the trailing comma on the last enum field. I tend to always include these in case a later version of the C library adds a new value that I need to tack on at the end. A minor convenience.

Structs


For the large majority of cases, a C struct can be directly translated to D with little or no modification. The only major difference in the declarations is when C's typedef keyword is involved. The following example shows two cases, with and without typedef. Notice that there is no trailing semi-colon at the end of the D structs.

// In C
struct foo_s
{
	int x, y;
};

typedef struct
{
	float x;
	float y;
} bar_t;

// In D
struct foo_s
{
	int x, y;
}

struct bar_t
{
	float x;
	float y;
}

Most cases of struct declarations are covered by those two examples. But some times, a struct with two names, one in the struct namespace and one outside of it (the typedef), may be encountered. In that case, the typedefed name should always be used.

// In C
typedef struct foo_s
{
	int x;
	struct foo_s *next;
} foo_t;

// In D
struct foo_t
{
	int x;
	foo_t *next;
}

Another common case is that of what is often called an opaque struct (in C++, more commonly referred to as a forward reference). The translation from C to D is similar to that above.

// In C
typedef struct foo_s foo_t;

// In D
struct foo_t;

When translating the types of struct members, the same rules as outlined above in Typedefs, Aliases, and Native Types should be followed. But there are a few gotchas to be aware of.

The first gotcha is relatively minor, but annoying. I mentioned that I believe it's best to follow the C library interface as closely as possible when naming types and functions in a binding. This makes translating code using the library much simpler. Unfortunately, there are cases where a struct might have a field which happens to use a D keyword for its name. The solution, of course, is to rename it. I've encountered this a few times in Derelict. My solution is to prepend an underscore to the field name. For publicly available bindings, this should be prominantly documented.

// In C
typedef struct
{
	// oops! module is a D keyword.
	int module;
} foo_t;

// In D
struct foo_t
{
	int _module;
}

The next struct gotcha is that of versioned struct members. Though rare in my experience, some C libraries wrap the members of some structs in #define blocks. This can cause problems not only with language bindings, but also with binary compatibility issues when using C. Thankfully, translating this idiom to D is simple. Using it, on the other hand, can get a bit hairy.

// In C
typedef struct
{
	float x;
	float y;
	#ifdef MYLIB_GO_3D
	float z;
	#endif
} foo_t;

// In D
struct foo_t
{
	float x;
	float y;
	// Using any version identifier you want -- this is one case where I advocate breaking
	// from the C library. I prefer to use an identifier that makes sense in the context of the binding.
	version(Go3D) float z;
}

To make use of the versioned member, -version=Go3D is passed on the command line when compiling. This is where the headache begins.

If the binding is compiled as a library, then any D application linking to that library will also need to be compiled with any version identifiers the library was compiled with, else the versioned members won't be visible. Furthermore, the C library needs to be compiled with the equivalent defines. So to use foo_t.z from the example above, the C library must be compiled with -DMYLIB_GO_3D, the D binding with -version=Go3D, and the D app with -version=Go3D. When making a binding like Derelict that loads shared libraries dynamically, there's no way to ensure that end users will have a properly compiled copy of the C shared library on their system unless it is shipped with the app. Not a big deal on Windows, but rather uncommon on Linux. Also, if the binding is intended for public consumption, the versioned sections need to be documented.

Read more about D's version conditions in the D Programming Language documentation.

The final struct member gotcha, and a potentially serious one, is bitfields. The first issue here is that D does not have bitfields. For the general case, we have a library solution in std.bitmanip, but for a C binding it's not a silver-bullet solution because of the second issue. And the second issue is that the C standard leaves the ordering of bitfields undefined.

Consider the following example from C.

typedef struct
{
	int x : 2;
	int y : 4;
	int z: 8;
} foo_t;

There are no guarantees here about the ordering of the fields or where or even if the compiler inserts padding. It can vary from compiler to compiler and platform to platform. This means that any potential solution in D needs to be handcrafted to be compatibile with a specific C compiler version in order to guarantee that it works as expected.

Using std.bitmanip.bitfields might be the first approach considered.

// D translation using std.bitmanip.bitfields
struct foo_t
{
	mixin(bitfields!(
		int, "x", 2,
		int, "y", 4,
		int, "z", 8,
		int, "", 2)); // padding
}

Bitfields implemented this way must total to a multiple of 8 bits. In the example above, the last field, with an empty name, is 2 bits of padding. The fields will be allocated starting from the least significant bit. As long as the C compiler compiles the C version of foo_t starting from the least significant bit and with no padding in between the fields, then this approach might possibly work. I've never tested it.

The only other alternative that I'm aware of is to use a single member, then implement properties that use bit shift operations to pull out the appropriate value.

struct foo_t
{
	int flags;
	int x() @property { ... }
	int y() @property { ... }
	int z() @property { ... }
}

The question is, what to put in place of the ... in each property? That depends upon whether the C compiler started from the least-significant or most-significant bit and whether or not there is any padding in between the fields. In otherwords, the same difficulty faced with the std.bitmanip.bitfields approach.

In Derelict, I've only encountered bitfields in a C library one time, in SDL 1.2. My solution was to take a pass. I use a single 'flags' field, but provide no properties to access it. Given that Derelict is intended to be used on multiple platforms with C libraries compiled by multiple compilers, no single solution was going to work in all cases. I decided to leave it up to the user. Anyone needing to access those flags could figure out how to do it themselves. I think that's the best policy for any binding that isn't going to be proprietary. Proprietary bindings, on the other hand, can be targeted at specific C compilers on specific platforms.

Function Pointers


Function pointers are often encountered in C libraries. Often they are used as function parameters or struct members for callbacks. D has its own syntax for function pointer declarations, so they must be translated from the C style in a binding.

// A D-style function pointer declaration.
int function() MyFuncPtr;

So the format is: return type->function keyword->parameter list->function pointer name. Though it's possible to use MyFuncPtr directly, it's often convenient to declare an alias.

alias int function() da_MyFuncPtr;
da_MyFuncPtr MyFuncPtr;

Running the following code snippet will show that there's no difference between the two approaches in the general case.

int foo(int i)
{
	return i;
}
 
void main()
{
	int function(int) fooPtr;
	fooPtr = &foo;
 
 
	alias int function(int) da_fooPtr;
	da_fooPtr fooPtr2 = &foo;
 
 
	import std.stdio;
	writeln(fooPtr(1));
	writeln(fooPtr2(2));
}

Unfortunately, the general case does not always apply. I'll discuss that below when I talk about implementing dynamic bindings.

Here's how to translate a C function pointer to D.

// In C, foo.h
typedef int (*MyCallback)(void);
 
// In D
extern( C ) alias int function() MyCallback;

Notice that I used the alias form here. Anytime you declare a typedefed C function pointer in D, it should be aliased so that it can be used in the same way as it is elsewhere in the C header. Next, the case of function pointers declared inline in a parameter list.

// In C, foo.h
extern void foo(int (*BarPtr)(int));
 
// In D.
// Option 1
extern( C ) void foo(int function(int) BarPtr);
 
// Option 2
extern( C ) alias int function(int) BarPtr;
extern( C ) void foo(BarPtr);

Personally, I prefer option 2. Finally, function pointers declared inline in a struct.

// In C, foo.h
typedef struct
{
	int (*BarPtr)(int);
} baz_t;

// In D
struct baz_t
{
	extern( C ) int function(int) BarPtr;   
}

Function Declarations in Static Bindings


In D, we generally do not have to declare a function before using it. The implementation is the declaration. And it doesn't matter if it's declared before or after the point at which it's called. As long as it is in the currently-visible namespace, it's callable. However, when linking with a C library, we don't have access to any function implementations (nor, actually, to the declarations, hence the binding). They are external to the application. In order to call into that library, the D compiler needs to be made aware of the existence of the functions that need to be called so that, at link time, it can match up the proper address offsets to make the call. This is the only case I can think of in D where a function declaration isn't just useful, but required.

I explained linkage attributes in the eponymous section above. The examples I gave there, coupled with the details in the section that follows it regarding type translation, are all that is needed to implement a function declaration for a static D binding to a C library. But I'll give an example anyway.

// In C, foo.h
extern int foo(float f);
extern void bar(void);
 
// In D
extern( C )
{
 
    int foo(float);
 
    void bar();
}

Implementing Dynamic Bindings


Barring any corner cases that I've failed to consider or have yet to encounter myself, all of the pieces needed to implement static bindings are in place up to this point. The only thing left to cover is how to implement dynamic bindings. Here, function pointers are used rather than function declarations. As it turns out, simply declaring function pointers is not enough. It's a bit more complicated. The first thing to consider is function pointer initialization.

In one of the examples above (fooPtr), I showed how a function pointer can be declared and initialized. But in that example, it is obvious to the compiler that the function foo and the pointer fooPtr have the same basic signature (return type and parameter list). Now consider this example.

// This is all D.
int foo() { return 1; }
 
void* getPtr() { return cast(void*) &foo; }
 
void main()
{
 
    int function() fooPtr;
 
    fooPtr = getPtr();
}

Trying to compile this will result in something like the following.

fptr.d(10): Error: cannot implicitly convert expression (getPtr()) of type void* to int function()

Now, obviously this is a contrived example. But I'm mimicking what a dynamic binding has to go through. OS API calls (like GetProcAddress or dlsym) return function pointers of void* type. So this is exactly the sort of error that will be encountered if naively assigning the return value to a function pointer declared in this manner.

The first solution that might come to mind is to go ahead and insert an explicit cast.

fooPtr = cast(fooPtr)getPtr();

The error here might be obvious to an experienced coder, but certainly not to most. I'll let the compiler explain.

fptr.d(10): Error: fooPtr is used as a type

Exactly. fooPtr is not a type, it's a variable. This is akin to declaring int i = cast(i)x; Not something to be done. So the next obvious solution might be to use an aliased function pointer declaration. Then it can be used as a type. And that is, indeed, one possible solution (and, for reasons I'll explain below, the best one).

alias int function() da_fooPtr;
da_fooPtr fooPtr = cast(da_fooPtr)getPtr();

This compiles. For the record, the 'da_' prefix is something I always use with function pointer aliases. It means 'D alias'. It's not a requirement.

I implied above that there was more than one possible solution. Here's the second one.

int foo() 
{ 
	return 1; 
}

void* getPtr() 
{ 
	return cast(void*) &foo; 
}

void bindFunc(void** func) 
{ 
	*func = getPtr(); 
}

void main()
{
	int function() fooPtr;
	bindFunc(cast(void**)&fooPtr);
}

Here, the address of fooPtr is being taken (giving us, essentially, a foo**) and cast to void**. Then bindFunc is able to dereference the pointer and assign it the void* value without a cast.

When I first implemented Derelict, I used the alias approach. In Derelict 2, Tomasz Stachowiak implemented a new loader using the void** technique. That worked well. And, as a bonus, it eliminated a great many alias declarations from the codebase. Until something happened that, while a good thing for many users of D on Linux, turned out to be a big headache for me.

For several years, DMD did not provide a stack trace when exceptions were thrown. Then, some time ago, a release was made that implemented stack traces on Linux. The downside was that it was done in a way that broke Derelict 2 completely on that platform. To make a long story short, the DMD configuration files were preconfigured to export all symbols when compiling any binaries, be they shared objects or executables. Without this, the stack trace implementation wouldn't work. This caused every function pointer in Derelict to clash with every function exported by the bound libraries. In other words, the function pointer glClear in Derelict 2 suddenly started to conflict with the actual glClear function in the OpenGL shared library, even though the library was loaded manually. So, I had to go back to the aliased function pointers. Aliased function pointers and variables declared of their type aren't exported. If you are going to make a publicly available dynamic binding, this is something you definitely need to keep in mind.

I still use the void** style to load function pointers, despite having switched back to aliases. It was less work than converting everything to a direct load. And when I implemented Derelict 3, I kept it that way. So if you look at the Derelict loaders...

// Instead of seeing this
foo = cast(da_Foo)getSymbol("foo");
 
// You'll see this
foo = bindFunc(cast(void**)&foo, "foo");

I don't particularly advocate one approach over the other when implementing a binding with the aid of a script. But when doing it by hand, the latter is much more amenable to quick copy-pasting.

There's one more important issue to discuss. Given that a dynamic binding uses function pointers, the pointers are subject to D's rules for variable storage. And by default, all variables in D are stashed in Thread-Local Storage. What that means is that, by default, each thread gets its own copy of the variable. So if a binding just blindly declares function pointers, then they are loaded in one thread and called in another... boom! Thankfully, D's function pointers are default initialized to null, so all you get is an access violation and not a call into random memory somewhere. The solution here is to let D know that the function pointers need to be shared across all threads. We can do that using one of two keywords: shared or __gshared.

One of the goals of D is to make concurrency easier than it traditionally has been in C-like languages. The shared type qualifier is intended to work toward that goal. When using it, you are telling the compiler that a particular variable is intended to be used across threads. The compiler can then complain if you try to access it in a way that isn't thread-safe. But like D's immutable and const, shared is transitive. That means if you follow any references from a shared object, they must also be shared. There are a number of issues that have yet to be worked out, so it hasn't seen a lot of practical usage that I'm aware of. And that's where __gshared comes in.

When you tell the compiler that a piece of data is __gshared, you are saying, "Hey, Mr. Compiler, I want to share this data across threads, but I don't want you to pay any attention to how I use it." Essentially, it's no different from a normal variable in C or C++. When sharing a __gshared variable across threads, it's the programmer's responsibility to make sure it's properly synchronized. The compiler isn't going to help.

So when implementing a dynamic binding, a decision has to be made: thread-local (default), shared, or __gshared? My answer is __gshared. If we pretend that our function pointers are actual functions, which are accessible across threads anyway, then there isn't too much to worry about. Care still needs be taken to ensure that the functions are loaded before any other threads try to access them and that no threads try to access them after the bound library is unloaded. In Derelict, I do this with static module constructors and destructors (which can still lead to some issues during program shutdown, but that's beyond the scope of this article).

extern( C )
{
	alias void function(int) da_foo;
	alias int function() da_bar;
}
 
__gshared
{
	da_foo foo;
	da_bar bar;
}

Finally, there's the question of how to load the library. That, I'm afraid, is an exercise for the reader. In Derelict, I implemented a utility package (DerelictUtil) that abstracts the platform APIs for loading shared libraries and fetching their symbols. The abstraction is behind a set of free functions that can be used directly or via a convenient object interface. In Derelict itself, I use the latter since it makes loading an entire library easier. But in external projects, I often use the free-function interface for loading one or two functions at a time (such as certain Win32 functions that aren't available in the ancient libs shipped with DMD). It also supports selective loading, which is a term I use for being able to load a library even when specific functions are missing (the default behavior is to throw an exception when an expected symbol fails to load).

Conclusion


Overall, there's a good deal of work involved in implementing any sort of binding in D. But I think it's obvious that dynamic bindings require quite some extra effort. This is especially true given that the automated tools I've seen so far are all geared toward generating static bindings. I've only recently begun to use custom scripts myself, but they still require a bit of manual preparation because I don't want to deal with a full-on C parser. That said, I prefer dynamic bindings. I like having the ability to load and unload at will and to have the opportunity to present my own error message to the user when a library is missing. Others disagree with me and prefer to use static bindings. That's perfectly fine.

At this point, static and dynamic bindings exist for several popular libraries already. Deimos is a collection of the former and Derelict 3 the latter. Some bindings for the same library can be found in both and several that are in one project but not the other. I hope that, if the need arises, the tips I've laid out in this article can help fill in the holes for those developing new static or dynamic bindings.

Scripting Custom Windows in Unity3D

$
0
0
Unity allows you to extend its interface by scripting your own custom windows, which will be draggable and re-sizable like the other windows in Unity (i.e. Project, Scene, Hierarchy, Inspector).

I'm going to teach you the basics of making your own windows.

You will need:
  • Unity3D
  • Something to edit scripts with. If you have Unity installed, you should at least have the built-in editor, UniSciTE, installed.
  • You should at least know the very basics of Unity and scripting with Unity.

Creating a Window


Let's start by getting our new window to show up. Unity makes this rather simple.

Create a new project or open an existing project (whichever you prefer).

In your Project window (by default, it's at the bottom of the screen), click the Create button and then click 'Folder'. You can also right-click anywhere in the Project window, hover your mouse over 'Create', and then click 'Folder'.


Attached Image: CreateFolder.png


In order to script a window, you have to put your script files in a folder that's named "Editor". If it's not in a folder named Editor, it cannot access the classes and functions it needs to behave like a window. So name the new folder you created 'Editor'. If it's not already being renamed, click twice on the folder name to begin renaming it.

Once the folder is properly named, right-click on it, select Create, and then the type of script you want to make (JavaScript, C#, or Boo). Name this new script "MyWindow".

Open the script with your text editor.

Note:  
JavaScript users may not know this: every script file in Unity is actually a class that extends the MonoBehaviour class. Unity 'hides' the class declaration from you if you use JavaScript (but it doesn't do this for Boo or C#), but it lets you declare it yourself if you want to.


We want our new script to inherit from the EditorWindow class, not MonoBehaviour, because we don't need to place this script on GameObjects; we just need it for this window.

Declare your class like this:

//C Sharp:
using UnityEngine; //This should be in your script file already.
using UnityEditor; //This won't be in your script file by default, so put it there.  It lets us access all of Unity's methods and classes for making windows.

public class MyWindow:EditorWindow //Name your class the same thing you named your script file, and make sure it inherits from EditorWindow instead of MonoBehaviour (it will inherit from MonoBehaviour by default!)
{
	
}

//JavaScript:
import UnityEditor; //This won't be in your script file by default, so put it there.  It lets us access all of Unity's methods and classes for making windows.

public class MyWindow extends EditorWindow //Name your class the same thing you named your script file, and make sure it extends EditorWindow instead of MonoBehaviour (it will extend MonoBehaviour by default!)
{

}

Now we'll add an option to create our window. Put this function in your window class (the one named MyWindow that we just made):

//C Sharp:
[MenuItem ("Window/My Window")] //This is the place that the option to create the window will be added.
public static void ShowWindow() //Don't change the name of the function
{
	EditorWindow.GetWindow(typeof(MyWindow)); //If you disobeyed this article and named your class something else, replace the 'MyWindow' in this line with that name.
}

//JavaScript:
@MenuItem("Window/My Window") //This is the place that the option to create the window will be added.
static function ShowWindow() //Don't change the name of the function
{
	EditorWindow.GetWindow(MyWindow); //If you disobeyed this article and named your class something else, replace the 'MyWindow' in this line with the actual name.
}

Now you can open your window by clicking on the 'Window' menu at the top of the screen, then finding 'My Window' and clicking on that. Your window won't have anything in it yet.

Displaying Things in the Window


Now that your window is showing up, let's get it to show things.

This kind of code should go in the OnGUI() function in your class.

Usually, you'll be using editor functions that you can find in the EditorGUI and EditorGUILayout classes, which we have access to since we're inheriting from EditorWindow.

Let's make some fields that the user can input into. Here's the code, including all of the previous code:

//C Sharp:
using UnityEngine;
using UnityEditor;

public class MyWindow:EditorWindow
{
	//Let's declare some variables that we'll use later:
	public string textField = "Text";
	public int intField = 2;

	void OnGUI() //This is where we'll put all of our code that the window should run
	{
		textField = EditorGUILayout.LabelField("Input some text:",textField); //This will display the first string, followed by a box that the user can type characters into
		intField = EditorGUILayout.IntField("Input some numbers:",intField); //This will display the first string, followed by a box that the user can type numbers into
	}
	
	//Displaying the Window:
	[MenuItem ("Window/My Window")]
	public static void ShowWindow()
	{
		EditorWindow.GetWindow(typeof(MyWindow));
	}
}

//JavaScript:
import UnityEditor;

public class MyWindow extends EditorWindow
{
	//Let's declare some variables that we'll use later:
	public var textField:String = "Text";
	public var intField:int = 2;

	function OnGUI() //This is where we'll put all of our code that the window should run
	{
		textField = EditorGUILayout.TextField("Input some text:",textField) as String; //This will display the first string, followed by a box that the user can type characters into
		intField = EditorGUILayout.IntField("Input some numbers:",intField); //This will display the first string, followed by a box that the user can type numbers into
	}
	
	@MenuItem("Window/My Window")
	static function ShowWindow()
	{
		EditorWindow.GetWindow(MyWindow);
	}

}

Conclusion


Now you're prepared to make your own windows in Unity. Once again, make sure you always place your window scripts in an 'Editor' folder, and be sure to inherit from EditorWindow instead of MonoBehaviour.

Here are some miscellaneous notes about scripting Unity windows:
  • The Input.mousePosition variable is not updated when the game is not playing, and is useless for editor windows. If you want to get the mouse position, you'll have to use Event.current.mousePosition in an OnGUI() function instead.
  • Variables that aren't public will reset to their default values when your project refreshes. This means if you edit a script or add a new file to your Assets folder, every variable that is not public will revert back to what you declared it as. For example, if a variable is set to 2 by default, but during your use of the window, you set that variable to 5, then it would reset back to 2 every time the project refreshes.

Article Update Log


May 10 2013: Initial release

Game Programming: Snake

$
0
0

Introduction


What is Snake?


Quoting Wikipedia:

Snake is a casual video game that originated during the late 1970s in arcades and has maintained popularity since then, becoming something of a classic. After it became the standard pre-loaded game on Nokia mobile phones in 1998, Snake found a massive audience.


Who is this article for?


In order to get the most out of this article, you should be familiar with the C++ programming language, and have written and successfully compiled a few programs (or games) on your own.


What will I learn?


If I do my job right, you should learn how to develop a Snake clone game. We are going to talk about the basics first, that is, getting something on the screen. Then we will cover gathering input from the player and making things move. Next we will go through the architecture of the game, and finally we will take each step one by one and by the end you should have a solid understanding of how to sit down and write your very own Snake game from scratch.


What do I need?


I will be using a Windows machine, however you may use a Linux or a Mac computer because we are using a cross-platform library so that our game can target as many platforms as possible without changing the code. That said, here is a list of things to bring with you.

  • C++ compiler (I will be using the Mingw C++ compiler provided with the Code::Blocks IDE)
  • SDL version 1.2.15 which may be obtained here.
  • Pen and Paper (or the digital equivalent) for taking notes.

Compiler Setup


First things first.


The first thing we need to do is download and setup our compiler (Remember, we are using Mingw through the Code::Blocks IDE here) to use SDL. Head on over to the SDL download page and download SDL-devel-1.2.15-mingw32.tar.gz then extract the contents to your computer.


You should have a folder called SDL-1.2.15 containing a bunch of files. I like to keep my computer tidy, and I create a root folder called “CLibs” in which I install all my libraries that I will use with the C and C++ programming languages. I would recommend that you do the same in order to avoid confusion later on.


We will only need the include, lib, and bin folders from the SDL-1.2.15 folder. Go ahead and copy those folders into C:\CLibs\SDL-1.2.15\ and then we can move on over to configuring Code::Blocks so that it is able to find the SDL library files it needs.


Start up Code::Blocks and click on the Settings menu, then click on the Compiler and Debugger... menu item. In the window that opens, choose the Search directories tab, and under the Compiler sub-tab, you need to click on the Add button and browse for the C:\CLibs\SDL-1.2.15\include folder and click the OK button to add the folder to the compiler search directory paths. Now click on the Linker sub-tab and repeat the process for the C:\CLibs\SDL-1.2.15\lib folder. Click on the OK button and you are finished with telling Code::Blocks where the SDL files are located.


Note:  A vital last step for Windows users is to copy the file SDL.dll into the bin directory in your compiler. In my case, on Windows 7, this happens to be C:\Program Files (x86)\CodeBlocks\MinGW\bin


Testing the install.


We are going to write a very small program to test that Code::Blocks is correctly configured to use SDL.


Step 1.


Select File -> New -> Project from the menu in Code::Blocks, and then select Empty project from the templates and click on the Go button.


Step 2.


If you see “Welcome to the new empty project wizard!” just click on the Next button. Otherwise, if you see “Please select the folder where you want the new project to be created as well as its title.” then type in a name for your project. In this case, we are testing SDL, so type in the name SDLTest into the Project title field and then click the Next button, and the Finish button on the next screen.


Step 3.


Select File -> New -> Empty file from the menu and click Yes when asked “Do you want to add this new file in the active project (has to be saved first)?” and enter sdltest-main.cpp as the file name, and save the file to the SDLTest folder created along with your new project. When asked to select the targets, just click the OK button.


Step 4.


Finally we get to write a little code. Enter each line exactly as you see it. I will not explain this test code, because all we are looking for is a yay or nay about SDL being configured correctly, and this article’s purpose is not to go over basic code.


#include <SDL/SDL.h>
int main(int argc, char* argv[])
{
    if (SDL_Init(SDL_INIT_EVERYTHING) < 0) 
    {
        return -1;
    }
   
    SDL_Quit();
    return 0;
}

Step 5.


Last thing, we need to specify the SDL libraries so we can compile the project. Right-click on the SDLTest item in the Projects panel and select Build options... then select the Linker settings tab. Under the Other linker options box, type in the following items each on their own line.

  • -lmingw32
  • -lSDLmain
  • -lSDL

Take note that each line begins with minus sign then a lowercase letter L.

Step 6.


Well, I know I said last thing in the previous step, but this really is the last thing. Build the project and Run the project. Select Build -> Build from the menu and as long as there are no errors, select Build -> Run from the menu. If you have any errors, go back to Step 1 and read through and make sure you have done everything as specified. If you continue to have trouble, then contact me with the full error you are having, and I will see if I can help you get things sorted out.


You should get a black console window appear and it should say


Process returned 0 (0x0) execution time : 0.201 s
Press any key to continue.


If this is not the case, then something went wrong. If you see the text like above, then you are ready to proceed further into this article.


All systems are go.


Okay great, SDL is installed, Code::Blocks is configured, you know how to get an SDL project created and compiled, we’re good to move on to something a little more exciting. We are going to take a small step away from the code and have a look at some pretty pictures to help you understand what we are going to be doing over the next few sections of the article.


Attached Image: GenericGameLoop.png


This is called the game-loop. Every single game has something like this inside of it. From Pong to Halo to Farmville to World of Warcraft. (Disclaimer: These games and their names are copyright and/or trademarks of their respective owners.) Every Single Game Has A Game Loop of some kind. This fun little loop is what keeps the game going. If nothing ever looped, the game would start, and then they would just about immediately end. That would be really boring. So let’s see what exactly is going on here. First we do a little housekeeping, like handling events and what-not, next we update the game world, finally we render the game world, and the whole thing repeats until something tells it not to.


Now, there are hundreds if not thousands of articles and books out there that will explain this in at least a hundred different ways in more detail. I’m not going to add to that total with this article. Instead I am going to jump ahead right into our next project which is called Big Blue Box (Disclaimer: I did not check to see if Big Blue Box is trademarked or copyrighted to anyone. If it is, sorry for using your name.) in which our job as a programmer is to make a big blue box appear on the screen. Fun? Nah... but we have to start somewhere before we can get to the fun stuff.


SDL Basics


Beginnings of Big Blue Box


Just like the SDLTest project, create a new project and configure the linker settings so the project will compile, and also throw in a .cpp file into the mix so we have somewhere to write our code. I’m calling my project BigBlueBox and the source file bigbluebox-main.cpp you can do the same, or change the name. Your choice.


Okay, first we need some include statements and then we need to define some constants for our little program.


#include <iostream>
#include <SDL/SDL.h>

static const unsigned WINDOW_WIDTH = 800;
static const unsigned WINDOW_HEIGHT = 600;
static const unsigned BOX_WIDTH = 256;
static const unsigned BOX_HEIGHT = 256;

Everything should be self-explanatory. Our window will be 800x600 and the box will be 256x256. Simple enough. We need iostream because we will be using the cerr error output stream for error reporting and naturally we need SDL.h because we are writing a program which uses SDL. Next, we write the main code.


int main(int argc, char* argv[])
{
    return 0;
}

This should be pretty much stuck in your brain if you have had any programming experience with C and C++. The rest of our program’s code will fall between the starting brace of the function and the return zero line.


I usually declare my variables when they are used, however in this particular project I will declare all the variables I will use at the top of the function just so that you can refer to a single location to see the datatype of a variable being used.


We are going to need a pointer to an SDL Surface, to represent our primary drawing surface and our program’s window. We need an SDL Event object for our event handling. We need an SDL Rect object to define our box’s position and dimensions. We need a couple unsigned integers for our box color and the color to make the background, and finally we need a boolean variable for keeping track of our game loop. Let’s see the variable declarations now.


SDL_Surface* displaysurface = NULL;
SDL_Event sdlevent;
SDL_Rect boxrect;
unsigned boxcolor;
unsigned backgroundcolor;
bool running;

The next thing we need to do is initialize SDL. This is accomplished with the SDL_Init function. Then we need to set the video mode to create our program’s window. This is accomplished with the SDL_SetVideoMode function. We then set the window caption text to something relevant to our program. This is accomplished with the SDL_WM_SetCaption function. If we don’t do this, the caption will be “SDL_app”. Let’s have a look at the code for all of this now.


if (SDL_Init(SDL_INIT_EVERYTHING) < 0)
{
    std::cerr << "SDL_Init Failed: " 
              << SDL_GetError() << std::endl;
    return -1;
}

displaysurface = SDL_SetVideoMode(
    WINDOW_WIDTH, WINDOW_HEIGHT, 32, 
    SDL_HWSURFACE | SDL_DOUBLEBUF);
if (displaysurface == NULL)
{
    std::cerr << "SDL_SetVideoMode Failed: " 
              << SDL_GetError() << std::endl;
    return -1;
}

SDL_WM_SetCaption("Big Blue Box", NULL);

Next we are going to set up our box to be the right size using our constants we defined at the start of our code, and then we will position our box in the center of the screen.


Note:  
Tip: To center an object on the screen, first subtract the object’s size from the size of the screen and then you divide the difference by two.


boxrect.w = BOX_WIDTH;
boxrect.h = BOX_HEIGHT;

boxrect.x = (WINDOW_WIDTH - boxrect.w) / 2;
boxrect.y = (WINDOW_HEIGHT - boxrect.h) / 2;

Now we are going to set up our color variables. We want obviously a blue box. And I want a black background, so we are going to use the SDL_MapRGB function to get the right color values. Lastly, we set our running boolean to true.


backgroundcolor = SDL_MapRGB(displaysurface->format, 0, 0, 0);
boxcolor = SDL_MapRGB(displaysurface->format, 0, 0, 255);
running = true;

We finally arrive at the game loop. Our game loop will be very simple, since our program is not really a game, we don’t have much to do here. We just need to handle a couple events and then draw our screen.


while(running)
{
    // handle events
    // render game
}

The most complex part of this will be handling the events, and honestly, this is not really that difficult. We need to handle the SDL_QUIT event, which is sent when the user tries to close the window. If we don’t handle this event, well the window would refuse to close and your user will be pretty irritated with you.


Note:  
Tip: ALWAYS remember to handle the SDL_QUIT event or your users will be very unhappy with you and your game.


Handling the event is pretty simple really. We just need to tell our game loop to stop looping, in our case, we just set our running boolean variable to false. Easy peasy. We would also like to be able to close our game by pressing the ESC key on the keyboard. To accomplish this feat, we need to handle the SDL_KEYDOWN event and check for the SDLK_ESCAPE key, and same as the SDL_QUIT handler, tell our game loop to stop looping. That wraps up the event handling we need to do here.


Now, that we know what events we have to handle, we need to know how to actually find out what events are being fired off. To do this, we need to call the SDL_PollEvent function inside a loop so that we can handle all events that get queued up when our game is running. Let’s have a look at the code for our event handling. Remember that this code falls within our game loop.


while(SDL_PollEvent(&sdlevent))
{
    switch(sdlevent.type)
    {
        case SDL_QUIT:
        {
            running = false;
        } break;

        case SDL_KEYDOWN:
        {
            if (sdlevent.key.keysym.sym == SDLK_ESCAPE)
            {
                running = false;
            }
        } break;
    }
}

Great, now the only thing left to wrap up our game loop is the rendering of our game screen. We will use the SDL_FillRect function to color our background, and to draw our box on the screen. After everything gets drawn, we need to call the SDL_Flip function in order to make our rendering visible on the screen because we are using double buffering (and we definitely want to be using double buffering). And lastly in order to keep our CPU happy, we will call the SDL_Delay function to give a few time slices back to the system.


SDL_FillRect(displaysurface, NULL, backgroundcolor);
SDL_FillRect(displaysurface, &boxrect, boxcolor);
SDL_Flip(displaysurface);
SDL_Delay(20);

Our game loop is done. The rest of the code that follows should be outside the game loop’s closing brace. In order to wrap up the game code, we need to clean up after ourselves. Because our game is very simple and we don’t allocate anything other than the display surface, we can clean up by calling the SDL_Quit function.


SDL_Quit();

And we are done! Now go ahead and build and run the project. You should see a big blue box on a black screen. Press the ESC key on your keyboard and the window should close.


Attached Image: BigBlueBox-Screenshot.png


Moving Boxes.


Our next little project will build on the BigBlueBox project and we will add the ability to move our box around the screen using the arrow keys. We are going to need to add a couple additional variables to the top of our main function. We need an SDL_Rect to define the boundaries in which we can move our box, and an unsigned integer that defines the speed at which the box is able to move.


SDL_Rect boxbounds;
unsigned boxspeed = 6;

Now after we set the running boolean to true, before we start the game loop, we need to set up our bounding box rect. There are four variables in an SDL_Rect which we are going to use to specify the left, top, right, and bottom edges of a bounding box in which our box will be able to move. We subtract the size of our box from the size of our window to get the limits of the upper-left corner of our box.


boxbounds.x = 0;
boxbounds.y = 0;
boxbounds.w = WINDOW_WIDTH - boxrect.w;
boxbounds.h = WINDOW_HEIGHT - boxrect.h;

We now are going to check if any of the arrow keys are being pressed, and if they are being pressed, move our box by adding or subtracting the box speed. We also need to ensure the box does not move outside out bounding box we have defined. But first, we have to have a way to read directly the current state of the keyboard. We are able to accomplish this task with the SDL_GetKeyState function. The code should be added to the game loop after the event handling loop and before the code that handles the rendering.


unsigned char* keys = SDL_GetKeyState(NULL);

if (keys[SDLK_UP])
{
    boxrect.y -= boxspeed;
    if (boxrect.y < boxbounds.y)
    {
        boxrect.y = boxbounds.y;
    }
}
else if (keys[SDLK_DOWN])
{
    boxrect.y += boxspeed;
    if (boxrect.y > boxbounds.h)
    {
        boxrect.y = boxbounds.h;
    }
}

Now that takes care of the UP and DOWN movement, so let’s take care of the LEFT and RIGHT next.


if (keys[SDLK_LEFT])
{
    boxrect.x -= boxspeed;
    if (boxrect.x < boxbounds.x)
    {
        boxrect.x = boxbounds.x;
    }
}
else if (keys[SDLK_RIGHT])
{
    boxrect.x += boxspeed;
    if (boxrect.x > boxbounds.w)
    {
        boxrect.x = boxbounds.w;
    }
}

And that is all we are going to need to do. You should be able to build and run the project as before, and this time you can move the box around the screen using the arrow keys, and the box should not move beyond the edges of the screen. We have now covered enough of the basics that you should have enough knowledge of using SDL at this point to start writing your Snake game. So I’m done here.


...just kidding. Well, just about the last part. I’m not done here. I still have to teach you about programming Snake, since that is what this article is really about. This has all just been a crash-course introduction to get your appetite whetted. Now, before we can code our Snake game, we have to talk about how we are going to engineer our game code.


A Look At Snake


I am going to use a very simple design for our little Snake game. For brevity and to help keep the focus on the core subject, I will not be implementing sound, I will not be using any external bitmaps, I will not implement scoring or text output, and I will not implement any sort of game state management or anything that would otherwise further complicate the program. This article is not about how to go about creating a polished, retail-ready game. It is about how to program a Snake game, and that is all I am going to do here.


For our game, we need two objects. The Snake, and a “Collectable Coin” which causes the Snake to grow in length. The rules are simple as well. If the Snake collides with the edge of the screen or itself, then the Snake will die. The player uses the Arrow keys to control the Snake in any of the four directions; Up, Down, Left, and Right. The Snake cannot be made to move in the opposite direction of it’s movement, as that would cause the snake to bite itself instantly causing death. We will use simple filled rectangles to represent the various visuals of the game.


The code will consist of three classes and the main() function which houses the sample init and game loop code you have seen in the BigBlueBox project. The body of the Snake will be composed of multiple pieces, referred to as segments which will be held in a deque, or double-ended queue which can be found in the C++ STL. You can read more about deques here.


In order to make the Snake move, we will prepend a segment positioned in the location where the Snake is going to move, and if the Snake is moving into a location where there is no “Collectable Coin”, the tail end of the Snake is chopped off. Using a deque makes this process straightforward through the push_front and pop_back methods. In order to cause the Snake to grow in length, we do not chop off the tail if we collide with a “Collectable Coin”.


The game screen is divided into a number of “Cells”. A single segment and the “Collectable Coin” are both sized the same as a single Cell. The Snake begins in the center of the screen. This should be enough information for us to start writing the code for our little Snake game.


Building Snake


Finally, we get to have some fun programming. In order for us to begin, we will need to include a few header files, and then define our constants. We will need iostream for using cerr for our error reporting, deque to contain our Snake Segments, and of course SDL.h to access the SDL library functionality which powers our game.


We have our window dimensions, the four directions the Snake can move, and some constants to define the scale of the game world, and lastly the starting location and length of the Snake are defined as constants as well.


#include <iostream>
#include <deque>
#include <SDL/SDL.h>
static const unsigned WINDOW_WIDTH = 800;
static const unsigned WINDOW_HEIGHT = 600;
static const unsigned GO_UP = 0;
static const unsigned GO_DOWN = 1;
static const unsigned GO_LEFT = 2;
static const unsigned GO_RIGHT = 3;
static const unsigned CELL_SIZE = 20;
static const unsigned CELL_WIDTH = WINDOW_WIDTH / CELL_SIZE;
static const unsigned CELL_HEIGHT = WINDOW_HEIGHT / CELL_SIZE;
static const unsigned START_X = CELL_WIDTH / 2;
static const unsigned START_Y = CELL_HEIGHT / 2;
static const unsigned START_LENGTH = 3;

The first class in our little game is nothing more than a data structure that keeps track of the position of each segment of the snake.


class SnakeSegment
{
    public:
    unsigned x;
    unsigned y;

    SnakeSegment(unsigned x, unsigned y)
    {
        this->x = x;
        this->y = y;
    }
};

Next up we have the Coin class which keeps track of the position of the coin. The same data as the SnakeSegment, however I wanted to have two distinct classes. The only notable difference between the SnakeSegment class and the Coin class is a method which randomly sets the position of the “Collectable Coin”.


class Coin
{
    public:
    unsigned x;
    unsigned y;

    Coin()
    {
        Respawn();
    }

    void Respawn()
    {
        x = 1 + rand() % (CELL_WIDTH - 2);
        y = 1 + rand() % (CELL_HEIGHT - 2);
    }
};

The third class of our game is where the majority of the work is located, and is also inevitably the most complex. The Snake class is a composite of the previous classes along with a few members necessary to implement the desired mechanics. We need to keep track of the direction the Snake is moving, we need a timing mechanism to keep from calling our collision detection code every frame, and a few colors. I also reuse a single SDL_Rect object for all the rendering to minimize the allocations and deallocations per-frame. We need methods to restart the game, update the game, render the game, determine if the game is over, and handle player input and collisions with the walls, the “Collectable Coin” and the snake itself.


class Snake
{
    private:
    std::deque<SnakeSegment> segments;
    Coin coin;
    bool dead;
    unsigned direction;
    unsigned time, timeout;
    unsigned headcolor, segmentcolor, coincolor;
    SDL_Rect renderrect;
    public:
    Snake(unsigned headcolor, unsigned segmentcolor, 
          unsigned coincolor);
    ~Snake();
    void Restart();
    void Update();
    void Render(SDL_Surface* dest);
    inline bool IsDead() { return dead; }

    private:
    
    void UpdateInputControls();
    void RenderSnake(SDL_Surface* dest);
    void RenderCoin(SDL_Surface* dest);
    void AddSegment(unsigned x, unsigned y);
    void MoveSnake();
    bool CheckForWallCollision();
    bool CheckForSelfCollision();
    bool CheckForCoinCollision();
};

Before I get into the code that implements the Snake class methods, I want to show you the main function and how the Snake class is used to create the gameplay flow. You have already seen most of the code in the BigBlueBox project, however there are a few small changes in the code arrangement. The layout is still the same: Init, Game Loop (Handle Events, Update, Render), Cleanup.


In the Init section of the main function, the following code should be written. If it is not immediately obvious, the background color is dark green, the head of the snake is red, the body of the snake is bright green, and the coin is yellow.


if (SDL_Init(SDL_INIT_EVERYTHING) < 0)
{
	std::cerr << "SDL_Init Failed: " 
               << SDL_GetError() << std::endl;
	return -1;
}

SDL_Surface* displaysurface = SDL_SetVideoMode(
    WINDOW_WIDTH, WINDOW_HEIGHT, 32, 
    SDL_HWSURFACE | SDL_DOUBLEBUF);
if (displaysurface == NULL)
{
	std::cerr << "SDL_SetVideoMode Failed: " 
               << SDL_GetError() << std::endl;
	return -1;
}

SDL_WM_SetCaption("Snake", NULL);

unsigned backgroundcolor = SDL_MapRGB(
    displaysurface->format, 0, 64, 0);
unsigned snakeheadcolor = SDL_MapRGB(
    displaysurface->format, 255, 0, 0);
unsigned snakebodycolor = SDL_MapRGB(
    displaysurface->format, 0, 255, 0);
unsigned coincolor = SDL_MapRGB(
    displaysurface->format, 255, 255, 0);

Snake snake(snakeheadcolor, snakebodycolor, coincolor);

SDL_Event sdlevent;
bool running = true;

In the SDL_KEYDOWN section of the event handling code of the Game Loop, after the code that handles SDLK_ESCAPE, the following code needs to be added to allow the player to restart the game after dying by pressing the ENTER (RETURN) key.


else if (sdlevent.key.keysym.sym == SDLK_RETURN)
{
    if (snake.IsDead())
    {
        snake.Restart();
    }
}

Simply call the Update method of the snake for the Update section of the Game Loop, and call the Render method in the Render section. That wraps up the code for the main function. Next we will take a look at the method implementations of the Snake class.

Note:  
Be sure to call the Render method AFTER calling the SDL_FillRect function, and BEFORE calling the SDL_Flip function.


Constructing the Snake


First up is the class constructor. Most of the construction process has been delegated to the Restart method, to avoid code duplication. The constructor consists of setting the colors and then calling the Restart function to finish the construction.


Snake::Snake(unsigned headcolor, unsigned segmentcolor, 
             unsigned coincolor)
{
    this->headcolor = headcolor;
    this->segmentcolor = segmentcolor;
    this->coincolor = coincolor;
    Restart();
}

Destructing the Snake


The class destructor just needs to clear out the deque since we do not have any dynamic memory allocations which need to be freed.


Snake::~Snake()
{
    segments.clear();
}

Restarting the Snake


As mentioned before, the construction of the Snake has been delegated to the Restart method to avoid code duplication. When the Snake is restarted, the deque is cleared out, then the starting snake segments are added to the deque. The direction of movement is reset as well as the dead flag and the timing mechanism.


void Snake::Restart()
{
    segments.clear();
    for (unsigned i = 0; i < START_LENGTH; i++)
    {
        AddSegment(START_X - i, START_Y);
    }
    direction = GO_RIGHT;
    time = 0;
    timeout = 6;
    dead = false;
}

Adding Snake Segments


We add segments to the tail of the starting Snake by pushing to the back of the deque. This only occurs when building the initial Snake body in the Restart method.


void Snake::AddSegment(unsigned x, unsigned y)
{
    SnakeSegment segment(x, y);
    segments.push_back(segment);
}

Updating the Snake


If the Snake is dead, we do not continue the update. First we update the input controls, then update the timing mechanism. If the time has not timed out, we do not continue the update. If the time has timed out, we check for collisions and finally move the snake.


void Snake::Update()
{
    if (dead) { return; }

    UpdateInputControls();

    time++;
    if (time < timeout)
    {
        return;
    }

    time = 0;

    if (CheckForWallCollision() || CheckForSelfCollision())
    {
        dead = true;
        return;
    }

    if (CheckForCoinCollision())
    {
        coin.Respawn();
    }
    else
    {
        segments.pop_back();
    }

    MoveSnake();
}

Controlling the Snake


We do not want the Snake to be able to reverse its direction of movement, so our movement code is a little more than just if key pressed, then move. But nothing too difficult.


void Snake::UpdateInputControls()
{
    unsigned char* keys = SDL_GetKeyState(NULL);

    if (keys[SDLK_UP] && direction != GO_DOWN)
    {
        direction = GO_UP;
    }
    else if (keys[SDLK_DOWN] && direction != GO_UP)
    {
        direction = GO_DOWN;
    }
    else if (keys[SDLK_LEFT] && direction != GO_RIGHT)
    {
        direction = GO_LEFT;
    }
    else if (keys[SDLK_RIGHT] && direction != GO_LEFT)
    {
        direction = GO_RIGHT;
    }
}

When the Snake hits the Wall


Checking for collision between the head of the Snake and a “Wall” is a straightforward process of testing if the head of the Snake has reached any of the four edges of the game world.


bool Snake::CheckForWallCollision()
{
    unsigned headx = segments[0].x;
    unsigned heady = segments[0].y;

    return (
            (headx == 0) ||
            (heady == 0) ||
            (headx == CELL_WIDTH) ||
            (heady == CELL_HEIGHT));
}

Watch Out For Your Tail


If the Snake’s head touches another segment of the Snake body, it dies from the poison. Just loop through the deque starting at the segment after the head and if the head is in the same location as the iterated segment, you have a collision.


bool Snake::CheckForSelfCollision()
{
    unsigned headx = segments[0].x;
    unsigned heady = segments[0].y;

    for (unsigned i = 1; i < segments.size(); i++)
    {
        if (segments[i].x == headx && segments[i].y == heady)
        {
            return true;
        }
    }
    return false;
}

Collecting Coins


This is the easiest collision check of them all. If the head touches the coin, you collect the coin. Pretty easy stuff after all the code we have written so far.


bool Snake::CheckForCoinCollision()
{
    return (segments[0].x == coin.x && segments[0].y == coin.y);
}

Moving the Snake


In order to make the Snake appear to move, we push a new head segment to the front of the deque. Since the Update method takes care of popping the back end segment off of the deque, this gives the illusion that the segments are following the head segment, which looks like the Snake moves as an intelligent entity.


void Snake::MoveSnake()
{
    static const int movex[] = { 0, 0, -1, 1 };
    static const int movey[] = { -1, 1, 0, 0 };

    unsigned x = segments[0].x + movex[direction];
    unsigned y = segments[0].y + movey[direction];

    SnakeSegment nextsegment(x, y);

    segments.push_front(nextsegment);
}

Drawing the Snake


If the Snake is dead, we do not continue the rendering process. Coins are rendered first, then the Snake itself. Since all visuals are the same size rectangle, we are able to reuse a single SDL_Rect structure and simply update the x and y values for each component to be rendered in the correct location. Every x and y value needs to be multiplied by the size of a single “Cell” in the game world, so that the on-screen positions line up correctly.


void Snake::Render(SDL_Surface* dest)
{
    if (dead) { return; }

    renderrect.w = CELL_SIZE;
    renderrect.h = CELL_SIZE;

    RenderCoin(dest);
    RenderSnake(dest);
}

void Snake::RenderCoin(SDL_Surface* dest)
{
    renderrect.x = coin.x * CELL_SIZE;
    renderrect.y = coin.y * CELL_SIZE;
    SDL_FillRect(dest, &renderrect, coincolor);
}

void Snake::RenderSnake(SDL_Surface* dest)
{
    renderrect.x = segments[0].x * CELL_SIZE;
    renderrect.y = segments[0].y * CELL_SIZE;
    SDL_FillRect(dest, &renderrect, headcolor);

    for (unsigned i = 1; i < segments.size(); i++)
    {
        renderrect.x = segments[i].x * CELL_SIZE;
        renderrect.y = segments[i].y * CELL_SIZE;
        SDL_FillRect(dest, &renderrect, segmentcolor);
    }
}

The End is Here


Attached Image: Snake-Screenshot.png


With that, our little Snake game is complete. Go ahead of build and run the project and you should get a dark green screen with a red & green snake that you can control using the arrow keys to collect yellow coins that randomly appear after you collect each one. If you bite yourself or hit a wall, you die, and nothing will be drawn but the dark green screen. Pressing the Enter key will restart the game, and pressing ESC will quit the game.


If you have any problems with the project, or would like to discuss the project. Feel free to contact me. My email address is ccpsceo@gmail.com. Please include “Programming Snake” in your subject when emailing me. You may also contact me via Skype by adding the user bbastudios and when asking for me to add you, include that you have read this Programming Snake article


Thank you for reading. I hope you have enjoyed this as much as I have.


Sincerely,
Richard Marks
Senior Technical Director
Bang Bang Attack Studios
www.bangbangattackstudios.com

Building a First-Person Shooter Part 1.2: The Player Class

$
0
0
It's finally time to begin fleshing out our player class. This class will manage the first-person user controls. We will start by setting up player.h. This header file will contain the declarations of the player class as well as the various variables and functions that will be held within the player class. At this time copy and paste the following code into player.h:

#pragma once
#include "MyGame.h"

using namespace Leadwerks;

class Player: public Node
{
private:
        Camera* camera;
        float standheight;
        float crouchheight;
        float cameraheight;
        float move;
        float strafe;
        float movementspeed;
        float maxacceleleration;
        float sensitivity;
        float smoothedcamerapositiony;
        float cameraypositionsmoothing;
        float cameralooksmoothing;
        float runboost;
        float jump;
        float jumpforce;
        float jumpboost;
        int footstepwalkfrequency;
        int footsteprunfrequency;
        long footsteptimer;
        bool running;
        bool crouched;
        bool landing;
        Vec2 mousespeed;
        Vec3 normalizedmovement;
        Vec3 cameraposition;
        Vec3 playerrotation;
        Sound* footstepsound[4];
        Sound* landsound[4];
        Sound* jumpsound[1];

public:
        Player();
        virtual ~Player();

        virtual void UpdateControls();
        virtual void Update();
};

Setting Up the Player Class


The player.cpp file will contain all the logic and code for setting up FPS player mechanics. We start with a basic player class that contains a constructor, destructor, and two empty functions:

#include "MyGame.h"

using namespace Leadwerks;

Player::Player()
{
}

Player::~Player()
{
}

void Player::UpdateControls()
{
}

void Player::Update()
{
}

Since the player class is a child of the node class it will inherit an entity member from its parent. In the player constructor we assign a value to this entity member with a call to Pivot::Create(). A pivot is an invisible entity with no special properties, it is essentially an instantiation of an empty entity:

entity = Pivot::Create();

We now want to setup the player physics properties for the entity:

entity->SetPhysicsMode(Entity::CharacterPhysics);
entity->SetCollisionType(Collision::Character);
entity->SetMass(10.0);

And finally position the player at the origin:

entity->SetPosition(0,0,0,true);

With the code additions our player class will now look as such:

#include "MyGame.h"

using namespace Leadwerks;

Player::Player()
{
        //Create the entity
        entity = Pivot::Create();
        //Set up player physics
        entity->SetPhysicsMode(Entity::CharacterPhysics);
        entity->SetCollisionType(Collision::Character);
        entity->SetMass(10.0);
        //Player position
        entity->SetPosition(0,0,0,true);
}

Player::~Player()
{
}

void Player::UpdateControls()
{
}

//Update function
void Player::Update()
{
}

Adding in a Camera


In a FPS the player’s camera acts as the player’s head, in that it should be positioned at a height directly above the player’s shoulders and be restricted to normal human movements. For the player’s height we will create and initialize three separate variables in the constructor:

standheight=1.7;
crouchheight=1.2;
cameraheight = standheight;

We then create the camera, position it to the height of a standing player, and narrow the camera’s field of view:

camera = Camera::Create();
camera->SetPosition(0,entity->GetPosition().y + cameraheight,0,true);
camera->SetFOV(70);

We also don’t want to forget to deal with the camera when an instance of the player class gets deleted. so in the destructor we add in:

if (camera)
{
        camera->Release();
        camera = NULL;
}

After these changes the player class will now look like this:

#include "MyGame.h"

using namespace Leadwerks;

Player::Player()
{
        //Create the entity
        entity = Pivot::Create();

        //Initialize values
        standheight=1.7;
        crouchheight=1.2;
        cameraheight = standheight;
        //Create the player camera
        camera = Camera::Create();
        camera->SetPosition(0,entity->GetPosition().y + cameraheight,0,true);
        camera->SetFOV(70);
        //Set up player physics
        entity->SetPhysicsMode(Entity::CharacterPhysics);
        entity->SetCollisionType(Collision::Character);
        entity->SetMass(10.0);
        //Player position
        entity->SetPosition(0,0,0,true);
}

Player::~Player()
{
        if (camera)
        {
                camera->Release();
                camera = NULL;
        }
}

void Player::UpdateControls()
{
}

//Update function
void Player::Update()
{
}

Up next, we'll talk about movement with keyboard input.

Configuration And Tweaking

$
0
0

A Configuration and Tweak System


Setting up a configuration system for a game sounds like a trivial task. What exactly is there to store beyond some graphics, sound and controller information? For the final released game, those items cover most of the needs of a simple game, but during development it is handy to store considerably more information. Simple items such as auto loading a specific level you are working on, if bounding boxes are displayed and other items can greatly speed debugging. Of course it is possible to write different systems, one for the primary configuration and another for tweakables, but that is a duplication of effort and not required. Presented in this article is configuration system which supports both standard configuration and development time configuration.

This article builds on the CMake environment presented in the articles here and extends from the updated version presented with the SIMD articles here. The code for the article can be found here starting at the tag ‘ConfigSystem’ and contained in the "Game" directory.

Goals


The primary goals of the configuration system are fairly simple: provide configuration serialization without getting in the way of normal game programming or requiring special base classes. While this seems simple enough, there are some tricky items to deal with. An example could be the choice of a skin for the in-game UI. The configuration data will be loaded when the game starts up in order to setup the main window’s position, size and if it is fullscreen or not, but the primary game UI is created later after the window is setup. While it is possible to simply set a global flag for later inspection by the UI, it is often preferable to keep the data with the objects which use them. In order to solve this sort of delayed configuration, the system maintains a key value store of the configuration such that access is available at any point during execution.

Keeping the solution as simple and non-intrusive as possible is another important goal. It should take no more than a minute or two to hook up configuration file persistence without requiring multiple changes. If it is needed to change a local variable to be attached to a configuration item it should not be required to change the local to a global or move it to a centralized location. The system should work with the local value just as well as member variables and globals in order to remain non-intrusive.

Finally, while not a requirement of the configuration data directly, it should be possible to control and display the items from within the game itself. For this purpose, a secondary library is supplied which wraps the open source library AntTweakBar (http://anttweakbar.sourceforge.net/doc/) and connects it to variables in the game. This little library is a decent enough starting point to get going after hacking it a bit to fit into the CMake build environment. Eventually the library will likely be replaced with the chosen UI library for the game being written as part of these articles. For the time being though, it serves the purpose as something quick to use with some nice abilities.

Using the System


A basic overview of using the configuration system is presented through a series of small examples. For full examples the current repository contains an application called XO which is the beginnings of a game and includes a number of useful additions beyond the scope of this article. It currently builds off of SFML 2.0 and includes a test integration of the ‘libRocket’ UI framework in addition to a number of utilities for logging and command line argument parsing. For more detailed examples, please see the application being created.

The Singleton


The configuration system requires a singleton object to store the in memory database. While there are many ways to implement singletons, the choice of singleton style here is to use a scoped object somewhere within the startup of the game in order to explicitly control creation and shutdown. A very simple example of usage:

#include <Config/Config.hpp>

int main( int argc, char** argv )
{
  Config::Initializer  configInit( "config.json" );
  return 0;
}

Compared to other solutions, such as the Pheonix singleton, there are no questions as to the lifetime of the object which is very important in controlling when data is loaded and saved.

Simple Global Configuration Items


The first use of the configuration system will show a simple global configuration item. This will be shown without any of the helpers which ease usage in order to provide a general overview of the classes involved. The example is simply a modification of the standby “Hello World!” example:

#include <Config/Config.hpp>
#include <string>
#include <iostream>

std::string gMessage( "Hello World!" );
Config::TypedItem< std::string > gMessageItem( "HelloWorld/Message", gMessage );


int main( int argc, char** argv )
{
  Config::Initializer  configInit( "HelloWorld.json" );


  // Initialize the message from the configuration.
  // If the item does not exist, the initial value is retained.
  Config::Instance->Initialize( gMessageItem );

  std::cout << gMessage;

  // Update the message in the configuration registry.
  // This example never changes the value but it is
  // possible to modify it in the json file after
  // the first run.
  Config::Instance->Store( gMessageItem );

  return 0;
}

When you run this the first time, the output is as expected: “Hello World!”. Additionally, the executable will create the file “HelloWorld.json” with the following contents:

{
  "Registry" :
  [
    {
      "Name"  : "HelloWorld&#092;/Message",
      "Value" : "Hello World!"
    }
  ]
}

If you edit the value string in the JSON file to be “Goodbye World!” and rerun the example, the output will be changed to the new string. The default value is overwritten by the value read from the configuration file. This is not in itself all that useful, but it does show the basics of using the system.

Auto Initialization and Macros


In order to ease the usage of the configuration system there is a utility class and a set of macros. Starting with the utility class, we can greatly simplify the global configuration item. Rewrite the example as follows:

#include <Config/Config.hpp>
#include <string>
#include <iostream>

std::string gMessage( "Hello World!" );
Config::InitializerList gMessageItem( "HelloWorld/Message", gMessage );


int main( int argc, char** argv )
{
  Config::Initializer  configInit( "HelloWorld.json" );

  std::cout << gMessage;

  return 0;
}

The InitializerList class works with any global or static item and automates the initialization and storage of the item. This system uses a safe variation of static initialization in order to build a list of all items wrapped with the InitializerList class. When the configuration initializer is created and the configuration is loaded, items in the list are automatically configured. At shutdown, the configuration data is updated from current values and as such the user does not need to worry about the global and static types when the InitializerList is in use.

Note:  
Using the static initializer from a static library in release builds will generally cause the object to be stripped as it is not directly referenced. This means that the item will not be configured in such a scenario. While this can be worked around, it is not currently done in this implementation. If you require this functionality before I end up adding it, let me know and I’ll get it added.


A further simplification using macros is also possible. The two lines defining the variable and wrapping it with an initializer list are helpfully combined into the CONFIG_VAR macro. The macro takes the type of the variable, the name, the key to be used in the registry and the default starting value. The macro expands identically to the two lines and is not really needed, but it does make things more readable at times.

Scoped Configuration


Other forms of configuration such as local scoped variables and members can be defined in similar manners to the global items. Using the InitializerList class is safe in the case of locals and members as it will initialize from the registry on creation and of course store to the registry on destruction. The class automatically figures out if the configuration is loaded and deals with the referenced item appropriately. So, for instance the following addition to the example works as intended:

#include <Config/Config.hpp>
#include <string>
#include <iostream>

CONFIG_VAR( std::string, gMessage, "HelloWorld/Message", "Hello World!" );


int main( int argc, char** argv )
{
  Config::Initializer  configInit( "HelloWorld.json" );

  CONFIG_VAR( int32_t, localVar, "HelloWorld/localVar", 1234 );

  std::cout << gMessage << " : " << localVar;

  return 0;
}

The currently configured message will be printed out followed by “: 1234” and the configuration JSON will reflect the new variable. Changing the variable in the configuration file will properly be reflected in a second run of the program and if you changed the value within the program it would be reflected in the configuration file.

Class Member Configuration


Configuring classes using the system is not much more difficult than using globals, the primary difference is in splitting the header file declaration from the implementation initialization and adding some dynamic key building abilities if appropriate. Take the following example of a simple window class:

class MyWindow
{
public:
  MyWindow( const std::string& name );

private:
  const std::string mName;
  Math::Vector2i    mPosition;
  Math::Vector2i    mSize;
};

MyWindow::MyWindow( const std::string& name )
:  mName( name )
,  mPosition( Math::Vector2i::Zero() )
,  mSize( Math::Vector2i::Zero() )
{
}

In order to add configuration persistence to this class simply make the following modifications:

class MyWindow
{
public:
  MyWindow( const std::string& name );

private:
  const std::string mName;
  CONFIG_MEMBER( Math::Vector2i,    mPosition );
  CONFIG_MEMBER( Math::Vector2i,    mSize );
};

MyWindow::MyWindow( const std::string& name )
:  mName( name )
,  CONFIG_INIT( mPosition, name+"/Position", Math::Vector2i::Zero() )
,  CONFIG_INIT( mSize, name+"/Size", Math::Vector2i::Zero() )
{
}

Each differently named window will now have configuration data automatically initialized from and stored in the configuration registry. On first run, the values will be zero’d and after the user moves the windows and closes them, they will be properly persisted and restored next use.

Once again, the macros are not required and are simply a small utility to create the specific type instance and the helper object which hooks it to the configuration system. While it would be possible to wrap the actual instance item within the configuration binding helpers and avoid the macro, it was preferable to leave the variables untouched so as not to affect other pieces of code. This was a tradeoff required to prevent intrusive behavior when converting items to be configured.

Adding New Types


Adding new types to the configuration system is intended to be fairly simple. It is required to add a specialized template class for your type and implement three items: the constructor, a load and save function. The following structure will be serialized in the example:

struct MyStruct
{
  int32_t     Test1;
  uint32_t    Test2;
  float       Test3;
  std::string Test4;
};

While prior examples only dealt with single types, it is quite simple to deal with composites such as this structure given the underlying nature of the JSON implementation used for serialization; the outline of the implementation is as follows:

#include <Config/Serializers.hpp>

namespace Config
{
  template<>
  struct Serializer< MyStruct > : public Config::Item
  {
    Serializer( const std::string& key ) : Item( key )    {}

   protected:
    bool _Load( MyStruct& ms, const JSONValue& inval );
    JSONValue* _Save( const MyStruct& inval );
  };
}

That is everything you need to do to handle your type, though of course we need to fill in the _Load and _Save functions which is also quite simple. The _Load function is:

inline bool Serializer< MyStruct >::_Load( MyStruct& ms, const JSONValue& inval )
{
  if( inval.IsObject() )
  {
    const JSONObject& obj = inval.AsObject();
    ms.Test1 = (int32_t)obj.at( L"Test1" )->AsNumber();
    ms.Test2 = (uint32_t)obj.at( L"Test2" )->AsNumber();
    ms.Test3 = (float)obj.at( L"Test3" )->AsNumber();
    ms.Test4 = string_cast< std::string >( obj.at( L"Test4" )->AsString() );
    return true;
  }
  return false;
}

Obviously this code does very little error checking and can cause problems if the keys do not exist. But other than adding further error checks, this code is representative of how easy the JSON serialization is in the case of reading value data. The save function is just as simplistic:

inline JSONValue* Serializer< MyStruct >::_Save( const MyStruct& inval )
{
  JSONObject obj;
  obj[ L"Test1" ] = new JSONValue( (double)inval.Test1 );
  obj[ L"Test2" ] = new JSONValue( (double)inval.Test2 );
  obj[ L"Test3" ] = new JSONValue( (double)inval.Test3 );
  obj[ L"Test4" ] = new JSONValue( string_cast< std::wstring >( inval.Test4 ) );
  return new JSONValue( obj );
}

This implementation shows just how easy it is to implement new type support thanks to both the simplicity of the library requirements and the JSON object serialization format in use.

Note:  
The JSON library used works with L literals or std::wstring by default, the string_cast functions are simple helpers to convert std::string to/from std::wstring. These conversions are not code page aware or in anyway safe to use with real unicode strings, they simply trim/expand the width of the char type since most of the data in use is never intended to be presented to the user.


The Tweak UI


As mentioned in the usage overview, the UI for tweaking configuration data is currently incorporated into the beginnings of a game application called XO. The following image shows a sample of configuration display, some debugging utility panels and a little test of the UI library I incorporated into the example. While this discussion may seem related to the configuration system itself, that is only a side affect of both systems going together. There is no requirement that the panels refer only to data marked for persistence, the tweak UI can refer to any data persisted or not. This allows hooking up panels to debug just about anything you could require.


Attached Image: TweakPanels.jpg


The ‘Debug Panel’ is the primary panel which shows the current position and size of the application window, if the window is fullscreen or not and the fullscreen mode selection if you wish to change to fullscreen. Below that basic information are buttons which allow you to toggle open or closed the ‘UI Debugger’ and the ‘Joystick Debugger’ panels. The panels are also integrated into the configuration system such that they remember their display state, position and size information. And finally, if compiled with the CMake controlled value ENABLE_DEVBUILD turned off, all of the debugging windows compile out of the build removing reliance on the AntTweakBar library.

The panels are simply examples and won’t be discussed. How to create your own panels and hook them up will be gone over briefly in the remainder of the article.

A Basic Panel


Creating a basic debug panel and hooking it up for display in the testbed is fairly easy, though it uses a form of initialization not everyone will be familiar with. Due to the fact that AntTweakBar provides quite a number of different settings and abilities, I found it preferable to wrap up the creation in a manner which does not require a lot of default arguments, filling in structures or other repetitive details. The solution is generally called chained initialization which looks rather odd at first but can reduce the amount of typing in complicated initialization scenarios. Let’s create a simple empty panel in order to start explaining chaining:

TweakUtils::Panel myPanel = TweakUtils::Panel::Create( "My Panel" );

If that were hooked into the system and displayed it would be a default blue colored panel with white text and no content. Nothing too surprising there, but let’s say we want to differentiate the panel for quick identification by turning it bright red with black text. In a traditional initialization system you would likely have default arguments in the Create function which could be redefined. Unfortunately given the number of options possible in a panel, such default arguments become exceptionally long chains. Consider that a panel can have defaults for position, size, color, font color, font size, iconized or not, and even a potential callback to update or read data items it needs to function; the number of default arguments gets out of hand. Chaining the initialization cleans things up, though it looks a bit odd as mentioned:

TweakUtils::Panel myPanel = TweakUtils::Panel::Create( "My Panel" )
  .Color( 200, 40, 40 )
  .DarkText();

If you look at the example and say “Huh???”, don’t feel bad, I said the same thing when I first discovered this initialization pattern. There is nothing really fancy going on here, it is normal C++ code. Color is a member function of Panel with the following declaration:

Panel& Color( uint8_t r, uint8_t g, uint8_t b, uint8_t a=200 );

Because Panel::Create returns a Panel instance, the call to Color works off the returned instance and modifies the rgba values in the object, returning a reference to itself which just happens to be the originally created panel instance. DarkText works off the reference and modifies the text color, once again returning a reference to the original panel instance. You can chain such modifiers as long as you want as long as they all return a reference to the panel. At the end of the chain, the modified panel object is assigned to your variable with all the modifications in place. When you have many possible options, this chaining is often cleaner than definition structures or default arguments. This is especially apparent with default arguments where you may wish to add only one option but if that option were at the end of the defaults, you would have to write all the intermediates just to get to the final argument.

Adding a Button


With the empty panel modified as desired, it is time to add something useful to it. For the moment, just adding a simple button which logs when it is pressed will be enough. Adding a button also uses the initializer chaining though there is one additional requirement I will discuss after the example:

TweakUtils::Panel myPanel = TweakUtils::Panel::Create( "My Panel" )
  .Color( 200, 40, 40 )
  .DarkText();
  .Button( "My Button", []{ LOG( INFO ) << "My Button was pressed."; } ).End();

Using a lambda as the callback for button press, we simply log event. But you may be wondering what the End function is doing. When adding controls to the panel the controls don’t return references to the panel, they return references to the created control. In this way, if it were supported, you could add additional settings to the button such as a unique color. The initialization chain would affect the control being defined and not the panel itself even if the functions were named the same. When you are done setting up the control, End is called to return the owning Panel object such that further chaining is possible. So, adding to the example:

static uint32_t sMyTestValue = 0;
TweakUtils::Panel myPanel = TweakUtils::Panel::Create( "My Panel" )
  .Color( 200, 40, 40 )
  .DarkText();
  .Button( "My Button", []{ LOG( INFO ) << "My Button was pressed."; } ).End()
  .Variable< uint32_t >( "My Test", &someVariable ).End();

Adds an editable uint32_t variable to the panel. Panel variables can be most fundamental types, std::string and the math library Vector2i, Vector3f and Quaternionf types. With the Vector3f and Quaternionf types, AntTweakBar displays a graphical representation of direction and orientation respectively which helps when debugging math problems. Further and more detailed examples exist in the XO application within the repository.

Note:  
The current implementation of the TweakUI is fairly preliminary which means that it is both dirty and subject to rapid change. As with the configuration system, it gets the required job done but it is missing some features which would be nice to have.

An additional note, in order to prevent direct dependencies, the Vector and Quaternion types are handled in a standalone header. If you do not desire them, simply do not include the header and there will be no dependencies on the math library.


Adding a Panel to the Screen


Adding a panel to the system can be done in a number of ways. The obvious method is to create a panel, hook up a key in the input processing and toggle it from there. This is perfectly viable and is in fact how the primary 'Debug Panel’ works. I wanted something a little easier though and as such I added a quick (and dirty) panel management ability to the application framework itself. The function RegisterPanel exists in the AppWindow class where you can hand a pointer to your panel over and it will be added to the ‘Debug Panel’ as a new toggle button. At the bottom of the ‘Debug Panel’ in the screen shot, you see the ‘Joystick Debugger’ button, that button is the result of registering the panel in this manner. It is a quick and simple way to add panels without having to bind specific keys to each panel.

Note:  
Currently the 'Debug Panel' is bound to the F5 function key and all panels default to hidden. Pressing F5 will open/close the panel, which the first time will be very small in the upper left corner. Move it, resize it and exit the application. The next run it will be shown or not at the location and size of the last exit.

Additionally worth noting, the current panel creation may change to better integrate with other sections of code. The chained initialization is likely to remain unchanged but the returned types may be modified a bit.


Conclusion


This article provides a brief overview of the configuration system I am using in my open source testbed tutorials project. It is not a perfect solution, nor is it actually intended to be. It sets out to solve a couple fairly simple goals with a few less-common items thrown in, all without trying to be 100% complete for every possible usage. Only currently in-use items are fairly well tested and debugged and additions will be made only as needed or requested.

The supplied tweak UI is a good starting point until such time as you have your own UI items such as graphics and sound options. Even after such items exist, the live tweak abilities of the debug panels are highly useful since a panel can be added quite quickly to test modified values during live gameplay.

Of course, it is always important to reiterate that the code is live and undergoing modifications continually. Some of the information presented here may be out of date (and eventually updated) but hopefully with the overview it won’t be too far off.

Case Study: Bomberman Mechanics in an Entity-Component-System

$
0
0
The Bomberman series of games are simple games with an interesting set of mechanics. Having used an ECS framework in a few projects, I thought it would be useful to see how we can implement these mechanics using this pattern.

I won't go into a detailed introduction of ECS here. For a great primer on the topic, have a look at Understanding Component-Entity-Systems.

I also provide a working game that contains the bulk of the PvP core mechanics, and look at what value ECS provided us (and where there is room for improvement). The game leverages ECS in lots of other ways, but for the purpose of this article I will only discuss the core game mechanics.

For the purposes of clarity and language-independence, code samples in the article will be a sort of pseudo-code. For the full C# implementation, see the sample itself.

Also, I use bold capitalized names to refer to components. So a Bomb refers to the official component, while if I mention a bomb I'm just talking about the concept or the entity that represents the concept.

Let's get to work


Before designing any system, it's necessary to understand the scope of the problem you're trying to solve. This means listing out all the interactions between various game objects. From there, we can figure out the right abstractions to use. Of course, knowing all the interactions is impossible if your game is under development - or even if you're trying to make a clone - because there will be things you missed at first. One of the advantages of ECS is that it lends itself to making changes as needed while affecting a minimum of other code.

A rough summary of the PvP Bomberman gameplay is as follows. Players plant bombs that destroy other players and disintegrate blocks. Disintegrated blocks leave behind various powerups that augment the destructive power of your bombs, or affect player speed. Players complete to see who is the last to survive as a clock counts down to total destruction.

Without further ado, let's look into the basic bomb mechanics Bomberman and come up with a design we can implement using the ECS pattern.

Explosions


Attached Image: Impacts123.jpg
Explosion showing behavior with (1) hard blocks, (2) soft blocks, and (3) empty space


When a bomb explodes, the explosion shoots out in various directions. The following things can happen:
  • "Hard blocks" block the path of the explosion
  • "Soft blocks" block the path of the explosion (usually), and are destroyed; they randomly reveal a powerup
  • Un-triggered bombs will detonate
  • Any players hit by the explosion will die


Attached Image: ChainReaction.jpg
One bomb's explosion can trigger another bomb


It seems there are two concepts here: how a particular object reacts to the explosion (dies, triggers, disintegrates), and how a particular object affects the path of the explosion (blocks it, or doesn't).

We can create an ExplosionImpact component to describe this. There are only a few ways an object can affect the path of the explosion, but many ways it can then react. It's doesn't make sense to describe the myriad ways an object can react to an explosion in a component, so we'll leave that up to a custom message handler on each object. So ExplosionImpact might look like this:

enum ExplosionBarrier
{
    None = 0,
    Soft = 1,
    Hard = 2,
}
class ExplosionImpact : Component
{
    ExplosionBarrier Barrier;
}

That's pretty simple. Next, let's look at the innate properties of an explosion. This basically depends on the type of the bomb. But it's useful to distinguish bombs vs explosions, since bombs have additional properties like a countdown timer and an owner.

Explosions can:
  • propagate any or all of 8 directions
  • sometimes propagate through soft blocks (pass-through bombs, which have blue explosions)
  • different propagation ranges (or an infinite range)
  • sometimes propagate through hard blocks!


Attached Image: InfiniteRange.jpg
Power Bomb or Full Fire gives bombs infinite range


There are two obvious ways to model an explosion. You could have a single entity for an explosion, or an entity for each piece of the explosion as it propagates out (Bomberman is grid-based, so the latter is feasible). Given that an explosion can propagate unevenly depending on what it hits (as previously discussed), it would be somewhat tricky to represent with a single entity. It seems then, that one entity per explosion square would be reasonable. Note: this may make it seem tricky to render a cohesive image of an explosion to the screen, but you'd actually have a similar problem if your explosion was a single entity. A single entity would still need a complicated way to describe the shape of the overall explosion.


Attached Image: SquareBomb.jpg
Dangerous Bombs explode in a square instead of a line


So let's take a stab at an Explosion component:

class Explosion : Component
{
    bool IsPassThrough;         // Does it pass through soft blocks?
    bool IsHardPassThrough;     // Does it pass through hard blocks?
    int Range;                  // How much further will it propagate?
    PropagationDirection PropagationDirection;
    float Countdown;            // How long does it last?
    float PropagationCountdown; // How long does it take to propagate to the next square?
}

enum PropagationDirection
{
    None        = 0x00000000,
    Left        = 0x00000001,
    UpperLeft   = 0x00000002,
    Up          = 0x00000004,
    UpperRight  = 0x00000008,
    Right       = 0x00000010,
    BottomRight = 0x00000020,
    Bottom      = 0x00000040,
    BottomLeft  = 0x00000080,
    NESW        = Left | Up | Right | Bottom,
    All         = 0x000000ff,
}

Of course, since we're using ECS, things like position and the explosion image are handled by other components.

I've added two more fields to the Explosion component that bear some mentioning: Countdown represents how long an explosion lasts. It's not an instant in time - it lasts a short duration, during which a player can die if they walk into it. I also added a PropagationCountdown. In Bomberman, from what I can tell, explosions propagate instantaneously. For no particular reason, I've decided differently.

So how does this all tie together? In an ECS, systems provide the logic to manipulate the components. So we'll have an ExplosionSystem that operates over the Explosion components. You can look at the sample project for the entire code, but let's briefly outline some of the logic it contains. First of all, it's responsible for propagating explosions. So for each Explosion component:
  • Update Countdown and PropagationCountdown
  • If Countdown reaches zero, delete the entity
  • Get any entities underneath the explosion, and send them a message telling them they are in an explosion
  • If PropagationCountdown reaches zero, create new child explosion entities in the desired directions (see below)
ExplosionSystem also contains the propagation logic. It needs to look for any entities underneath it with an ExplosionImpact component. Then it compares the ExplosionImpact's ExplosionBarrier with properties of the current Explosion (IsHardPassThrough, etc...) and decides if it can propagate and in what directions. Any new Explosions have one less Range, of course.

Powerups


Next, we'll trace the path from collecting powerups to the player dropping bombs. I've used a subset of 12 of the typical Bomberman powerups (I've left out the ones that let you kick, punch and pick up bombs - I didn't have time to implement them for this article, but it could be a good follow-up). As before, let's look at our scenarios - what the powerups can do - and come up with a design.
  • Bomb-Up: Increase by one the number of simultaneous bombs the player can place
  • Fire-Up: Increase the blast radius (propagation range) of the bombs' explosions
  • Speed-Up: Increase player speed
  • (the above three also have "Down" versions)
  • Full-Fire: Bombs have infinite range (except when combined with Dangerous-Bomb)
  • Dangerous Bomb: Blast expands in a square, and goes through hard blocks
  • Pass-Through Bomb: Blast propagates through soft blocks
  • Remote Bomb: Bombs only detonate when you trigger them
  • Land Mine Bomb: Your first bomb only detonates when someone walks over it
  • Power Bomb: Your first bomb has infinite range (like Full-Fire but only for the first bomb)


Attached Image: PowerUps.jpg
Various powerups that have been revealed under disintegrated soft blocks


You'll see that while most powerups affect the kinds of bombs you place, they can also affect other things like player speed. So powerups are different concepts than bombs. Furthermore, powerups are not exclusive, they combine. So if you have a couple of Fire-Ups with a Dangerous Bomb, you get a bomb that explodes in a bigger square.


Attached Image: PassThrough.jpg
Pass-Through bombs propagate through soft blocks.


So essentially the player has a set of attributes that indicate what kinds of bombs they can place. The powerups modify those attributes. Let's take a stab at what a PlayerInfo component would look like. Keep in mind, this won't contain information like position, current speed or texture. That information exists in other components attached to the player entity. The PlayerInfo component, on the other hand, contains information that is specific to the player entities in the game.

class PlayerInfo : Component
{
    int PlayerNumber;	// Some way to identify the player - this could also be a player name string
    float MaxSpeed;
    int PermittedSimultaneousBombs;
    bool FirstBombInfinite;
    bool FirstBombLandMine;
    bool CanRemoteTrigger;
    bool AreBombsPassThrough;
    bool AreBombsHardPassThrough;
    int BombRange;
    PropagationDirection BombPropagationDirection;
}

When a player drops a bomb, we look at its PlayerInfo component to see what kind of bomb we should drop. The logic to do so is a bit complicated. There are lots of conditionals: for instance, Land Mine bombs look different than Dangerous Bombs that explode in all directions. So when you have a Land Mine that's also a Dangerous Bomb, what texture is used? Also, Power Bombs powerups give us infinite BombRange, but we don't want an infinite range when the bomb propagates in all directions (or else everything on the board will be destroyed).

So there can be some fairly complex logic here. The complexity arises from the nature of the Bomberman rules though, and not from any problem with code. It exists as one isolated piece of code. You can make changes to the logic without breaking other code.

We also need to consider how many bombs the player currently has active (undetonated): we need to cap how many they place, and also apply some unique attributes to the first bomb they place. Instead of storing a player's current undetonated bomb count, we can just calculate how many there are by enumerating through all Bomb components in the world. This avoids needing to cache an UndetonatedBombs value in the PlayerInfo component. This can reduce the risk of bugs caused by this getting out of sync, and avoids cluttering the PlayerInfo component with information that happens to be needed by our bomb-dropping logic.

With that in mind, let's take a look at the final piece of our puzzle: the bombs.

class Bomb : Component
{
    float FuseCountdown;  // Set to float.Max if the player can remotely trigger bombs.
    int OwnerId;		  // Identifies the player entity that owns the bomb. Lets us count
    					  // how many undetonated bombs a player has on-screen
    int Range;
    bool IsPassThrough;
    bool IsHardPassThrough;
    PropagationDirection PropagationDirection;
}

Then we'll have a BombSystem that is responsible for updating the FuseCountdown for all Bombs. When a Bomb's countdown reaches zero, it deletes the owning entity and creates an new explosion entity.

In my ECS implementation, systems can also handle messages. The BombSystem handles two messages: one sent by the ExplosionSystem to entities underneath an explosion (which will trigger the bomb so we can have chain reactions), and one sent by the player's input handler which is used for remotely triggering bombs (for remote control bombs).

One thing you'll notice is that the Explosion, Bomb and Player components share a lot in common: range, propagation direction, IsPassThrough, IsHardPassThrough. Does this suggest that they should actually all be the same component? Not at all. The logic that operates over those three types of components is very different, so it makes sense to separate them. We could create a BombState component that contains the similar data. So an explosion entity would contain both an Explosion component and a BombState component. However, this just adds extra infrastructure for no reason - there is no system that would operate only over BombState components.

The solution I've chosen is just to have a BombState struct (not a full on Component), and Explosion, Bomb and PlayerInfo have this inside them. For instance, Bomb looks like:

struct BombState
{
    bool IsPassThrough;
    bool IsHardPassThrough;
    int Range;
    PropagationDirection PropagationDirection;
}

class Bomb : Component
{
    float FuseCountdown;  // Set to float.Max if the player can remotely trigger bombs.
    int OwnerId;          // Identifies the player entity that owns the bomb. Lets us count
                          // how many undetonated bombs a player has on-screen
    BombState State;
}

One more note on players and bombs. When a bomb is created, it inherits the abilities of its player at the time it is placed (Range, etc...) instead of referencing the player abilities. I believe the actual Bomberman logic might be different: if you acquire a Fire-Up powerup, it affects already-placed bombs. At any rate, it was an explicit decision I made that I was felt was important to note.


Attached Image: Killed.jpg
A soft block is no protection against a Pass-Through bomb (spiked)


Let's finally talk about the powerups themselves. What do they look like? I have a very simple PowerUp component:

class PowerUp : Component
{
    PowerUpType Type;
    int SoundId;          // The sound to play when this is picked up
}

PowerUpType is just an enum of the different kinds of powerups. PowerUpSystem, which operates over PowerUp components and controls picking them up, just has a large switch statement that manipulates the PlayerInfo component of the entity that picked it up. Oh the horror!

I did consider having different message handlers attached to each powerup prefab which contained the custom logic for that particular powerup. That is the most extensible and flexible system. We wouldn't even need a PowerUp component or PowerUpSystem. We'd simply define a "a player is colliding with me" message which would be fired and picked up by the custom powerup-specific message handler. This really seemed like over-architecting to me though, so I went with a simpler quicker-to-implement choice.

Here's a little snippet of the switch statement where we assign the player capabilities based on the powerup:

    case PowerUpType.BombDown:
		player.PermittedSimultaneousBombs = Math.Max(1, player.PermittedSimultaneousBombs - 1);
    	break;
    
    case PowerUpType.DangerousBomb:
    	player.BombState.PropagationDirection = PropagationDirection.All;
    	player.BombState.IsHardPassThrough = true;
    	break;

Prefabs


My ECS allows you to construct entity templates, or prefabs. These assign a name to a template (e.g. "BombUpPowerUp"), and associate with it a bunch of Components and their values. We can tell our EntityManager to instantiate a "BombUpPowerUp", and it will create an Entity with all the right Components.


Attached Image: Prefabs.jpg
Visual representation of various prefabs


I think it would be useful to list some of the prefabs I use for the Bomberman clone. I won't go into details on the values used in each; I'll simply list which Components each type of entity uses, with some comments where useful. You can look at the source code for more details. These are just examples of prefabs - e.g. in the actual game there are multiple types of Brick (SoftBrick, HardBrick) with different values in their components.

"Player"
    Placement
    Aspect
    Physics
    InputMap           // controls what inputs control the player (Spacebar, game pad button, etc...)
    InputHandlers      // and how the player reacts to those inputs (DropBomb, MoveUp)
    ExplosionImpact
    MessageHandler
    PlayerInfo

"Brick"
    Placement
    Aspect
    Physics
    ExplosionImpact
    MessageHandler     // to which we attach behavior to spawn powerups when a brick is destroyed

"Bomb"
    Placement
    Aspect
    Physics
    ExplosionImpact
    MessageHandler
    ScriptContainer    // we attach a script that makes the bomb "wobble" 
    Bomb

"Explosion"
    Placement
    Aspect
    Explosion
    FrameAnimation     // this one lets us animation the explosion image

"PowerUp"
    Placement
    Aspect
    ExplosionImpact
    ScriptContainer
    PowerUp

Interesting Points


An ECS also gives you great flexibility at creating new types of entities. It makes it easy to say "hey, what if I combine this with that?". This can be good for brainstorming new kinds of mechanics. What if you could take control of a bomb? (Add InputMap to a bomb entity). What if explosions could cause other players to slow down? (Add PowerUp to an explosion entity). What if explosions were solid? (Add Physics to an explosion entity). What if a player could defect an explosion back towards someone? (A little bit of logic to add, but still pretty trivial).

You'll find that it is very easy to experiment and add new code without breaking other things. The dependencies between components are (hopefully) clear and minimal. Each pieces of code operates on the absolute minimum it needs to know.

Of course, I also faced some problems in this little project.

I decided to use the Farseer Physics library to handle collision detection between the player and other objects. The game is grid-based, but the player can move on a much more granular level. So that was an easy way to get that behavior without having to do much work. However, a lot of the gameplay is grid-based (bombs can only be dropped at integer locations, for instance). So I also have my own very simple grid collision detection (which lets you query: "what entities are in this grid square?"). Sometimes these two methods came into conflict. This problem isn't anything specific to ECS though. In fact, ECS ecnourages my usage of Farseer Physics to be entirely limited to my CollisionSystem (which operates over Physics components). So it would be very easy to swap out the physics library with another and not have it affect any other code. The Physics component itself has no dependency on Farseer.

Another problem I faced is that there is a tendency to make certain problems fit into the ECS way of thinking. One example is the state needed for the overall game: the time remaining, the size of the board, and other global state. I ended up creating a GameState component and an accompanying GameStateSystem. GameStateSystem is responsible for displaying the time remaining, and determining who won the game. It seems a bit awkward to cram it into the ECS framework - it only ever makes sense for there to be one GameState object. It does have some benefits though, as it makes it easier to implement a save game mechanic. My Components are required to support serialization. So I can serialize all entities to a stream, and then deserialize them and end up exactly back where I was.

One decision that I often faced was: "Do I make a new Component type for this, or just attach a script for custom behavior?" Sometimes it is a fairly arbitrary decision as to whether a piece of logic merits its own Component and System or not. A Component and System can feel a bit heavyweight, so it is definitely essential to have the ability to attach custom behavior to entities. This can make it harder to grok the whole system though.

I currently have 3 ways of attaching custom behavior to an entity: input handlers, message handlers and scripts. Scripts are executed every update cycle. Input and message handlers are invoked in response to input actions or sending messages. I was trying out a new input handler methodology for this project. It worked well (but it might make sense to combine it with message handling). I was using the keyboard to control the player. When it came time to implement gamepad support, it took all of five minutes. I was inspired by this article.


Attached Image: Diagram.jpg
A powerup entity (generic container) is defined by its components: Placement, Aspect, ExplosionImpact, ScriptContainer and PowerUp. ScriptContainer allows attaching scripts for custom behavior. In this case, a wiggle script is responsible for wiggling the powerup around.


Scripts often need to store state. For instance, a script that makes a powerup wiggle, or a bomb entity wobble (by changing the Size property in its Aspect component) needs to know the minimum and maximum sizes, and what point we are in the wobble progression. I could make scripts full-fledged classes with state, and instantiate a new one each each entity that needs it. However, this causes problems with serialization (each script would need to know how to serialize itself). So in my current implementation, scripts are simply callback functions. The state they need is stored in a generic property bag in the Scripts component (the Scripts component simply stores a list of ids that are mapped to a specific callback function). This makes the C# script code a little cumbersome, as each get and set of a variable is a method call on the property bag. At some point, I plan to support a very simple custom scripting language with syntactic sugar to hide the ugliness. But I haven't done that yet.

Conclusion


Theory is nice, but I hope this article helped with showing a practical implementation of some mechanics with ECS.

The sample project attached is implemented in XNA 4.0. In addition to the mechanics described in this article, it shows some other things which might be interesting:
  • How I handle animating the components like explosions
  • The input mapping system I briefly described above
  • How I handle querying objects at a particular grid location
  • How little things like the bomb wobble or land mine rise/fall is done
I didn't have time to implement AI players in the sample, but there are 3 human-controllable characters. Two of them use the keyboard: (arrow keys, space bar and enter) and (WASD, Q and E). The third uses the gamepad, if you have that. It should be possible to implement a mouse-controlled player without too much work.


Attached Image: DeathBlocks.jpg
When time runs out, death blocks appear...


The sample features 12 full-functioning powerups (some of the more powerful ones appear too frequently though), random soft blocks, and the "death blocks" that start appearing when time is running out. Of course, a lot of polish is missing: the graphics are ugly, there is no death animation or player walking animation. But the main focus is on the gameplay mechanics.

Article Update Log


24 May 2013: Initial draft

The Shaming of Pac-Man: A Remake of the Classic From the 80's With A Beginner Friendly Class Framework

$
0
0

In this long titled article, I will address two things:

Firstly, I will present my Pac-Man remake that I prepared for the themed article contest of May. Following a brief technical overview and highlight of some code items of extra interest I will adress the part that was most fun to me: The storyline I added to the game.

Secondly, I will present in a semi-detailed overview the class structure that I used to make the game. This section is intended for beginner game programmers that may be a bit confused as to how to piece together their knowledge about animations and game loops and drawing to the screen into a finished, small, solid, game.


My Pac-Man remake


To start off with: The finished game is available at www.mrbenterprises.eu/PacMan . It is based on JavaScript/HTML5. I would recommend you try it with Chrome on Debian or Windows if you can't get it to run, since those are combinations I have successfully run the game on.

Apart from the new story and the cut scenes and the space trucker persona I decided to give Pac-Man, the gameplay is a subset of the original Pac-Man described in detail in the excellent Pac-Man dossier by Jamey Pittman. Due to time running out I had to cut some aspects – in my version the ghosts only have the chase state, there are no power-ups (and thus no ghosts can “die”) and the spawning mechanism of the ghosts is a bit different. I also had to cut several cool things that I had in mind (teleport animation and ship energy core graphics, for example... sad!).

What is identical though is the AI of the ghosts (minus a bug that was apparently part of the original), the ghosts and pacman graphics, and the tileset should be more or less identical as well.


Some cool technical details


While there are lots of things to mention, there are three things I felt particularly good about.

  1. I sort of really nailed MVC for the GameObjects. And letting the container class inherit the model class and pass itself to the view and controller was such a convenience.
  2. The base for the graphics is not data in any image format, but arrays holding the pixel on/off info. So one could say that the game has vector graphics, scalable to any size. The graphics scale is set at the start of the game and distributed to every entity. I included a configuration option for people to try out different settings in case of tiny/large screens.
  3. The ghosts are exactly the same except for their color, obviously, and their target tile acquiring component which is set at instantiation by the GhostFactory. It felt really good getting down a sort of component-based approach to the design in such a neat way.

The (added) story line


For me, the most fun in making games is the world and story creation, and hopefully leaving the gamer in a state of emotionally exhausted awe* at the epic end screen. As such I felt that just making a Pac-Man clone with reproduced gameplay mechanics would be bland. Early on I tried to come up with a different take on the whole thing, and decided on making Pac-Man an irritating, immoral douchebag space trucker, whose interest in his fellow xenomorph is decided on the basis of the profit he can make off of looting the unfortunate alien in question.

* Who can hold back a tear of grief when in the win scene the stars drift slowly by, underlining the feeling of sadness and doom of the remnants of the ghost species.

Further, the usual Pac-Man map is, of course, a spaceship, and the ghosts are members of an alien species whose home world is dying. Their millenia-old search for a better life is put to hard test when Pac-Man enters the scene.

All in all, I thought it could all be a nice lesson on the dire consequences of non-sustainable living and wasting others' resources.


My Beginner-Friendly Game Dev Class Framework


In this section I present the system of classes I used to make my Pac-Man game. The text is aimed at beginners who could use a focusing point for their first somewhat bigger (relative to previous projects) game.


Our goal


We want an ordered system that is easy to understand and that will enable easily going from, say, the loading screen to the title screen. We also want to be able to handle user input and draw to the screen, animate objects and route user input correctly.

In addition, of course (?), we want a diversity of things moving on the screen. We want a VampireSnail that eerily stalks its prey in the dark of the midnight hours, but also a FriendlySnail that cares for the well being of the player and offers health potions at opportune time. Or maybe a... HockeyPlayer, or something, if you're into the weirder kind of stuff.


Our way: The system


What I made to be able to have all of the above, is a system that is made up of four classes: The Game, the Scenehandler, the Scene, and the GameObject classes. Let's look at these classes in detail and take note of their functionality.

Note:  I describe the classes part in words, and part in a made-up computer language. So bear in mind that you might have to do some detective work to translate the different code bits into your own language of choice. In fact, you should view the code samples as sketchy code showing the important aspects of the class rather than the precise implementation.


The classes


The Game class

The Game class is the top level class and, chronologically speaking, would be the first thing we create in the code. Ideally we want the whole game to work automagically just by the simple line


Game g = new Game();

Possibly with the addition of

g.start();

The Game class is responsible for:

  1. Creating a Scenehandler
  2. Creating the first Scene in the game
  3. Adding the first Scene to the SceneHandler
  4. Entering a game loop or somehow setting up a piece of code to be called repeatedly

And, for each loop in the while loop:


  1. Getting input and distributing to the SceneHandler
  2. Calling update on the SceneHandler

So, in code the Game class could look something like the following.

Class Game()
{
	SceneHandler theSceneHandler = new SceneHandler();
	firstScene = new TheFirstSceneConstructor(theSceneHandler);
	theSceneHandler.addScene(firstScene);
	while(true)
	{
		input = getUserInputInSomeWay();
		sceneHandler.handleInput(input);
		sceneHandler.update();
		sleepSomeNumberOfMilliSeconds();
	}
}

What are the important bits to notice here?

First, the Game has a SceneHandler. It creates the first scene and gives it to the SceneHandler, but does not keep a reference to the first Scene. In this way, the Game does not have to know about later Scenes. It's okay for the Game class to know only about the first Scene, because as you will see below, a Scene can link itself to the next Scene, without the involvement of the Game class.

Secondly, as mentioned, the Game sets up a game loop and tells the SceneHandler about updates and input.

That was not so much, was it? Let's go on to the SceneHandler to further clarify the workings of the system.


The SceneHandler class

In short, the SceneHandler manages a list of Scenes, and has a number of comvenience functions added to it. Let's have a look at the code:


class SceneHandler()
{
	Array myScenes;

	function addScene(scene)
	{
		myScenes.add(scene); //push
	}

	function removeLastScene()
	{
		myScenes.removeLastAdded(); //pop
	}

	function update()
	{
		myScenes.getLastElement().update();
	}

	function handleInput(input)
	{
		myScenes.getLastElement().handleInput(input);
	}
}

As you can see, the main (and sort of only) point of the SceneHandler is that it has an array of Scenes. It also has functions to add a Scene to the last position of the array, and a function to remove the lastly added Scene.

An important thing to notice, though, is that the SceneHandler's update and handleInput functions call the corresponding functions on the last Scene added. So, the last Scene in the array has a certain role. It is the current Scene. We could even have added an extra property to the SceneHandler class called currentScene to emphasise this (and made sure that it was always the same as the last element in the array).

So using this setup, it means that only the current Scene gets input from the user and is notified of another cycle in the game loop.

With this simple class digested, we walk on to the Scenes themselves, where we start filling things with content.


The Scene class

The important points of the Scene are:


  1. To create and store objects (GameObjects)
  2. To tell the stored objects when its time to update and draw themselves
  3. To pass user input to the objects
  4. Enable searching for an object from outside the class
  5. To store a reference to the SceneHandler and make that, too, available to the objects.

In more words, we could also say that a Scene has an array of GameObjects. And when the Scene is created, it will fill its array of GameObjects with different objects, depending on what part of the game the Scene corresponds to (Options menu, title screen or main game screen, etc.). A very important aspect here, is that each GameObject will be given a reference to the Scene. This enables the objects to search for, remove and add new objects to the Scene! (by calling getObjects and manipulating the array).

Since the objects are given a reference to the Scene, and can ask the Scene for its SceneHandler, the objects can also change the current scene! So if, in the main game scene, your CollisionDetection object notices that TheHero is at the same tile as TheMonsterThatEatsHeroes, it easily switches to the more appropriate GameOverScene.

As game cycles pass, the Scene tells its objects when it's time to draw themselves to the screen and when it's time to update themselves. i.e, in the Scene update function, it loops over its objects and calls the update and draw functions of the objects. First the update function on all objects, and then the draw function of all objects. In the same manner, user input notifications are passed on from upper classes to the objects.

Let's look at some code, to hopefully straighten out remaining question marks.


class Scene(sceneHandler)
{
	SceneHandler theSceneHandler = sceneHandler;
	ArrayLikeClass myObjects;

	// Create cool objects and put in myObjects here

	GameObject theExampleObject = new ExampleObject(this);
	this.addObject(theExampleObject );

	function update()
	{
		foreach(object in myObjects)
		{
			object.update()
		}

		foreach(object in myObjects)
		{
			object.draw()
		}
	}

	function getObjects()
	{
		return	myObjects;
	}

	function getScenehandler()
	{
		return theSceneHandler;
	}

	function handleInput(input)
	{
		foreach(object in myObjects)
		{
			object.handleInput(input)
		}
	}

}

The GameObject class

The GameObjects are the Dragons, StrangeObelisks, Pencils, or whatever interesting things you want to have in your game. A GameObjects may even be an abstract thing like a Text or a GameOverTrigger.

There are some things the system demands that all GameObjects have in common:

The object needs to have functions for drawing and updating itself. It need not actually do something in those functions (although I guess most objects would), but it should have the functions so that they can be called. The drawing method for drawing itself to the screen, obviously, and the update method for AI considerations.

Another important thing, which is needed for the system to be as flexible as we want it to be, is that a specific object can be identified by having a tag (or an id if you will). The good thing about a tag is that it allows us to search for a particular object in a collection of several objects.

The reason that we want to search for a particular object is that one specific object might want to know something about another specific object. The WickedWolf, for example, would be interested in calling getPosition() on the object with the “LittleRedRidingHood” tag.

In essence, the tag functionality allows our objects to be interactive and reactive towards each other. Objects may take decisions or pathfind or cease to exists, etc, based on the status of other objects.

And as noted, since the gameObject has access to its parent Scene, it can remove or add objects, and also change the current Scene of the game completely through the Scenehandler.


class GameObject(scene)
{
	theScene = scene;
	myTag = 'someTagAppropriateToTheGameObject';

	// other variables that this object needs 

	function update()
	{
		// do something cool ? AI! Check for game over, search for sheep to eat, 
	}
	function draw()
	{
		// draw something that represents the view of this object (at this moment)
	}
	function handleInput()
	{
		// change something (or not) in the object depending on the input 
	}
}

Now, it's important to realize, and you've already done that of course, that the line saying “other variables that this object needs” contains a possible ton of different things depending on what you want the object to do. Maybe you want to have objects to have a position (yes). Then you have to add that upon construction, and change the position in the update function, and draw the object at different places depending on position in the draw function.


Summing up


I hope that some recognition of a usable pattern has formed in the reader's brain. Should my noob pedagogy have left questions lingering behind - feel free to contact me on my twitter, @NiklasBjornberg

Some final considerations


MVC pattern


Should you glance into the code of my Pac-Man project, you will find that the GameObjects are divided into even smaller classes too – namely Models, Views and Controllers. That is because I follow the Model-View-Controller pattern for the GameObjects. I find this a very powerful pattern, because it helps me to keep the code and data for the behavior (the controller part) of an object away from the code and data for drawing (the view part) an object and the model data. So all in all it helps to make things a lot less messy and facilitates changing parts without affecting other parts.


Diverse requirements among GameObjects


As you might have noted and pondered upon, in my system I propose that things like a GameOverTrigger or CollisionDetection be GameObjects and stored in the Scenes object array. This may pose some problems. For example, one object (WickedWolf comes to mind again) might want to examine the position of all the other objects. But this would mean, in the context of most languages and usual implementations, that all the objects in the object list has to implement a getPosition function, for example. In the generic problem statement, the expectations of one object affects all the other objects and forces them to have an interface that is possibly counterintuitive to their nature.


How do we solve this? Here are some ways, in order of level of genius:


  1. Introduce separate lists for each kind of objects.
  2. We really make all objects have an interface that answers to the demand of all the others. This might be okay in a small project with very similar GameObjects.
  3. Based upon tag, you select only the objects you are interested in and that should, by the tag value, live up to your expectations.
  4. Instead of just getting the property or calling the function you want, you make sure it is there first. Either by a language supported way or using some sort of component based approach (see last month's article winner! Seems really interesting.)

I would suggest the solution in item 4. But I guess that all except item 1 could be argued for.


Article Update Log


30 May 2013: Hello world!

Using C# Managed DLL's in UDK

$
0
0
The following article is similar to articles that I have posted on the UDK forums and in my blog. This article has been updated to use the latest version of Visual Studio Express and the latest version of the Unreal Development Kit.

To follow this article you will need a copy of the Unreal Development Kit and Visual Studio 2012 Express. If for some reason you are unable to use Visual Studio 2012 Express I will briefly talk about potential options near the end of this article.

This article will be using the February 2013 UDK Beta.

The problem


So you want to use the DLLBind feature of UDK in order to add capabilities that you need for your particular project. However what if you are not a C guru or are more comfortable with using a managed language? Well you could say "I will simply create my DLL in C#!" however that will prove problematic as the C# DLL will be using managed code which is far different from an unmanaged DLL (managed code is not a direct binary file but gets turned into IL and then there are issues with export tables and all sorts of other fun technical bits that you can read in a number of much better-worded articles).

Possible solutions


If we had access to the C++ code of UDK we could use various schemes to interopt with our DLL like PInvoke or Com interop, however we are stuck with the DLLBind mechanism that UDK provides to us. We need to work within the confines of what it expects and so we are left with a few options.

The first is to write two DLL files. One that is our managed DLL and then write a C/C++ wrapper DLL that allows it to interact with DLLBind. This solution is a big pain because then we are forced to use C/C++ anyway! It makes writing the DLL in C# very unappetizing.

The second is to dissemble the DLL into IL code and manually add a VTable/VTable Fixups. This is possible but a ton of work and can be a bit nerve-wracking (for instance now you must learn IL and hope you don't screw something up).

The third (and the option I will present in this tutorial) is to use a template to allow unmanaged DLL exports from C# (using an MSBuild task that automates a lot of the work for us).

Getting started


The first step is to create a new Visual C# Class Library project in Visual Studio 2012 Express. In the Name field enter UDKManagedTestDLL and click OK.


Attached Image: newproject.jpg


We will see a workspace that looks like the following:


Attached Image: projectcreated.jpg


The next step is that we need to acquire the Unmanaged Exports Template from Robert Giesecek. His template will automate a lot of the work necessary for allowing our C# dll to be used in UDK. Essentially it will provide unmanaged exports that we can then call in DLLBind!

Following the directions we go to Tools->Library Package Manager->Package Manager Console


Attached Image: packagemanagerconsole.jpg


Run the command in the console:

Install-Package UnmanagedExports


Attached Image: unmanagedexportsinstalled.jpg


A simple example


I started with a very simple test DLL to test the capabilities of the approach. Here is the C# code I used:

using System;
using System.Runtime.InteropServices;
using System.Collections.Generic;
using System.Text;
using RGiesecke.DllExport;

namespace UDKManagedTestDLL
{
    internal static class UnmanagedExports
    {
        [DllExport("GetGreeting", CallingConvention = CallingConvention.StdCall)]
        [return: MarshalAs(UnmanagedType.LPWStr)]
        static String GetGreeting()
        {
            return "Happy Managed Coding!";
        }
    }
}

The MarshalAs LPWStr is a way to tell C# how to marshal the return string to the unmanaged code. An LPWStr is a 32-bit pointer to a string of 16-bit unicode characters. This is UTF-16 strings that the UDK DLLBind supports. See the limitations section here: DLLBind limitations.

The name of the function that our DLL is going to export is GetGreeting. We specify the stdcall calling convention because that is the one supported by UDK DLLBind.

We need to set the properties of this DLL to use x86 and to allow unsafe code.


Attached Image: allowunsafe.jpg


I compiled this DLL and copied it in to the User Code folder.

For me the User Code folder is at: C:\UDK\UDK-2013-02\Binaries\Win32\UserCode

Then I created a class in UnrealScript which was named TestManagedDll.uc.

I placed the file here: C:\UDK\UDK-2013-02\Development\Src\UTGame\Classes

class TestManagedDLL extends Object
	DLLBind(UDKManagedTestDLL);

dllimport final function string GetGreeting();


DefaultProperties
{
}

Here we are importing the GetGreeting function that we exported in our DLL. We specify that the return type of the function is a string. Currently the GetGreeting function does not take any parameters.

I then modified the UTCheatManager.uc file to include

exec function testdll()
{
	local TestManagedDLL dllTest;
	local PlayerController PC;
	dllTest = new class'UTGame.TestManagedDLL';
	foreach WorldInfo.AllControllers(class'PlayerController',PC)
	{
		PC.ClientMessage(dllTest.GetGreeting());
	}
}

We are looping through all of the player controllers and calling the ClientMessage method which will print a message to the UDK console. Calling the GetGreeting method of dllTest will return the "Happy Managed Coding!" message that we defined in our C# DLL.

I then used the Unreal Frontend to compile my scripts:


Attached Image: unrealfrontend.jpg


We can then see the results in the UnrealEd. Go to View->World Properties. We need to set the Default Game Type and the Game Type for PIE to utgame (since that is where we wrote our code).


Attached Image: gametype.jpg


Press F8 to launch the game, type ~ to launch the console, and then type testdll. You should see the following:


Attached Image: happycoding.jpg


Passing Parameters


To pass parameters we can do the following in C#:

[DllExport("GetGreetingName", CallingConvention = CallingConvention.StdCall)]
[return: MarshalAs(UnmanagedType.LPWStr)]
static String GetGreetingName([MarshalAs(UnmanagedType.LPWStr)] String msgName)
{
     return "Happy Managed Coding " + msgName + "!";
}

Here we have added a parameter and we specify that the parameter should be marshaled as a LPWStr. String concatenation is used to form the message that is returned to UDK.

Build the DLL, and copy the DLL into the UserCode folder.

Our TestManagedDLL.uc file now looks like:

class TestManagedDLL extends Object
	DLLBind(UDKManagedTestDLL);

dllimport final function string GetGreeting();
dllimport final function string GetGreetingName(string msgName);

DefaultProperties
{
}

The GetGreetingName function has been added and we specify the string parameter.

We update the UTCheatManager.uc file to use GetGreetingName:

exec function testdll(string greetName)
{
	local TestManagedDLL dllTest;
	local PlayerController PC;
	dllTest = new class'UTGame.TestManagedDLL';
	foreach WorldInfo.AllControllers(class'PlayerController',PC)
	{
		PC.ClientMessage(dllTest.GetGreetingName(greetName));
	}
}

Passing the parameter from the exec function to the GetGreetingName method of dllTest will mean that we can provide a string parameter in the cheat console and have it passed to the C# DLL.

Use the UDK Frontend to rebuild the scripts.

Testing in UnrealEd yields the following:


Attached Image: happycoding2.jpg


Reading files


I assume a lot of people will want to use this technique to write C# DLL's that use .NET for working with files, since the UDK support for reading various file formats is so low. In order to do that we need to get the directory that the DLL is in, so that we can locate our files appropriately. We can do this using Reflection.

[DllExport("ReadTxtFile", CallingConvention = CallingConvention.StdCall)]
[return: MarshalAs(UnmanagedType.LPWStr)]
static String ReadTxtFile([MarshalAs(UnmanagedType.LPWStr)] String fileName)
{
    string retVal = "";
    StreamReader test = null;
    try
    {
        test = new StreamReader(Path.Combine(GetAssemblyPath(), fileName));
        retVal = test.ReadToEnd();
    }
    catch (Exception ex)
    {
        retVal = ex.Message;
    }
    finally
    {
        if (test != null)
        {
            test.Close();
        }
    }
    return retVal;
}

You should then be able to put a file in the same folder as the dll and then load it up and get the contents.

It also needs:

using System.IO;
using System.Reflection;

So it should be perfectly possible with some rudimentary knowledge to make dlls that make use of XML (I have actually done this and put a link in the references).

Here are the contents of TestManagerDll.uc:

class TestManagedDLL extends Object
	DLLBind(UDKManagedTestDLL);

dllimport final function string GetGreeting();
dllimport final function string GetGreetingName(string msgName);
dllimport final function string ReadTxtFile(string fileName);

DefaultProperties
{
}

And the modification to UTCheatManager.uc:

exec function testdll(string fileName)
{
	local TestManagedDLL dllTest;
	local PlayerController PC;
	dllTest = new class'UTGame.TestManagedDLL';
	foreach WorldInfo.AllControllers(class'PlayerController',PC)
	{
		PC.ClientMessage(dllTest.ReadTxtFile(fileName));
	}
}

I placed a file called greeting.txt in the UserCode folder. The contents of greeting.txt are as follows:

Hello there! This is a test of reading files!

Here is the output:


Attached Image: readfile.jpg


Passing structures


Note:  The following content may or may not be the best way to approach this problem. I will share what I have so far as a starting point, however you may wish to investigate this matter further. The use of IntPtr can be error-prone and buggy but sometimes custom marshalling is the only way to solve particular problem domains when doing this sort of work. I have done some use of using "ref" and letting it handle this sort of marshalling for me, however it does not appear to work in all circumstances.


Here is the C# code:

private static IntPtr MarshalToPointer(object data)
{
    IntPtr buf = Marshal.AllocHGlobal(
        Marshal.SizeOf(data));
    Marshal.StructureToPtr(data,
        buf, false);
    return buf;
}

struct MyVector
{
    public float x, y, z;
}

[DllExport("ReturnStruct", CallingConvention = CallingConvention.StdCall)]
static IntPtr ReturnStruct()
{
    MyVector v = new MyVector();
    v.x = 0.45f;
    v.y = 0.56f;
    v.z = 0.24f;

    IntPtr lpstruct = MarshalToPointer(v);
    return lpstruct;
}

This code is populating a structure to pass to UnrealScript through DLLBind.

Here is the code for TestManagedDLL.uc

class TestManagedDLL extends Object
	DLLBind(UDKManagedTestDLL);

dllimport final function string GetGreeting();
dllimport final function string GetGreetingName(string msgName);
dllimport final function string ReadTxtFile(string fileName);
dllimport final function vector ReturnStruct();

DefaultProperties
{
}

Here are the modifications to UTCheatManager.uc:

exec function testdll()
{
	local TestManagedDLL dllTest;
	local PlayerController PC;
	local Vector v;
	dllTest = new class'UTGame.TestManagedDLL';
	foreach WorldInfo.AllControllers(class'PlayerController',PC)
	{
		v = dllTest.ReturnStruct();
		PC.ClientMessage(v.Y);
	}
}

Here is the output:


Attached Image: vector.jpg


Returning structures from UnrealScript


Here is code to pass a structure from UnrealScript to C#:

private static T MarshalToStruct<T>(IntPtr buf)
{
    return (T)Marshal.PtrToStructure(buf, typeof(T));
}

[DllExport("SumVector", CallingConvention = CallingConvention.StdCall)]
static float SumVector(IntPtr vec)
{
    MyVector v = MarshalToStruct<MyVector>(vec);
    return v.x + v.y + v.z;
}

Special thanks to Chris Charabaruk (coldacid) for the MarshalToStruct improvement.

Here is the line added to TestManagedDLL.uc:

dllimport final function float SumVector(Vector vec);

And the modification to UTCheatManager.uc:

exec function testdll()
{
	local TestManagedDLL dllTest;
	local PlayerController PC;
	local Vector v;
	v.X = 2;
	v.Y = 3;
	v.Z = 5;
	dllTest = new class'UTGame.TestManagedDLL';
	foreach WorldInfo.AllControllers(class'PlayerController',PC)
	{
		PC.ClientMessage(dllTest.SumVector(v));
	}
}

Here is the output:


Attached Image: sumvector.jpg


Using out keyword with custom UnrealScript structure


Note:  Using strings in structures is a tricky issue due to the way that UnrealScript deals with strings. This article will not talk about doing strings in structures, but if you get a working example please share it in the comments!


When passing a structure as an out parameter you can do the following:

struct TestStruct
{
    public int val;
}

[DllExport("OutTestStruct", CallingConvention = CallingConvention.StdCall)]
static void OutTestStruct(ref TestStruct testStruct)
{
    testStruct.val = 7;
}

Here are the contents of TestManagedDLL.uc:

class TestManagedDLL extends Object
	DLLBind(UDKManagedTestDLL);

struct TestStruct
{
	var int val;
};

dllimport final function string GetGreeting();
dllimport final function string GetGreetingName(string msgName);
dllimport final function string ReadTxtFile(string fileName);
dllimport final function vector ReturnStruct();
dllimport final function float SumVector(Vector vec);
dllimport final function OutTestStruct(out TestStruct test);

DefaultProperties
{
}

Here is the modification to UTCheatManager.uc:

exec function testdll()
{
	local TestManagedDLL dllTest;
	local PlayerController PC;
	local TestStruct s;
	dllTest = new class'UTGame.TestManagedDLL';
	dllTest.OutTestStruct(s);
	foreach WorldInfo.AllControllers(class'PlayerController',PC)
	{
		PC.ClientMessage(s.val);
	}
}

Here is the output:


Attached Image: seven.jpg


Full source listing


using System;
using System.Runtime.InteropServices;
using System.Collections.Generic;
using System.Text;
using System.IO;
using System.Reflection;
using RGiesecke.DllExport;

namespace UDKManagedTestDLL
{
    internal static class UnmanagedExports
    {
        [DllExport("GetGreeting", CallingConvention = CallingConvention.StdCall)]
        [return: MarshalAs(UnmanagedType.LPWStr)]
        static String GetGreeting()
        {
            return "Happy Managed Coding!";
        }

        [DllExport("GetGreetingName", CallingConvention = CallingConvention.StdCall)]
        [return: MarshalAs(UnmanagedType.LPWStr)]
        static String GetGreetingName([MarshalAs(UnmanagedType.LPWStr)] String msgName)
        {
            return "Happy Managed Coding " + msgName + "!";
        }

        public static String GetAssemblyPath()
        {
            string codeBase = Assembly.GetExecutingAssembly().CodeBase;
            UriBuilder uri = new UriBuilder(codeBase);
            string path = Uri.UnescapeDataString(uri.Path);
            return Path.GetDirectoryName(path);
        }

        [DllExport("ReadTxtFile", CallingConvention = CallingConvention.StdCall)]
        [return: MarshalAs(UnmanagedType.LPWStr)]
        static String ReadTxtFile([MarshalAs(UnmanagedType.LPWStr)] String fileName)
        {
            string retVal = "";
            StreamReader test = null;
            try
            {
                test = new StreamReader(Path.Combine(GetAssemblyPath(), fileName));
                retVal = test.ReadToEnd();
            }
            catch (Exception ex)
            {
                retVal = ex.Message;
            }
            finally
            {
                if (test != null)
                {
                    test.Close();
                }
            }
            return retVal;
        }

        private static IntPtr MarshalToPointer(object data)
        {
            IntPtr buf = Marshal.AllocHGlobal(
                Marshal.SizeOf(data));
            Marshal.StructureToPtr(data,
                buf, false);
            return buf;
        }

        struct MyVector
        {
            public float x, y, z;
        }

        [DllExport("ReturnStruct", CallingConvention = CallingConvention.StdCall)]
        static IntPtr ReturnStruct()
        {
            MyVector v = new MyVector();
            v.x = 0.45f;
            v.y = 0.56f;
            v.z = 0.24f;

            IntPtr lpstruct = MarshalToPointer(v);
            return lpstruct;
        }

        private static T MarshalToStruct<T>(IntPtr buf)
        {
            return (T)Marshal.PtrToStructure(buf, typeof(T));
        }

        [DllExport("SumVector", CallingConvention = CallingConvention.StdCall)]
        static float SumVector(IntPtr vec)
        {
            MyVector v = MarshalToStruct<MyVector>(vec);
            return v.x + v.y + v.z;
        }

        struct TestStruct
        {
            public int val;
        }

        [DllExport("OutTestStruct", CallingConvention = CallingConvention.StdCall)]
        static void OutTestStruct(ref TestStruct testStruct)
        {
            testStruct.val = 7;
        }
    }
}

class TestManagedDLL extends Object
	DLLBind(UDKManagedTestDLL);

struct TestStruct
{
	var int val;
};

dllimport final function string GetGreeting();
dllimport final function string GetGreetingName(string msgName);
dllimport final function string ReadTxtFile(string fileName);
dllimport final function vector ReturnStruct();
dllimport final function float SumVector(Vector vec);
dllimport final function OutTestStruct(out TestStruct test);

DefaultProperties
{
}

Known Issues


Cooking


According to this thread, cooking may prove problematic using the Unreal Frontend. The problem is that the Unreal Frontend does not want to cook an unsigned DLL. You could purchase a certificate or use a custom installer to package your game for release. The thread also mentions modifying the Binaries\UnSetup.Manifests.xml file in the GameFilesToInclude tag to have:

<string>Binaries/Win32/UserCode/(.*).dll</string>

I have not tested any of this but I wanted to point it out.

Alternatives to using Visual Studio 2012


The unmanaged export template used for this article is a NuGet package. If you are using Mono and want to use the unmanaged export template then you may be able to get it working by reading the following resource: nuget on mono. I have not tested this and it is not guranteed to work without issues.

For older versions of Visual Studio (such as 2010) NuGet may work for you if you download it. If you have trouble getting the extension to work then NuGet can also be used on the command line.

Conclusion


I hope that you learned something about using C# to create DLLs for UDK. Be sure to checkout the references for further reading and information.

I would like to thank GDNet Executive Producer Drew "Gaiiden" Sikora for requesting that I post this article. What started as a port of an old journal entry has ended up as a fairly significant edit of the previous work!

Thank you for reading!

Disclaimer


Note:   This method may have serious drawbacks and limitations. The methods presented in this article may leak memory. It is left up to the reader to ensure that such issues if present are addressed. I am merely providing a technical basis, but it will be up to you to assume the risks of the implementation for your particular project. I take no responsibility for the use or misuse of this information for any reason whatsoever.


References


Unreal Development Kit
Visual Studio 2012 Express
NuGet
DLLBind
Mastering Structs in C#
Getting Assembly Path
Unmanaged Exports Template
My original journal entry
An article by Mavrik Games which cites my original article
A forum thread that discusses the signing issue with cooking a DLL using Unreal Frontend
My UDK XML library which uses the methods in this article
NuGet on mono
Installing NuGet packages directly from the command line

Article Update Log


10 Jun 2013: Updated images to link to GameDev.net.
9 Jun 2013: Initial release

Ten Things to Achieve When Starting 3D Programming

$
0
0
Starting 3D programming is not an easy task to accomplish. There are a lot of new things that come into play, and they vary from choosing a programming language to selecting the correct 3D modeling software. These 10 goals are the things that when they are done, no matter in what language and with what rendering engine, you can consider yourself a semi-expert on this matter.

#1: Build your own custom graphic initialization function


Today with the great variety of 3D engines and platforms, this task is always delegated to those. I still remember the times when you had to initialize OpenGL with all the windows functions, and how you had to manage windows handles and resource loading yourself. This is useful to understand how things are managed internally and will give you more comprehension of what you are doing. My advice is to start looking at NEHE tutorials, it has a graphic initialization function written in C and with windows APIs in chapter one. If this is a lot for you to handle, you should look at C++ equivalent functions or try to port them to managed languages like C#, Java or Python. There are plenty of examples on the internet.

#2: Implement your own camera


You can copy and paste a camera code from the internet, and use it without major problems, but it is not until you make your own camera from scratch that you will fully understand some concepts like vector handling, translation matrices, angle conversion, etc. You should start by coding a FPS (First Person Shooter) camera; it has everything it needs to get you ready. Later if you want to make your own game and you can’t use it, I recommend you to read this article to find out the type of camera that best suits your needs.

#3: Understand primary 3D concepts


When I started, I began to hear a lot of new words like anti-aliasing, anisotropic filtering, occlusion testing, z-buffer, alpha testing, shader language, bump mapping, etc. Maybe if you are a gamer, you have seen some of them while configuring the graphic settings of your game. Make sure you spent some time reading about this, because it will give an overview of what 3D programming is.

#4: Learn everything you can about vectors and matrices


This is always underestimated, I strongly recommend that in order to correctly manage things like cameras, terrain following, ray tracing; you should know everything about this. You should also learn minimum trigonometry basis. Now I understand how easy my life would have been if I would had spent only a few hours studying this matter.

#5: Code yourself a 3D model loader


I recommend beginning with a .OBJ file or a .STL file because they have an ASCII format representation. Later, you can move to other more complex formats like .3DS. With this, you not only will understand more how 3D models are saved, you will have to draw it in its raw manner: triangles, and then you will understand how everything is drawn in a graphics engine.

#6: Successfully make your own collision algorithm


It is one thing to draw a world and another thing to manage its geometry. In a virtual 3D world, there are no physics laws, so you have to create them. If you want an object not to go through a wall, then you have to create an internal geometric representation of the wall and make all the calculations yourself. There are several approaches to handle collisions; I recommend starting with binary collisions with a labyrinth project. Try this link for more information.

#7: Implement a small particle engine


I was disappointed when I found out that fire, smoke, some lighting and other stunning effects that you see in 3D games are made by particles and that particles are in essence planes with textures facing the camera. The more particles you add, the more realistic the effect looks but the performance is more compromised. The first particle engine I made was for rocket smoke and I did it without looking at a particle engine tutorial. Later I realized I had reinvented the wheel but I was really into this. By carrying out this, you will understand concepts like particle emitters, particle behavior and bill boarding techniques, among others.

#8: Learn the basics in a 3D modeling software


In order to make changes to the 3D models you want to use in your application, you should at least know operations like translating, scaling, rotating, texturing, exporting to other formats and making simple models. If you don’t do that, you will suffer from depending on other people to do your first game. I’ve worked with a few modeling software and I strongly recommend 3D Max or Maya.

#9: Load and play an animation


Loading and correctly playing an animation was the most difficult thing in 3D that I ever did. I had to do reverse engineering to a 3D max .XAF file. I had to also learn stuff like bone hierarchy, matrix interpolation, among others. At the end, it was very gratifying to look at your own models moving by themselves. I recommend starting with animating a robot since models like animals and people require another technique called skinning.

#10: Code a 2D custom Graphic User Interface (GUI)


When I began programming in XNA; I was forced to build my own GUI because XNA does not have implemented any windows controls. This gave me two things, the first one was the ability to make my custom GUI controls and the other one was the understanding of concepts like event handling and event capturing. It is not easy, the most difficult control I have made is a listbox, but once it is made you can use it everywhere.

Conclusion


In this journey you will come across several issues. You will spend a lot of time trying your code to work no matter how smart you are. But I can tell you that from a programmer side of view there is nothing more comforting than seeing your own code working. I still remember the joy when I first coded an OBJ model loader. I was trying to load a face and after several hours on the task at 3:50am suddenly a very weird face appeared on the screen and scared the hell out of me, I laugh every time I remember that story.

I am sure when you manage to achieve these ten things, you can say you have the basic knowledge of 3D programming. I wrote this because I spent a lot of work and time to achieve them, and because I would like everyone to have a small guideline when starting in this world. My advice is to start making a small game and to try to adapt them on the go. I think this is the best way because trying to learn all this without the possibility to see it in action is not very motivating. You will see after a while that gaming won't be same for you, because you will spend some time trying to figure out how they solved some technical issues that you faced before. Thats all for now I tried to keep this article clear and understandable, if you liked it, you can visit my blog for more stuff like this.


Article image from 3D Programming - Weekly
Viewing all 17625 articles
Browse latest View live


<script src="https://jsc.adskeeper.com/r/s/rssing.com.1596347.js" async> </script>