![image1.png]()
In May 2016, German game-development company Crytek made a decision to upload the source code of their game engine CryEngine V to Github. The engine is written in C++ and has immediately attracted attention of both the open-source developer community and the team of developers of PVS-Studio static analyzer who regularly scan the code of open-source projects to estimate its quality. A lot of great games were created by a number of video-game development studios using various versions of CryEngine, and now the engine has become available to even more developers. This article gives an overview of errors found in the project by PVS-Studio static analyzer.
Introduction
CryEngine is a game engine developed by German company Crytek in 2002 and originally used in first-person shooter Far Cry. A lot of great games were created by a number of video-game development studios using various licensed versions of CryEngine: Far Cry, Crysis, Entropia Universe, Blue Mars, Warface, Homefront: The Revolution, Sniper: Ghost Warrior, Armored Warfare, Evolve, and many others. In March 2016, Crytek announced a release date for their new engine CryEngine V and uploaded its source code to Github soon after.
The project's source code was checked by PVS-Studio static analyzer, version 6.05. This is a tool designed for detecting software errors in program source code in C, C++, and C#. The only true way of using static analysis is to regularly scan code on developers' computers and build-servers. However, in order to demonstrate PVS-Studio's diagnostic capabilities, we run single-time checks of open-source projects and then write articles about errors found. If we like a project, we might scan it again a couple of years later. Such recurring checks are in fact the same as single-time checks since the code accumulates a lot of changes during that time.
For our checks, we pick projects that are simply popular and wide-known as well as projects suggested by our readers via e-mail. That's why CryEngine V was by no means the first game engine among those scanned by our analyzer. Other engines that we have already checked include:
We also checked CryEngine 3 SDK once.
I'd like to elaborate on the check of Unreal Engine 4 engine in particular. Using that project as an example allowed us to demonstrate in every detail what the right way of using static analysis on a real project should look like, covering the whole process from the phase of integrating the analyzer into the project to the phase of cutting warnings to zero with subsequent control over bug elimination in new code. Our work on Unreal Engine 4 project developed into collaboration with Epic Games company, in terms of which our team fixed all the defects found in the engine's source code and wrote a joint article with Epic Games on the accomplished work (it was posted on Unreal Engine Blog). Epic Games also purchased a PVS-Studio license to be able to maintain the quality of their code on their own. Collaboration of this kind is something that we would like to try with Crytek, too.
Analyzer-report structure
In this article, I'd like to answer a few frequently asked questions concerning the number of warnings and false positives, for example, "What is the ratio of false positives?" or "Why are there so few bugs in so large a project?"
To begin with, all PVS-Studio warnings are classified into three severity levels: High, Medium, and Low. The High level holds the most critical warnings, which are almost surely real errors, while the Low level contains the least critical warnings or warnings that are very likely to be false positives. Keep in mind that the codes of errors do not tie them firmly to particular severity levels: distribution of warnings across the levels very much depends on the context.
This is how the warnings of the General Analysis module are distributed across the severity levels for CryEngine V project:
- High: 576 warnings;
- Medium: 814 warnings,
- Low: 2942 warnings.
Figure 1 shows distribution of the warnings across the levels in the form of a pie chart.
![image2.png]()
Figure 1 - Percentage distribution of warnings across severity levels
It is impossible to include all the warning descriptions and associated code fragments in an article. Our articles typically discuss 10-40 commented cases; some warnings are given as a list; and most have to be left unexamined. In the best-case scenario, project authors, after we inform them, ask for a complete analysis report for close study. The bitter truth is that in most cases the number of High-level warnings alone is more than enough for an article, and CryEngine V is no exception. Figure 2 shows the structure of the High-level warnings issued for this project.
![image3.png]()
Figure 2 - Structure of High-level warnings
Let's take a closer look at the sectors of this chart:
- Described in the article (6%) - warnings cited in the article and accompanied by code fragments and commentary.
- Presented as a list (46%) - warnings cited as a list. These warnings refer to the same pattern as some of the errors already discussed, so only the warning text is given.
- False Positives (8%) - a certain ratio of false positives we have taken into account for future improvement of the analyzer.
- Other (40%) - all the other warnings issued. These include warnings that we had to leave out so that the article wouldn't grow too large, non-critical warnings, or warnings whose validity could be estimated only by a member of the developer team. As our experience of working on Unreal Engine 4 has shown, such code still "smells" and those warnings get fixed anyway.
Analysis results
Annoying copy-paste![image4.png]()
V501 There are identical sub-expressions to the left and to the right of the '-' operator: q2.v.z - q2.v.z entitynode.cpp 93
bool
CompareRotation(const Quat& q1, const Quat& q2, float epsilon)
{
  return (fabs_tpl(q1.v.x - q2.v.x) <= epsilon)
      && (fabs_tpl(q1.v.y - q2.v.y) <= epsilon)
      && (fabs_tpl(q2.v.z - q2.v.z) <= epsilon) // <=
      && (fabs_tpl(q1.w - q2.w) <= epsilon);
}
A mistyped digit is probably one of the most annoying typos one can make. In the function above, the analyzer detected a suspicious expression, (q2.v.z - q2.v.z), where variables q1 and q2 seem to have been mixed up.
V501 There are identical sub-expressions '(m_eTFSrc == eTF_BC6UH)' to the left and to the right of the '||' operator. texturestreaming.cpp 919
//! Texture formats.
enum ETEX_Format : uint8
{
  ....
  eTF_BC4U,     //!< 3Dc+.
  eTF_BC4S,
  eTF_BC5U,     //!< 3Dc.
  eTF_BC5S,
  eTF_BC6UH,
  eTF_BC6SH,
  eTF_BC7,
  eTF_R9G9B9E5,
  ....
};

bool CTexture::StreamPrepare(CImageFile* pIM)
{
  ....
  if ((m_eTFSrc == eTF_R9G9B9E5) ||
      (m_eTFSrc == eTF_BC6UH) ||     // <=
      (m_eTFSrc == eTF_BC6UH))       // <=
  {
    m_cMinColor /= m_cMaxColor.a;
    m_cMaxColor /= m_cMaxColor.a;
  }
  ....
}
Another kind of typos deals with copying of constants. In this case, the m_eTFSrc variable is compared twice with the eTF_BC6UH constant. The second of these checks must compare the variable with some other constant whose name differs from the copied one in just one character, for example, eTF_BC6SH.
Two more similar issues:
- V501 There are identical sub-expressions '(td.m_eTF == eTF_BC6UH)' to the left and to the right of the '||' operator. texture.cpp 1214
- V501 There are identical sub-expressions 'geom_colltype_solid' to the left and to the right of the '|' operator. attachmentmanager.cpp 1004
V517 The use of 'if (A) {...} else if (A) {...}' pattern was detected. There is a probability of logical error presence. Check lines: 266, 268. d3dhwshader.cpp 266
int SD3DShader::Release(EHWShaderClass eSHClass, int nSize)
{
  ....
  if (eSHClass == eHWSC_Pixel)
    return ((ID3D11PixelShader*)pHandle)->Release();
  else if (eSHClass == eHWSC_Vertex)
    return ((ID3D11VertexShader*)pHandle)->Release();
  else if (eSHClass == eHWSC_Geometry)                   // <=
    return ((ID3D11GeometryShader*)pHandle)->Release();  // <=
  else if (eSHClass == eHWSC_Geometry)                   // <=
    return ((ID3D11GeometryShader*)pHandle)->Release();  // <=
  else if (eSHClass == eHWSC_Hull)
    return ((ID3D11HullShader*)pHandle)->Release();
  else if (eSHClass == eHWSC_Compute)
    return ((ID3D11ComputeShader*)pHandle)->Release();
  else if (eSHClass == eHWSC_Domain)
    return ((ID3D11DomainShader*)pHandle)->Release()
  ....
}
This is an example of lazy copying of a cascade of conditional statements, one of which was left unchanged.
V517 The use of 'if (A) {...} else if (A) {...}' pattern was detected. There is a probability of logical error presence. Check lines: 970, 974. environmentalweapon.cpp 970
void CEnvironmentalWeapon::UpdateDebugOutput() const
{
  ....
  const char* attackStateName = "None";
  if(m_currentAttackState &                       // <=
     EAttackStateType_EnactingPrimaryAttack)      // <=
  {
    attackStateName = "Primary Attack";
  }
  else if(m_currentAttackState &                  // <=
          EAttackStateType_EnactingPrimaryAttack) // <=
  {
    attackStateName = "Charged Throw";
  }
  ....
}
In the previous example, there was at least a small chance that an extra condition resulted from making too many copies of a code fragment, while the programmer simply forgot to remove one of the checks. In this code, however, the attackStateName variable will never take the value "Charged Throw" because of identical conditional expressions.
V519 The 'BlendFactor[2]' variable is assigned values twice successively. Perhaps this is a mistake. Check lines: 1265, 1266. ccrydxgldevicecontext.cpp 1266
void CCryDXGLDeviceContext::
OMGetBlendState(...., FLOAT BlendFactor[4], ....)
{
  CCryDXGLBlendState::ToInterface(ppBlendState, m_spBlendState);
  if ((*ppBlendState) != NULL)
    (*ppBlendState)->AddRef();
  BlendFactor[0] = m_auBlendFactor[0];
  BlendFactor[1] = m_auBlendFactor[1];
  BlendFactor[2] = m_auBlendFactor[2]; // <=
  BlendFactor[2] = m_auBlendFactor[3]; // <=
  *pSampleMask = m_uSampleMask;
}
In this function, a typo in the element index prevents the element with index '3', BlendFactor[3], from being filled with a value. This fragment would have remained just one of the many interesting examples of typos, had not the analyzer found two more copies of the same incorrect fragment:
V519 The 'm_auBlendFactor[2]' variable is assigned values twice successively. Perhaps this is a mistake. Check lines: 904, 905. ccrydxgldevicecontext.cpp 905
void CCryDXGLDeviceContext::
  OMSetBlendState(....const FLOAT BlendFactor[4], ....)
{
  ....
  m_uSampleMask = SampleMask;
  if (BlendFactor == NULL)
  {
    m_auBlendFactor[0] = 1.0f;
    m_auBlendFactor[1] = 1.0f;
    m_auBlendFactor[2] = 1.0f;                   // <=
    m_auBlendFactor[2] = 1.0f;                   // <=
  }
  else
  {
    m_auBlendFactor[0] = BlendFactor[0];
    m_auBlendFactor[1] = BlendFactor[1];
    m_auBlendFactor[2] = BlendFactor[2];         // <=
    m_auBlendFactor[2] = BlendFactor[3];         // <=
  }

  m_pContext->SetBlendColor(m_auBlendFactor[0],
                            m_auBlendFactor[1],
                            m_auBlendFactor[2],
                            m_auBlendFactor[3]);
  m_pContext->SetSampleMask(m_uSampleMask);
  ....
}
Here's that fragment where the element with index '3' is skipped again. I even thought for a moment that there was some intentional pattern to it, but this thought quickly vanished as I saw that the programmer attempted to access all the four elements of the m_auBlendFactor array at the end of the function. It looks like the same code with a typo was simply copied several times in the file ccrydxgldevicecontext.cpp.
V523 The 'then' statement is equivalent to the 'else' statement. d3dshadows.cpp 1410
void CD3D9Renderer::ConfigShadowTexgen(....)
{
  ....
  if ((pFr->m_Flags & DLF_DIRECTIONAL) ||
    (!(pFr->bUseHWShadowMap) && !(pFr->bHWPCFCompare)))
  {
    //linearized shadows are used for any kind of directional
    //lights and for non-hw point lights
    m_cEF.m_TempVecs[2][Num] = 1.f / (pFr->fFarDist);
  }
  else
  {
    //hw point lights sources have non-linear depth for now
    m_cEF.m_TempVecs[2][Num] = 1.f / (pFr->fFarDist);
  }
  ....
}
To finish the section on copy-paste, here is one more interesting error. No matter what result the conditional expression produces, the value m_cEF.m_TempVecs[2][Num] is always computed by the same formula. Judging by the surrounding code, the index is correct: it's exactly the element with index '2' that must be filled with a value. It's just that the formula itself was meant to be different in each case, and the programmer forgot to change the copied code.
Troubles with initialization![image5.png]()
V546 Member of a class is initialized by itself: 'eConfigMax(eConfigMax)'. particleparams.h 1013
ParticleParams() :
  ....
  fSphericalApproximation(1.f),
  fVolumeThickness(1.0f),
  fSoundFXParam(1.f),
  eConfigMax(eConfigMax.VeryHigh), // <=
  fFadeAtViewCosAngle(0.f)
{}
The analyzer detected a potential typo that causes a class field to be initialized to its own value.
V603 The object was created but it is not being used. If you wish to call constructor, 'this->SRenderingPassInfo::SRenderingPassInfo(....)' should be used. i3dengine.h 2589
SRenderingPassInfo()
  : pShadowGenMask(NULL)
  , nShadowSide(0)
  , nShadowLod(0)
  , nShadowFrustumId(0)
  , m_bAuxWindow(0)
  , m_nRenderStackLevel(0)
  , m_eShadowMapRendering(static_cast<uint8>(SHADOW_MAP_NONE))
  , m_bCameraUnderWater(0)
  , m_nRenderingFlags(0)
  , m_fZoomFactor(0.0f)
  , m_pCamera(NULL)
  , m_nZoomInProgress(0)
  , m_nZoomMode(0)
  , m_pJobState(nullptr)
{
  threadID nThreadID = 0;
  gEnv->pRenderer->EF_Query(EFQ_MainThreadList, nThreadID);
  m_nThreadID = static_cast<uint8>(nThreadID);
  m_nRenderFrameID = gEnv->pRenderer->GetFrameID();
  m_nRenderMainFrameID = gEnv->pRenderer->GetFrameID(false);
}

SRenderingPassInfo(threadID id)
{
  SRenderingPassInfo(); // <=
  SetThreadID(id);
}
In this code, incorrect use of constructor was detected. The programmer probably assumed that calling a constructor in a way like that - without parameters - inside another constructor would initialize the class fields, but this assumption was wrong.
Instead, a new unnamed object of type SRenderingPassInfo will be created and immediately destroyed. The class fields, therefore, will remain uninitialized. One way to fix this error is to create a separate initialization function and call it from different constructors.
V688 The 'm_cNewGeomMML' local variable possesses the same name as one of the class members, which can result in a confusion. terrain_node.cpp 344
void CTerrainNode::Init(....)
{
  ....
  m_nOriginX = m_nOriginY = 0; // sector origin
  m_nLastTimeUsed = 0;         // basically last time rendered

  uint8 m_cNewGeomMML = m_cCurrGeomMML = m_cNewGeomMML_Min ....

  m_pLeafData = 0;

  m_nTreeLevel = 0;
  ....
}
The name of the local variable cNewGeomMML coincides with that of a class field. It's usually not an error, but in this particular case it does look strange in comparison to how the other class fields are initialized.
V575 The 'memset' function processes '0' elements. Inspect the third argument. crythreadutil_win32.h 294
void EnableFloatExceptions(....)
{
  ....
  CONTEXT ctx;
  memset(&ctx, sizeof(ctx), 0);  // <=
  ....
}
This error is a very interesting one. When calling the memset() function, two arguments were swapped by mistake, which resulted in calling the function to fill 0 bytes. This is the function prototype:
void * memset ( void * ptr, int value, size_t num );
The function expects to receive the buffer size as the third argument and the value the buffer is to be filled with as the second.
The fixed version:
void EnableFloatExceptions(....)
{
  ....
  CONTEXT ctx;
  memset(&ctx, 0, sizeof(ctx));
  ....
}
V630 The '_alloca' function is used to allocate memory for an array of objects which are classes containing constructors. command_buffer.cpp 62
void CBuffer::Execute()
{
  ....
  QuatT * pJointsTemp = static_cast<QuatT*>(
    alloca(m_state.m_jointCount * sizeof(QuatT)));
  ....
}
In some parts of the project's code, the alloca() function is used to allocate memory for an array of objects. In the example above, with memory allocated in such a way, neither the constructor, nor the destructor will be called for objects of class QuatT. This defect may result in handling uninitialized variables, and other errors.
Here's a complete list of other defects of this type:
- V630 The '_alloca' function is used to allocate memory for an array of objects which are classes containing constructors. command_buffer.cpp 67
- V630 The '_alloca' function is used to allocate memory for an array of objects which are classes containing constructors. posematching.cpp 144
- V630 The '_alloca' function is used to allocate memory for an array of objects which are classes containing constructors. characterinstance.cpp 280
- V630 The '_alloca' function is used to allocate memory for an array of objects which are classes containing constructors. characterinstance.cpp 282
- V630 The '_alloca' function is used to allocate memory for an array of objects which are classes containing constructors. scriptbind_entity.cpp 6252
- V630 The '_alloca' function is used to allocate memory for an array of objects which are classes containing constructors. jobmanager.cpp 1016
- V630 The '_alloca' function is used to allocate memory for an array of objects which are classes containing constructors. driverd3d.cpp 5859
V583 The '?:' operator, regardless of its conditional expression, always returns one and the same value: -1.8f. posealignerc3.cpp 330
ILINE bool InitializePoseAlignerPinger(....)
{
  ....
  chainDesc.offsetMin = Vec3(0.0f, 0.0f, bIsMP ? -1.8f : -1.8f);
  chainDesc.offsetMax = Vec3(0.0f, 0.0f, bIsMP ? +0.75f : +1.f);
  ....
}
A few fragments were found where the ternary operator ?: returns one and the same value. While in the previous example it could have been done for aesthetic reasons, the reason for doing so in the following fragment is unclear.
float predictDelta = inputSpeed < 0.0f ? 0.1f : 0.1f; // <=
float dict = angle + predictDelta * ( angle - m_prevAngle) / dt ;
A complete list of other defects of this type:
- V583 The '?:' operator, regardless of its conditional expression, always returns one and the same value: -1.8f. posealignerc3.cpp 313
- V583 The '?:' operator, regardless of its conditional expression, always returns one and the same value: -2.f. posealignerc3.cpp 347
- V583 The '?:' operator, regardless of its conditional expression, always returns one and the same value: D3D11_RTV_DIMENSION_TEXTURE2DARRAY. d3dtexture.cpp 2277
- V583 The '?:' operator, regardless of its conditional expression, always returns one and the same value: 255U. renderer.cpp 3389
- V583 The '?:' operator, regardless of its conditional expression, always returns one and the same value: D3D12_RESOURCE_STATE_GENERIC_READ. dx12device.cpp 151
- V583 The '?:' operator, regardless of its conditional expression, always returns one and the same value: 0.1f. vehiclemovementstdboat.cpp 720
V570 The 'runtimeData.entityId' variable is assigned to itself. behaviortreenodes_ai.cpp 1771
void ExecuteEnterScript(RuntimeData& runtimeData)
{
  ExecuteScript(m_enterScriptFunction, runtimeData.entityId);

  runtimeData.entityId = runtimeData.entityId; // <=
  runtimeData.executeExitScriptIfDestructed = true;
}
A variable is assigned to itself, which doesn't look right. The authors should check this code.
Operation precedence![image6.png]()
V502 Perhaps the '?:' operator works in a different way than it was expected. The '?:' operator has a lower priority than the '+' operator. gpuparticlefeaturespawn.cpp 79
bool HasDuration() { return m_useDuration; }

void CFeatureSpawnRate::SpawnParticles(....)
{
  ....
  SSpawnData& spawn = pRuntime->GetSpawnData(i);
  const float amount = spawn.amount;
  const int spawnedBefore = int(spawn.spawned);
  const float endTime = spawn.delay +
                        HasDuration() ? spawn.duration : fHUGE;
  ....
}
The function above seems to measure time in a wrong way. The precedence of the addition operator is higher than that of the ternary operator :?, so the value 0 or 1 is added to spawn.delay first, and then the value spawn.duration or fHUGE is written into the endTime variable. This error is quite a common one. To learn more about interesting patterns of errors involving operation precedence collected from the PVS-Studio bug database, see my article: Logical Expressions in C/C++. Mistakes Made by Professionals.
V634 The priority of the '*' operation is higher than that of the '<' operation. It's possible that parentheses should be used in the expression. model.cpp 336
enum joint_flags
{
  angle0_locked = 1,
  ....
};

bool CDefaultSkeleton::SetupPhysicalProxies(....)
{
  ....
  for (int j = 0; .... ; j++)
  {
    // lock axes with 0 limits range
    m_arrModelJoints[i]....flags |= (....) * angle0_locked << j;
  }
  ....
}
This is another very interesting error that has to do with the precedence of the multiplication and bitwise shift operations. The latter has lower precedence, so the whole expression is multiplied by one at each iteration (as the angle0_locked constant has the value one), which looks very strange.
This is what the programmer must have wanted that code to look like:
m_arrModelJoints[i]....flags |= (....) * (angle0_locked << j);
The following file contains a list of 35 suspicious fragments involving precedence of shift operations: CryEngine5_V634.txt.
Undefined behaviorUndefined behavior is the result of executing computer code written in a certain programming language that depends on a number of random factors such as memory state or triggered interrupts. In other words, this result is not prescribed by the language specification. It is considered to be an error to let such a situation occur in your program. Even if it can successfully execute on some compiler, it is not guaranteed to be cross-platform and may fail on another machine, operating system, and even other settings of the same compiler.
![image7.png]()
V610 Undefined behavior. Check the shift operator '<'. The left operand '-1' is negative. physicalplaceholder.h 25
#ifndef physicalplaceholder_h
#define physicalplaceholder_h
#pragma once
....
const int NO_GRID_REG = -1<<14;
const int GRID_REG_PENDING = NO_GRID_REG+1;
....
Under the modern C++ standard, a left shift of a negative value is undefined behavior. The analyzer found a few more similar issues in CryEngine V's code:
- V610 Undefined behavior. Check the shift operator '<'. The left operand '~(TFragSeqStorage(0))' is negative. udpdatagramsocket.cpp 757
- V610 Undefined behavior. Check the shift operator '<'. The left operand '-1' is negative. tetrlattice.cpp 324
- V610 Undefined behavior. Check the shift operator '<'. The left operand '-1' is negative. tetrlattice.cpp 350
- V610 Undefined behavior. Check the shift operator '<'. The left operand '-1' is negative. tetrlattice.cpp 617
- V610 Undefined behavior. Check the shift operator '<'. The left operand '-1' is negative. tetrlattice.cpp 622
- V610 Undefined behavior. Check the shift operator '<'. The left operand '(~(0xF))' is negative. d3ddeferredrender.cpp 876
- V610 Undefined behavior. Check the shift operator '<'. The left operand '(~(0xF))' is negative. d3ddeferredshading.cpp 791
- V610 Undefined behavior. Check the shift operator '<'. The left operand '(~(1 < 0))' is negative. d3dsprites.cpp 1038
V567 Undefined behavior. The 'm_current' variable is modified while being used twice between sequence points. operatorqueue.cpp 105
bool COperatorQueue::Prepare(....)
{
  ++m_current &= 1;
  m_ops[m_current].clear();
  return true;
}
The analyzer detected an expression that causes undefined behavior. A variable is used multiple times between two sequence points, while its value changes. The result of executing such an expression, therefore, can't be determined.
Other similar issues:
- V567 Undefined behavior. The 'itail' variable is modified while being used twice between sequence points. trimesh.cpp 3101
- V567 Undefined behavior. The 'ihead' variable is modified while being used twice between sequence points. trimesh.cpp 3108
- V567 Undefined behavior. The 'ivtx' variable is modified while being used twice between sequence points. boolean3d.cpp 1194
- V567 Undefined behavior. The 'ivtx' variable is modified while being used twice between sequence points. boolean3d.cpp 1202
- V567 Undefined behavior. The 'ivtx' variable is modified while being used twice between sequence points. boolean3d.cpp 1220
- V567 Undefined behavior. The 'm_commandBufferIndex' variable is modified while being used twice between sequence points. xconsole.cpp 180
- V567 Undefined behavior. The 'm_FrameFenceCursor' variable is modified while being used twice between sequence points. ccrydx12devicecontext.cpp 952
- V567 Undefined behavior. The 'm_iNextAnimIndex' variable is modified while being used twice between sequence points. hitdeathreactionsdefs.cpp 192
Errors in conditions![image8.png]()
V579 The memcmp function receives the pointer and its size as arguments. It is possibly a mistake. Inspect the third argument. graphicspipelinestateset.h 58
bool
operator==(const SComputePipelineStateDescription& other) const
{
  return 0 == memcmp(this, &other, sizeof(this)); // <=
}
The programmer made a mistake in the equality operation in the call to the memcmp() function, which leads to passing the pointer size instead of the object size as a function argument. As a result, only the first several bytes of the objects are compared.
The fixed version:
memcmp(this, &other, sizeof(*this));
Unfortunately, three more similar issues were found in the project:
- V579 The memcpy function receives the pointer and its size as arguments. It is possibly a mistake. Inspect the third argument. geomcacherendernode.cpp 286
- V579 The AddObject function receives the pointer and its size as arguments. It is possibly a mistake. Inspect the second argument. clipvolumemanager.cpp 145
- V579 The memcmp function receives the pointer and its size as arguments. It is possibly a mistake. Inspect the third argument. graphicspipelinestateset.h 34
V640 The code's operational logic does not correspond with its formatting. The second statement will always be executed. It is possible that curly brackets are missing. livingentity.cpp 181
CLivingEntity::~CLivingEntity()
{
for(int i=0;i<m_nParts;i++) {
if (!m_parts[i].pPhysGeom || ....)
delete[] m_parts[i].pMatMapping; m_parts[i].pMatMapping=0;
}
....
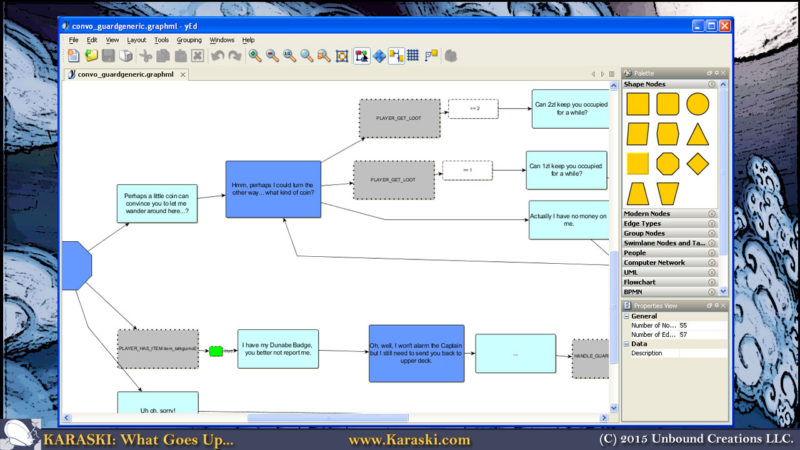
}I spotted a huge number of code blocks with statements written in one line. These include not only ordinary assignments, but rather loops, conditions, function calls, and sometimes a mixture of all of these (see Figure 3).
![image9.png]()
Figure 3 - Poor code formatting
In code of size like that, this programming style almost inevitably leads to errors. In the example above, the memory block occupied by an array of objects was to be freed and the pointer was to be cleared when a certain condition was met. However, incorrect code formatting causes the m_parts[i].pMatMapping pointer to be cleared at every loop iteration. The implications of this problem can't be predicted, but the code does look strange.
Other fragments with strange formatting:
- V640 The code's operational logic does not correspond with its formatting. The second statement will always be executed. It is possible that curly brackets are missing. physicalworld.cpp 2449
- V640 The code's operational logic does not correspond with its formatting. The second statement will always be executed. It is possible that curly brackets are missing. articulatedentity.cpp 1723
- V640 The code's operational logic does not correspond with its formatting. The second statement will always be executed. It is possible that curly brackets are missing. articulatedentity.cpp 1726
V695 Range intersections are possible within conditional expressions. Example: if (A < 5) { ... } else if (A < 2) { ... }. Check lines: 538, 540. statobjrend.cpp 540
bool CStatObj::RenderDebugInfo(....)
{
  ....
  ColorB clr(0, 0, 0, 0);
  if (nRenderMats == 1)
    clr = ColorB(0, 0, 255, 255);
  else if (nRenderMats == 2)
    clr = ColorB(0, 255, 255, 255);
  else if (nRenderMats == 3)
    clr = ColorB(0, 255, 0, 255);
  else if (nRenderMats == 4)
    clr = ColorB(255, 0, 255, 255);
  else if (nRenderMats == 5)
    clr = ColorB(255, 255, 0, 255);
  else if (nRenderMats >= 6)          // <=
    clr = ColorB(255, 0, 0, 255);
  else if (nRenderMats >= 11)         // <=
    clr = ColorB(255, 255, 255, 255);
  ....
}
The programmer made a mistake that prevents the color ColorB(255, 255, 255, 255) from ever being selected. The values nRenderMats are first compared one by one with the numbers from 1 to 5, but when comparing them with value ranges, the programmer didn't take into account that values larger than 11 already belong to the range of values larger than 6, so the last condition will never execute.
This cascade of conditions was copied in full into one more fragment:
- V695 Range intersections are possible within conditional expressions. Example: if (A < 5) { ... } else if (A < 2) { ... }. Check lines: 338, 340. modelmesh_debugpc.cpp 340
V695 Range intersections are possible within conditional expressions. Example: if (A < 5) { ... } else if (A < 2) { ... }. Check lines: 393, 399. xmlcpb_nodelivewriter.cpp 399
enum eNodeConstants
{
  ....
  CHILDBLOCKS_MAX_DIST_FOR_8BITS = BIT(7) - 1,    // 127
  CHILDBLOCKS_MAX_DIST_FOR_16BITS   = BIT(6) - 1, // 63
  ....
};

void CNodeLiveWriter::Compact()
{
  ....
  if (dist <= CHILDBLOCKS_MAX_DIST_FOR_8BITS) // dist <= 127
  {
    uint8 byteDist = dist;
    writeBuffer.AddData(&byteDist, sizeof(byteDist));
    isChildBlockSaved = true;
  }
  else if (dist <= CHILDBLOCKS_MAX_DIST_FOR_16BITS) // dist <= 63
  {
    uint8 byteHigh = CHILDBLOCKS_USING_MORE_THAN_8BITS | ....);
    uint8 byteLow = dist & 255;
    writeBuffer.AddData(&byteHigh, sizeof(byteHigh));
    writeBuffer.AddData(&byteLow, sizeof(byteLow));
    isChildBlockSaved = true;
  }
  ....
}
A similar mistake inside a condition was also found in the fragment above, except that this time the code that fails to get control is larger. The values of the constants CHILDBLOCKS_MAX_DIST_FOR_8BITS and CHILDBLOCKS_MAX_DIST_FOR_16BITS are such that the second condition will never be true.
V547 Expression 'pszScript[iSrcBufPos] != '=='' is always true. The value range of char type: [-128, 127]. luadbg.cpp 716
bool CLUADbg::LoadFile(const char* pszFile, bool bForceReload)
{
  FILE* hFile = NULL;
  char* pszScript = NULL, * pszFormattedScript = NULL;
  ....
  while (pszScript[iSrcBufPos] != ' ' &&
    ....
    pszScript[iSrcBufPos] != '=' &&
    pszScript[iSrcBufPos] != '==' &&  // <=
    pszScript[iSrcBufPos] != '*' &&
    pszScript[iSrcBufPos] != '+' &&
    pszScript[iSrcBufPos] != '/' &&
    pszScript[iSrcBufPos] != '~' &&
    pszScript[iSrcBufPos] != '"')
  {}
  ....
}
A large conditional expression contains a subexpression that is always true. The '==' literal will have type int and correspond to the value 15677. The pszScript array consists of elements of type char, and a value of type char can't be equal to 15677, so the pszScript[iSrcBufPos] != '==' expression is always true.
V734 An excessive expression. Examine the substrings "_ddn" and "_ddna". texture.cpp 4212
void CTexture::PrepareLowResSystemCopy(byte* pTexData, ....)
{
  ....
  // make sure we skip non diffuse textures
  if (strstr(GetName(), "_ddn")              // <=
      || strstr(GetName(), "_ddna")          // <=
      || strstr(GetName(), "_mask")
      || strstr(GetName(), "_spec.")
      || strstr(GetName(), "_gloss")
      || strstr(GetName(), "_displ")
      || strstr(GetName(), "characters")
      || strstr(GetName(), "$")
      )
    return;
  ....
}
The strstr() function looks for the first occurrence of the specified substring within another string and returns either a pointer to the first occurrence or an empty pointer. The string "_ddn" is the first to be searched, and "_ddna" is the second, which means that the condition will be true if the shorter string is found. This code might not work as expected; or perhaps this expression is redundant and could be simplified by removing the extra check.
V590 Consider inspecting this expression. The expression is excessive or contains a misprint. goalop_crysis2.cpp 3779
void COPCrysis2FlightFireWeapons::ParseParam(....)
{
  ....
  else if (!paused &&
          (m_State == eFP_PAUSED) &&        // <=
          (m_State != eFP_PAUSED_OVERRIDE)) // <=
  ....
}
The conditional expression in the ParseParam() function is written in such a way that its result does not depend on the (m_State != eFP_PAUSED_OVERRIDE) subexpression.
Here's a simpler example:
if ( err == code1 && err != code2)
{
  ....
}
The result of the whole conditional expression does not depend on the result of the (err != code2) subexpression, which can be clearly seen from the truth table for this example (see Figure 4)
![image10.png]()
Figure 4 - Truth table for a logical expression
Comparing unsigned values with zero![image11.png]()
When scanning projects, we often come across comparisons of unsigned values with zero, which produce either true or false every time. Such code does not always contain a critical bug; it is often a result of too much caution or changing a variable's type from signed to unsigned. Anyway, such comparisons need to be checked.
V547 Expression 'm_socket < 0' is always false. Unsigned type value is never < 0. servicenetwork.cpp 585
typedef SOCKET CRYSOCKET;
// Internal socket data
CRYSOCKET m_socket;

bool CServiceNetworkConnection::TryReconnect()
{
  ....
  // Create new socket if needed
  if (m_socket == 0)
  {
    m_socket = CrySock::socketinet();
    if (m_socket < 0)
    {
      ....
      return false;
    }
  }
  ....
}
I'd like to elaborate on the SOCKET type. It can be both signed and unsigned depending on the platforms, so it is strongly recommended that you use special macros and constants specified in the standard headers when working with this type.
In cross-platform projects, comparisons with 0 or -1 are common that result in misinterpretation of error codes. CryEngine V project is no exception, although some checks are done correctly, for example:
if (m_socket == CRY_INVALID_SOCKET)
Nevertheless, many parts of the code use different versions of these checks.
See the file CryEngine5_V547.txt for other 47 suspicious comparisons of unsigned variables with zero. The code authors need to check these warnings.
Dangerous pointers![image12.png]()
Diagnostic V595 detects pointers that are tested for null after they have been dereferenced. In practice, this diagnostic catches very tough bugs. On rare occasions, it issues false positives, which is explained by the fact that pointers are checked indirectly, i.e. through one or several other variables, but figuring such code out isn't an easy task for a human either, is it? Three code samples are given below that trigger this diagnostic and look especially surprising, as it's not clear why they work at all. For the other warnings of this type see the file CryEngine5_V595.txt.
<h4>Example 1</h4>
V595 The 'm_pPartManager' pointer was utilized before it was verified against nullptr. Check lines: 1441, 1442. 3denginerender.cpp 1441
void C3DEngine::RenderInternal(....)
{
  ....
  m_pPartManager->GetLightProfileCounts().ResetFrameTicks();
  if (passInfo.IsGeneralPass() && m_pPartManager)
    m_pPartManager->Update();
  ....
}
The m_pPartManager pointer is dereferenced and then checked.
<h4>Example 2</h4>
V595 The 'gEnv->p3DEngine' pointer was utilized before it was verified against nullptr. Check lines: 1477, 1480. gameserialize.cpp 1477
bool CGameSerialize::LoadLevel(....)
{
  ....
  // can quick-load
  if (!gEnv->p3DEngine->RestoreTerrainFromDisk())
    return false;

  if (gEnv->p3DEngine)
  {
    gEnv->p3DEngine->ResetPostEffects();
  }
  ....
}
The gEnv->p3DEngine pointer is dereferenced and then checked.
<h4>Example 3</h4>
V595 The 'pSpline' pointer was utilized before it was verified against nullptr. Check lines: 158, 161. facechannelkeycleanup.cpp 158
void FaceChannel::CleanupKeys(....)
{

  CFacialAnimChannelInterpolator backupSpline(*pSpline);

  // Create the key entries array.
  int numKeys = (pSpline ? pSpline->num_keys() : 0);
  ....
}
The pSpline pointer is dereferenced and then checked.
Miscellaneous![image13.png]()
V622 Consider inspecting the 'switch' statement. It's possible that the first 'case' operator is missing. mergedmeshrendernode.cpp 999
static inline void ExtractSphereSet(....)
{
  ....
  switch (statusPos.pGeom->GetType())
  {
    if (false)
    {
    case GEOM_CAPSULE:
      statusPos.pGeom->GetPrimitive(0, &cylinder);
    }
    if (false)
    {
    case GEOM_CYLINDER:
      statusPos.pGeom->GetPrimitive(0, &cylinder);
    }
    for (int i = 0; i < 2 && ....; ++i)
    {
      ....
    }
    break;
  ....
}
This fragment is probably the strangest of all found in CryEngine V. Whether or not the case label will be selected does not depend on the if statement, even in case of if (false). In the switch statement, an unconditional jump to the label occurs if the condition of the switch statement is met. Without the break statement, one could use such code to "bypass" irrelevant statements, but, again, maintaining such obscure code isn't easy. One more question is, why does the same code execute when jumping to the labels GEOM_CAPSULE and GEOM_CYLINDER?
V510 The 'LogError' function is not expected to receive class-type variable as second actual argument. behaviortreenodes_action.cpp 143
typedef CryStringT<char> string;
// The actual fragment name.
string m_fragName;
//! cast to C string.
const value_type* c_str() const { return m_str; }
const value_type* data() const  { return m_str; };

void LogError(const char* format, ...) const
{ .... }

void QueueAction(const UpdateContext& context)
{
  ....
  ErrorReporter(*this, context).LogError("....'%s'", m_fragName);
  ....
}
When it is impossible to specify the number and types of all acceptable parameters to a function, one puts ellipsis (...) at the end of the list of parameters in the function declaration, which means "and perhaps a few more". Only POD (Plain Old Data) types can be used as actual parameters to the ellipsis. If an object of a class is passed as an argument to a function's ellipsis, it almost always signals the presence of a bug. In the code above, it is the contents of the object that get to the stack, not the pointer to a string. Such code results in forming "gibberish" in the buffer or a crash. The code of CryEngine V uses a string class of its own, and it already has an appropriate method, c_str().
The fixed version:
LogError("....'%s'", m_fragName.c_str();A few more suspicious fragments:
- V510 The 'LogError' function is not expected to receive class-type variable as second actual argument. behaviortreenodes_core.cpp 1339
- V510 The 'Format' function is not expected to receive class-type variable as second actual argument. behaviortreenodes_core.cpp 2648
- V510 The 'CryWarning' function is not expected to receive class-type variable as sixth actual argument. crypak.cpp 3324
- V510 The 'CryWarning' function is not expected to receive class-type variable as fifth actual argument. crypak.cpp 3333
- V510 The 'CryWarning' function is not expected to receive class-type variable as fifth actual argument. shaderfxparsebin.cpp 4864
- V510 The 'CryWarning' function is not expected to receive class-type variable as fifth actual argument. shaderfxparsebin.cpp 4931
- V510 The 'Format' function is not expected to receive class-type variable as third actual argument. featuretester.cpp 1727
V529 Odd semicolon ';' after 'for' operator. boolean3d.cpp 1314
int CTriMesh::Slice(....)
{
  ....
  bop_meshupdate *pmd = new bop_meshupdate, *pmd0;
  pmd->pMesh[0]=pmd->pMesh[1] = this;  AddRef();AddRef();
  for(pmd0=m_pMeshUpdate; pmd0->next; pmd0=pmd0->next); // <=
    pmd0->next = pmd;
  ....
}
This code is very strange. The programmer put a semicolon after the for loop, while the code formatting suggests that it should have a body.
V535 The variable 'j' is being used for this loop and for the outer loop. Check lines: 3447, 3490. physicalworld.cpp 3490
void CPhysicalWorld::SimulateExplosion(....)
{
  ....
  for(j=0;j<pmd->nIslands;j++)                 // <= line 3447
  {
    ....
    for(j=0;j<pcontacts[ncont].nborderpt;j++)  // <= line 3490
    {
  ....
}
The project's code is full of other unsafe fragments; for example, there are cases of using one counter for both nested and outer loops. Large source files contain code with intricate formatting and fragments where the same variables are changed in different parts of the code - you just can't do without static analysis there!
A few more strange loops:
- V535 The variable 'i' is being used for this loop and for the outer loop. Check lines: 1630, 1683. entity.cpp 1683
- V535 The variable 'i1' is being used for this loop and for the outer loop. Check lines: 1521, 1576. softentity.cpp 1576
- V535 The variable 'i' is being used for this loop and for the outer loop. Check lines: 2315, 2316. physicalentity.cpp 2316
- V535 The variable 'i' is being used for this loop and for the outer loop. Check lines: 1288, 1303. shadercache.cpp 1303
V539 Consider inspecting iterators which are being passed as arguments to function 'erase'. frameprofilerender.cpp 1090
float CFrameProfileSystem::RenderPeaks()
{
  ....
  std::vector<SPeakRecord>& rPeaks = m_peaks;

  // Go through all peaks.
  for (int i = 0; i < (int)rPeaks.size(); i++)
  {
    ....
    if (age > fHotToColdTime)
    {
      rPeaks.erase(m_peaks.begin() + i); // <=
      i--;
    }
  ....
}
The analyzer suspected that the function handling a container would receive an iterator from another container. It's a wrong assumption, and there is no error here: the rPeaks variable is a reference to m_peaks. This code, however, may confuse not only the analyzer, but also other programmers who will maintain it. One shouldn't write code in a way like that.
V713 The pointer pCollision was utilized in the logical expression before it was verified against nullptr in the same logical expression. actiongame.cpp 4235
int CActionGame::OnCollisionImmediate(const EventPhys* pEvent)
{
  ....
  else if (pMat->GetBreakability() == 2 &&
   pCollision->idmat[0] != pCollision->idmat[1] &&
   (energy = pMat->GetBreakEnergy()) > 0 &&
   pCollision->mass[0] * 2 > energy &&
   ....
   pMat->GetHitpoints() <= FtoI(min(1E6f, hitenergy / energy)) &&
   pCollision) // <=
    return 0;
  ....
}
The if statement includes a rather lengthy conditional expression where the pCollision pointer is used multiple times. What is wrong about this code is that the pointer is tested for null at the very end, i.e. after multiple dereference operations.
V758 The 'commandList' reference becomes invalid when smart pointer returned by a function is destroyed. renderitemdrawer.cpp 274
typedef std::shared_ptr<....> CDeviceGraphicsCommandListPtr;

CDeviceGraphicsCommandListPtr
CDeviceObjectFactory::GetCoreGraphicsCommandList() const
{
  return m_pCoreCommandList;
}

void CRenderItemDrawer::DrawCompiledRenderItems(....) const
{
  ....
  {
    auto& RESTRICT_REFERENCE commandList = *CCryDeviceWrapper::
      GetObjectFactory().GetCoreGraphicsCommandList();

    passContext....->PrepareRenderPassForUse(commandList);
  }
  ....
}
The commandList variable receives a reference to the value stored in a smart pointer. When this pointer destroys the object, the reference will become invalid.
A few more issues of this type:
- V758 The 'commandList' reference becomes invalid when smart pointer returned by a function is destroyed. renderitemdrawer.cpp 384
- V758 The 'commandList' reference becomes invalid when smart pointer returned by a function is destroyed. renderitemdrawer.cpp 368
- V758 The 'commandList' reference becomes invalid when smart pointer returned by a function is destroyed. renderitemdrawer.cpp 485
- V758 The 'commandList' reference becomes invalid when smart pointer returned by a function is destroyed. renderitemdrawer.cpp 553
Conclusion
It costs almost nothing to fix bugs caught during the coding phase unlike those that get to the testers, while fixing bugs that have made it to the end users involves huge expenses. No matter what analyzer you use, the static analysis technology itself has long proved to be an extremely effective and efficient means to control the quality of program code and software products in general.
Our collaboration with Epic Games has shown very well how integration of our analyzer into Unreal Engine 4 has benefited the project. We helped the developers in every aspect of analyzer integration and even fixed the bugs found in the project so that the developer team could continue scanning new code regularly on their own. We've shown that similar collaboration can be achieved with Crytek.
Try PVS-Studio on your own C/C++/C# project!